With Silksong being a Metroidvania — and a big one at that — it's easy to get lost. Pharloom has multiple biomes and locations that hide secret paths and items, but you might just be looking for how to move forward.
This guide will give you our recommended route for each act in Hollow Knight: Silksong; we'll focus on the critical path towards the end of each act, and the end of the game, but also advise where you can branch off and explore different areas.
Beware, this guide contains spoilers for the entire game, so read at your own risk!
Subscribe to Nintendo Life on YouTube834k
Hollow Knight: Silksong - Best Route
To make things a little easier, we've broken up this guide to cover each of the game's acts. And, while we haven't included optional quests or items, we have included areas that are optional and alternate routes you can take.
Act 1 Recommended Route
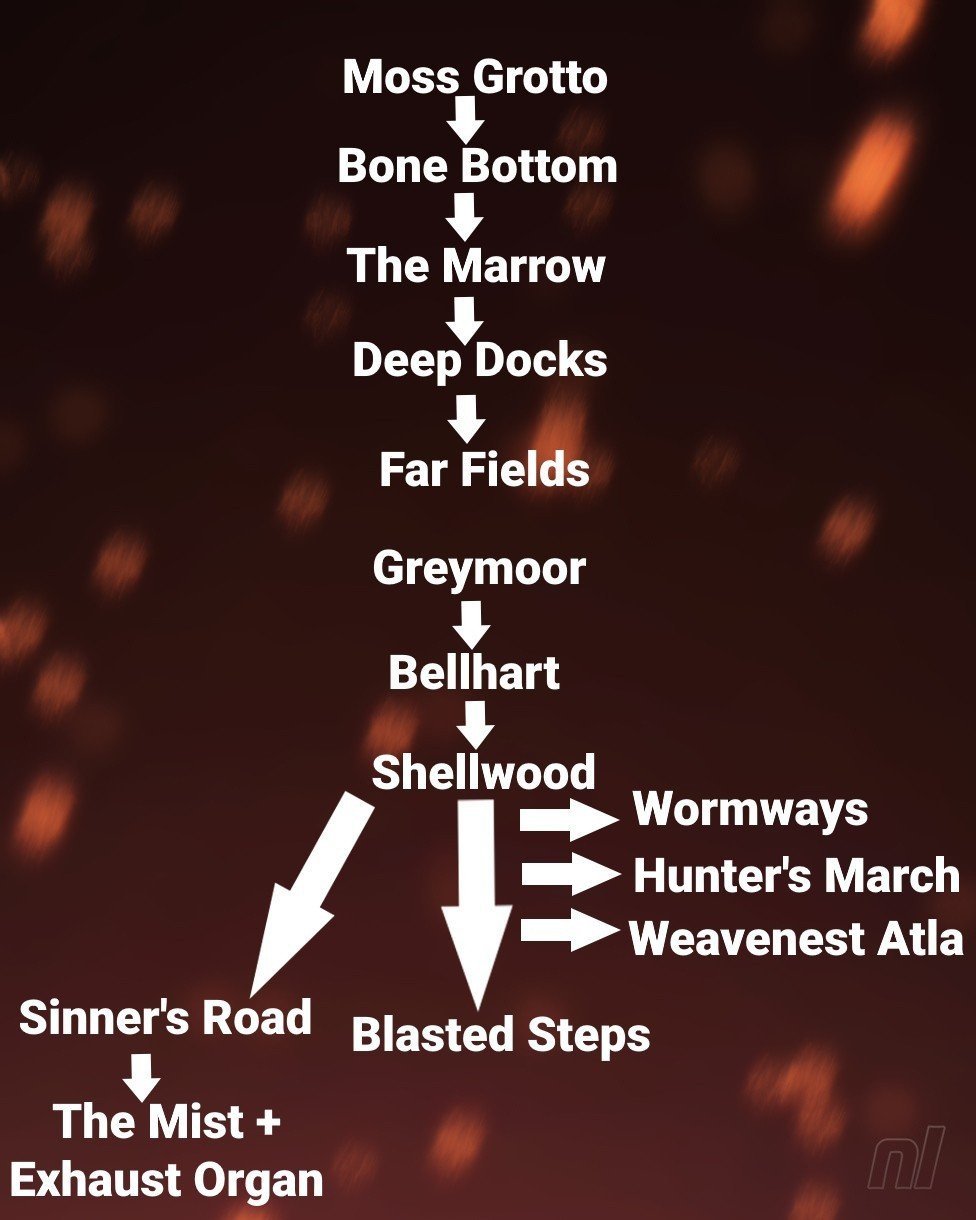
If you're aiming for straight progression, here's the route we advise taking (not including any optional Crests or Tools, of course):
- Moss Grotto
- Bone Bottom
- The Marrow
- Deep Docks
- Far Fields
- Greymoor
- Bellhart
- Shellwood
- Blasted Steps
While you can enter Wormways early (as long as you have a Simple Key), it's much easier to explore when you have the Cling Grip Ancestral Art, so we recommend doing it once you've beaten Sister Splinter at the very least.
The Hunter's March you can get to as early as The Marrow, but you actually can't progress through it without the Drifter's Cloak, and we think the enemies and boss here are much easier to deal with when you get Cling Grip. Trust us!
Lastly, Weavenest Atla is a very small area where you can upgrade your Hunter Crest, but you only have access to it after defeating Widow, which you should do at the end of Shellwood (you'll naturally loop back to Bellhart after getting Cling Grip).
One area we haven't covered here is The Slab, which is entirely optional at this point in the game as is actually closer to The Citadel than the rest of Pharloom. You have a chance of being captured by a bug in Pharloom, but you only have to explore this jail area much later.
Should I go through Blasted Steps or Sinner's Road?
We think the Blasted Steps is the best way to reach the end of Act 1, but you can actually take a completely different path through Sinner's Road, which is located just above Greymoor.
Blasted Steps is west of Shellwood and a much easier area to explore and make your way through than Sinner's Road. The latter is an alternate, more-difficult path that will take you through The Mist and the Exhaust Organ. You'll get a new Silk Skill for defeating the boss inside the Organ, but The Mist is not a fun place...
However, the boss at the end of Blasted Steps is a tricky one with a pretty nasty run-back, which you'll be doing a lot. So something to consider.
Act 2 Recommended Route

In Act 2, the world opens up, and you'll get even more traversal tools and Ancestral Arts that will just help reveal more and more secrets and, eventually, take you towards the game's "standard" ending.
In terms of normal progression — without any procrastination — here's the order we recommend travelling in and around in The Citadel:
- Choral Chambers
- First Shrine / Songclave
- Cogwork Core (bottom-half)
- Whispering Vaults (for the Vaultkeeper's Melody)
- Underworks (for Clawline Ancestral Art)
- Mount Fay (for Double Jump)
- Cogwork Core (top-half, for the Architect's Melody)
- High Halls (for the Conductor's Melody)
- The Cradle - Final Boss
Now, there is a little variant here that will change things — if you entered the Grand Gate and started Act 2 from the Blasted Steps, the you'll automatically end up in the Underworks. You'll have to make your way through here before returning to the Choral Chambers and making your way to the First Shrine.
Once you defeat the Cogwork Dancers (west of the First Shrine), you'll be given a quest to acquire the Threefold Melody. That opens up a lot of possibilities, and we've covered our recommendations below. But there are many, many places you can explore as you progress.
As soon as you get the Vaultkeeper's Melody, you want to go and get your next two traversal skills, Clawline and the Faydown Cloak (Double Jump). These two skills will completely blow open the rest of the map for you, with very few exceptions.
If you haven't already explored The Slab (i.e., you didn't get captured in Act 1), then go ahead and do it on the way to Mount Fay. But after climbing the snowy mountain, Memorium, Sands of Karak, and Wisp Thicket all become accessible.
Whiteward is another optional area we haven't included , but you can do it whenever (it's non-essential, though a Wish will take you down there eventually).
Which Threefold Melody should I get first?
Okay, while it is tempting to do the Melodies in any order — and you can, if you really want to! — we think it's best to tackle them in this order:
- Vaultkeeper's Melody
You don't need any additional skills for this, so heading to the Whispering Vaults is the easiest starting point. You'll need to defeat a rather fun boss on the way, though! - Architect's Melody
You need at least Clawline to get to the top of the Cogwork Core, but we think grabbing Double Jump for this puzzle is also pretty useful. So head there once you have both of these abilities. - Conductor's Melody
So the High Halls requires both the Clawline and Double Jump, but the reason we put this last is because getting Conductor's Melody might be one of the hardest challenges in the game. It's a ten-wave combat trial that you have to survive, so you'll want as many Mask Shards, Spool Fragments, and Needle Upgrades as you can get.
Once you have all three melodies, go ahead and talk to the trio of statues in the middle of the Cogwork Core, and you'll be prompted to play their songs. Then, the elevator opens up to take you to the final two bosses of the game... well, for the normal ending, at least.
If you're wondering why Bilewater is where it is, it's a totally optional area... unless you're going for the true ending route. As such, we recommend defeating the final boss before going to Bilewater.
If it's the True Ending and Act 3 you're looking for, well, that can take a bit of time, so go have a look at our guide on how to unlock the final Act.