
Fleas are everywhere! That's usually a bad right, right? In Silksong, it sort of still is, but Fleas are the pests they are in the real world. Makes sense in a game all about bugs...
The Flea Caravan needs your help finding all of the Lost Fleas so they can move on, and Hornet is willing to help. You'll also get some nice rewards for doing this along the way.
Here's our guide to the location of all 30 Lost Fleas in Hollow Knight: Silksong.
Subscribe to Nintendo Life on YouTube834k
Where To Find All 30 Fleas In Silksong
Below is where you'll find every single Lost Flea in Silksong. We've split these up by location, and marked where they're hiding on the map, accompanied with some detailed steps on just what you need to do to get them
The Marrow Fleas (1 Flea)
1) East of Bellway
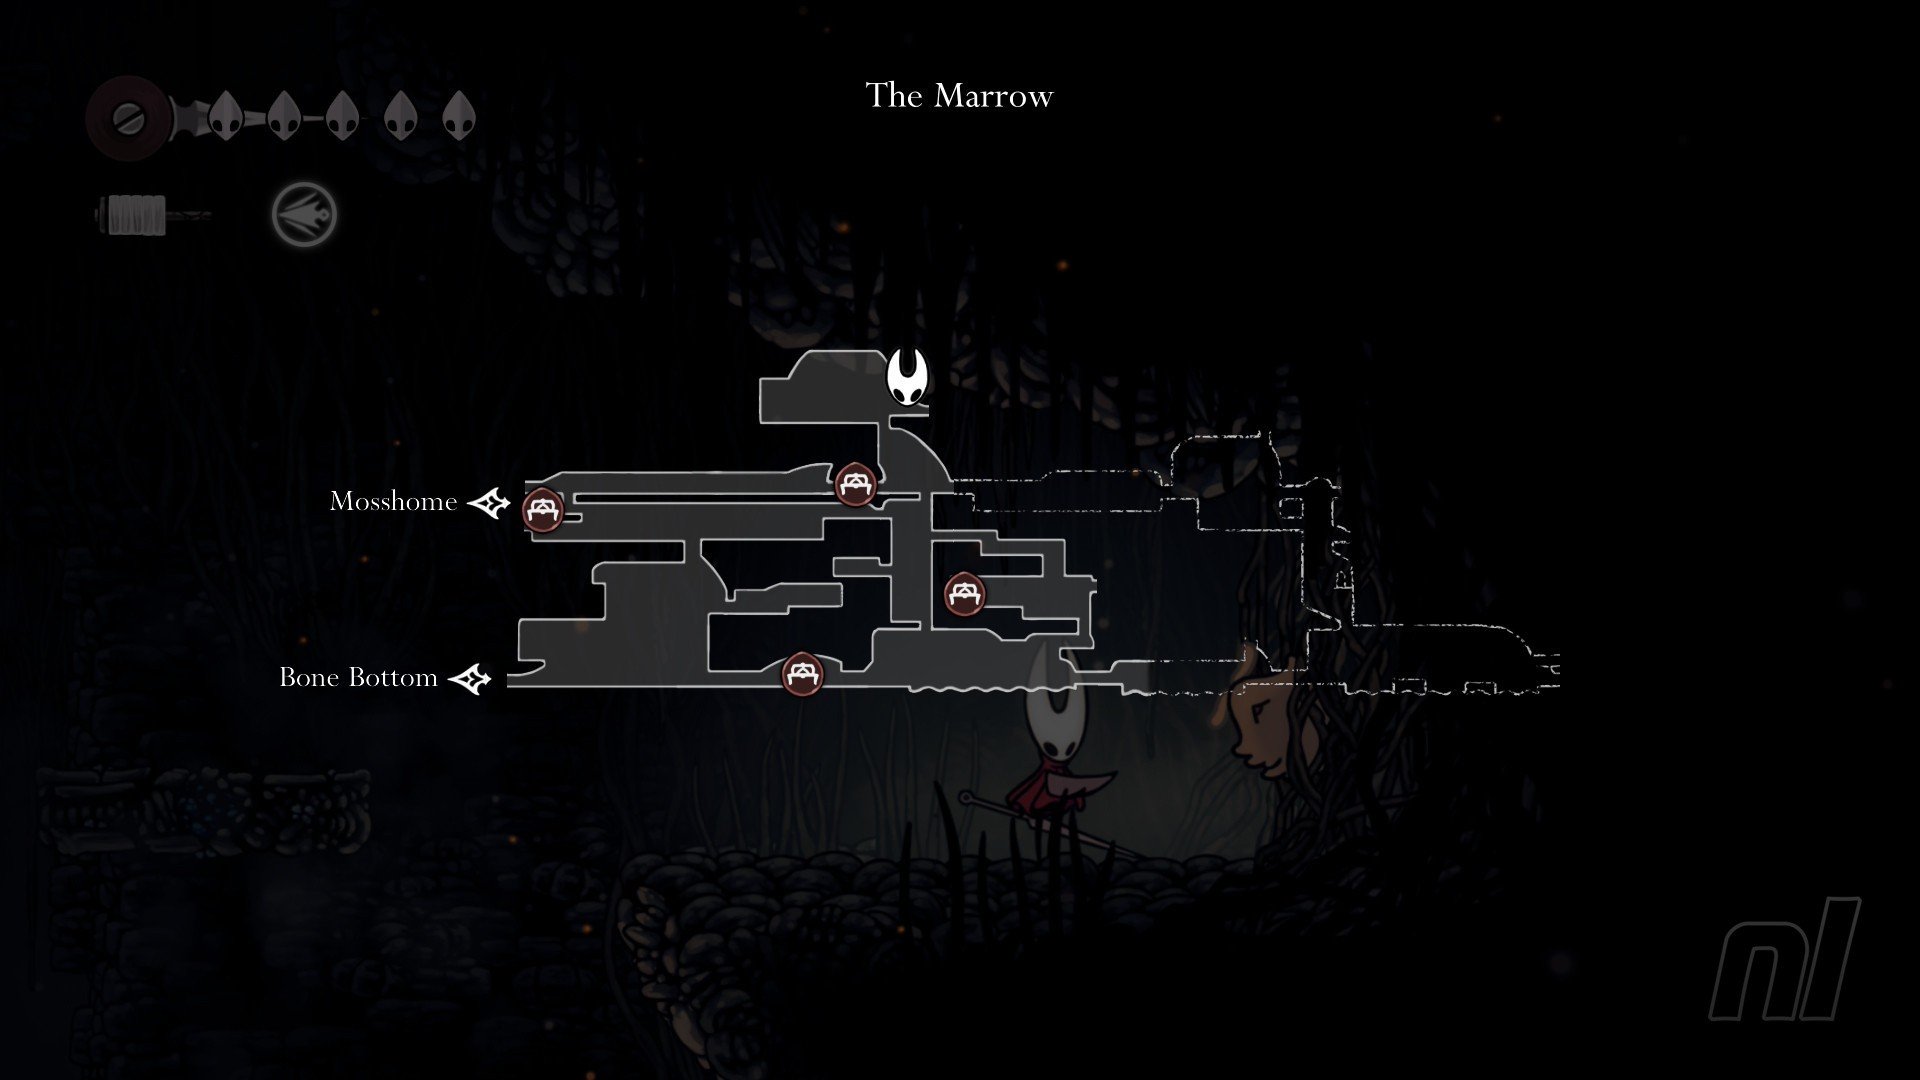
After you've defeated and freed the Bell Beast, rest at the bench and then head right into a large room. Then head up and make your way through this top-central area.
This little flea is stuck in the wall at the very far top-right of the area.
Deep Docks (2 Fleas)
2) Swift Step
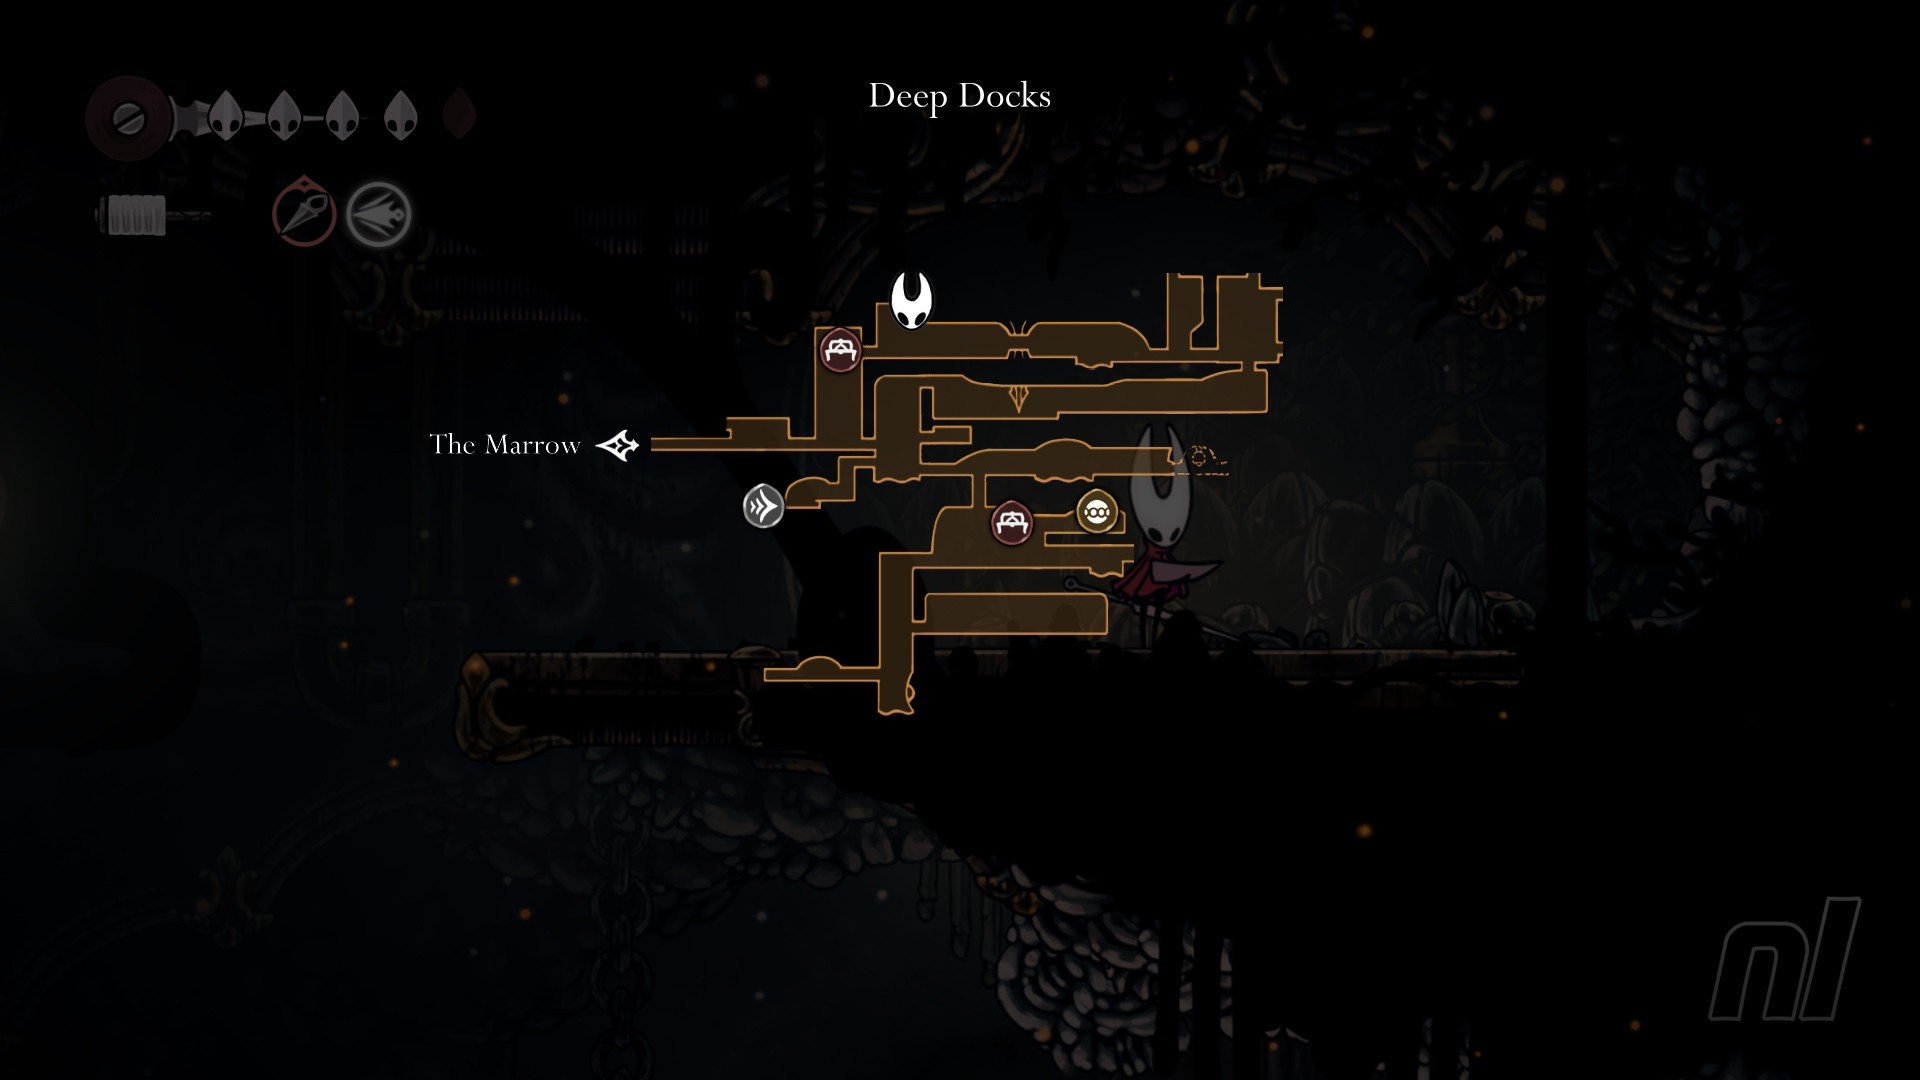
After you've unlocked the Swift Step Ancestral Art, head back to the very first bench in Deep Docks, then head right one room,
Here, you'll need to use the platforms above to jump from the right side of the room to the left using Swift Step. Break the jar to free the flea.
3) Hidden Room in Bellway
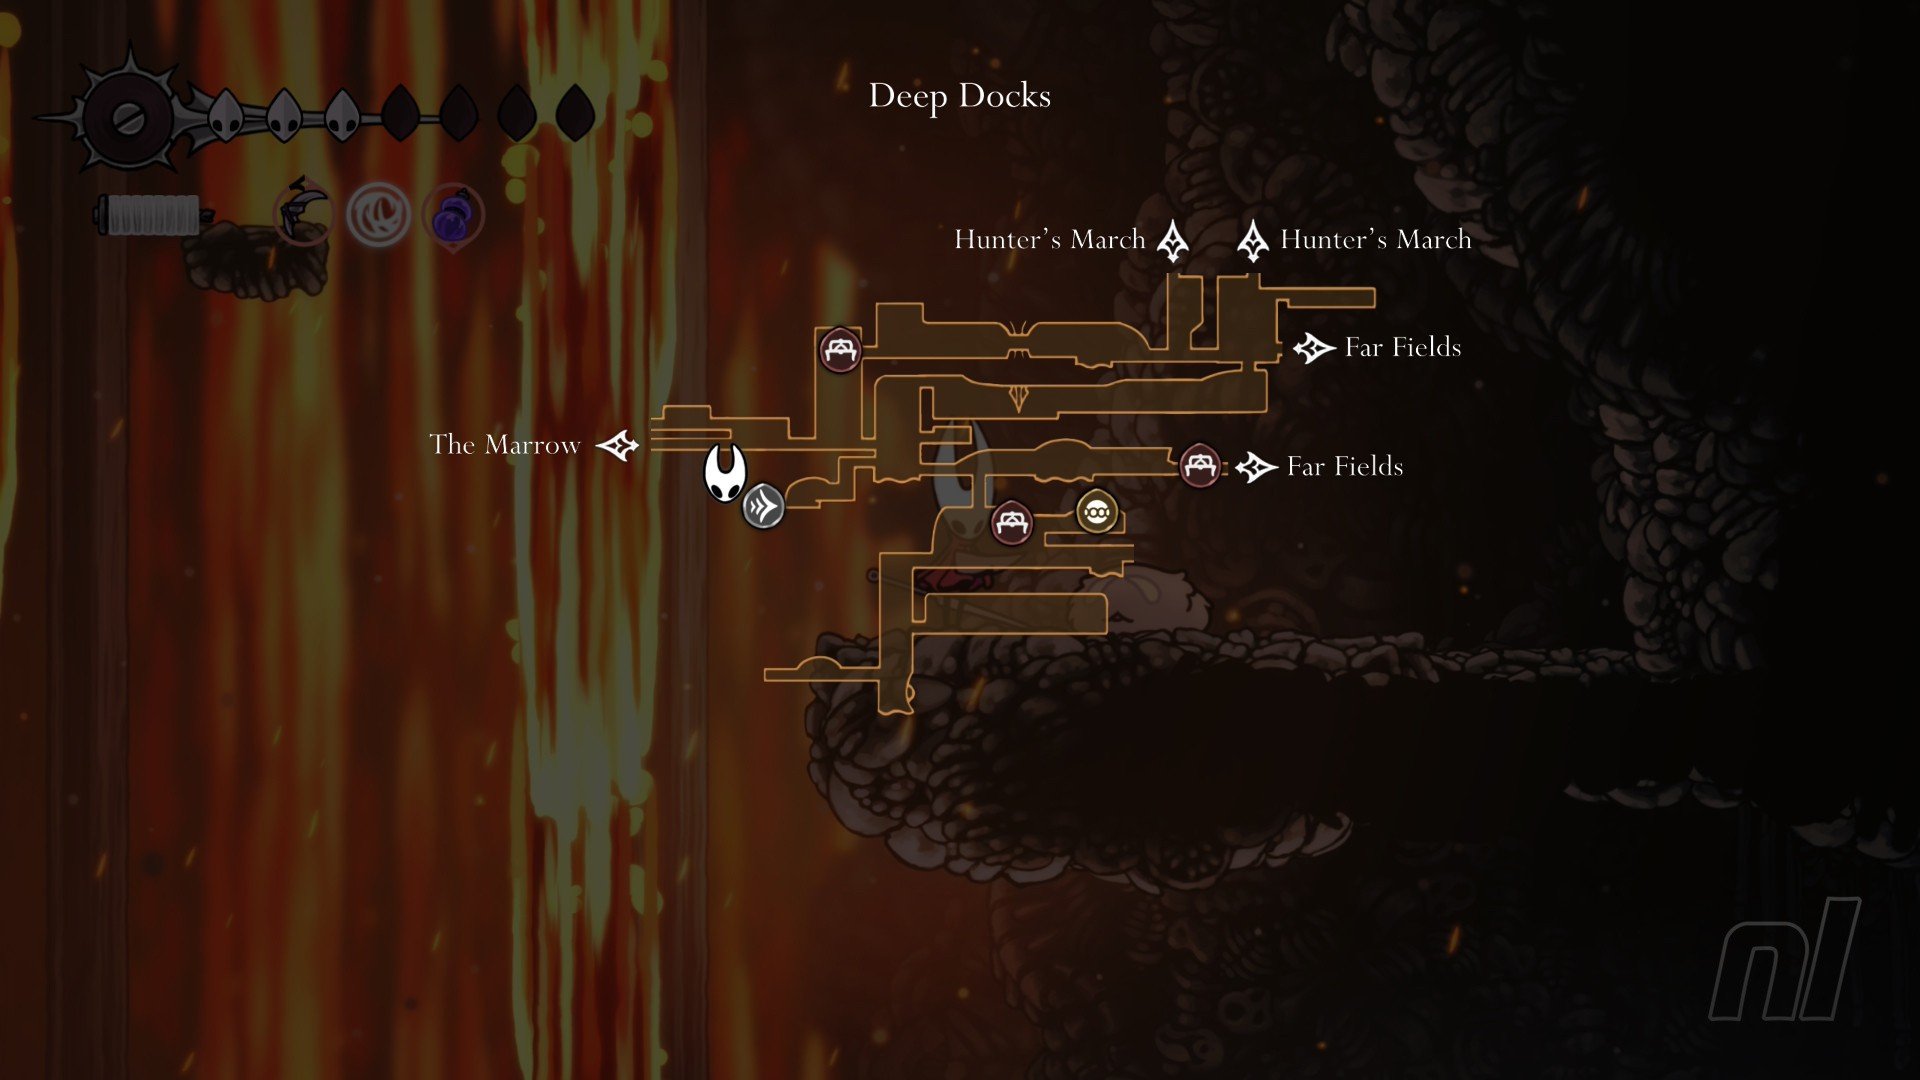
Once you find the Bellway, break the wall to the left of the Bell Beast to find a hidden room.
Make your way through the platforming puzzle and you'll find a sleeping Flea. Hit him and he'll wake up and return to the caravan.
4) Behind the Simple Key Door
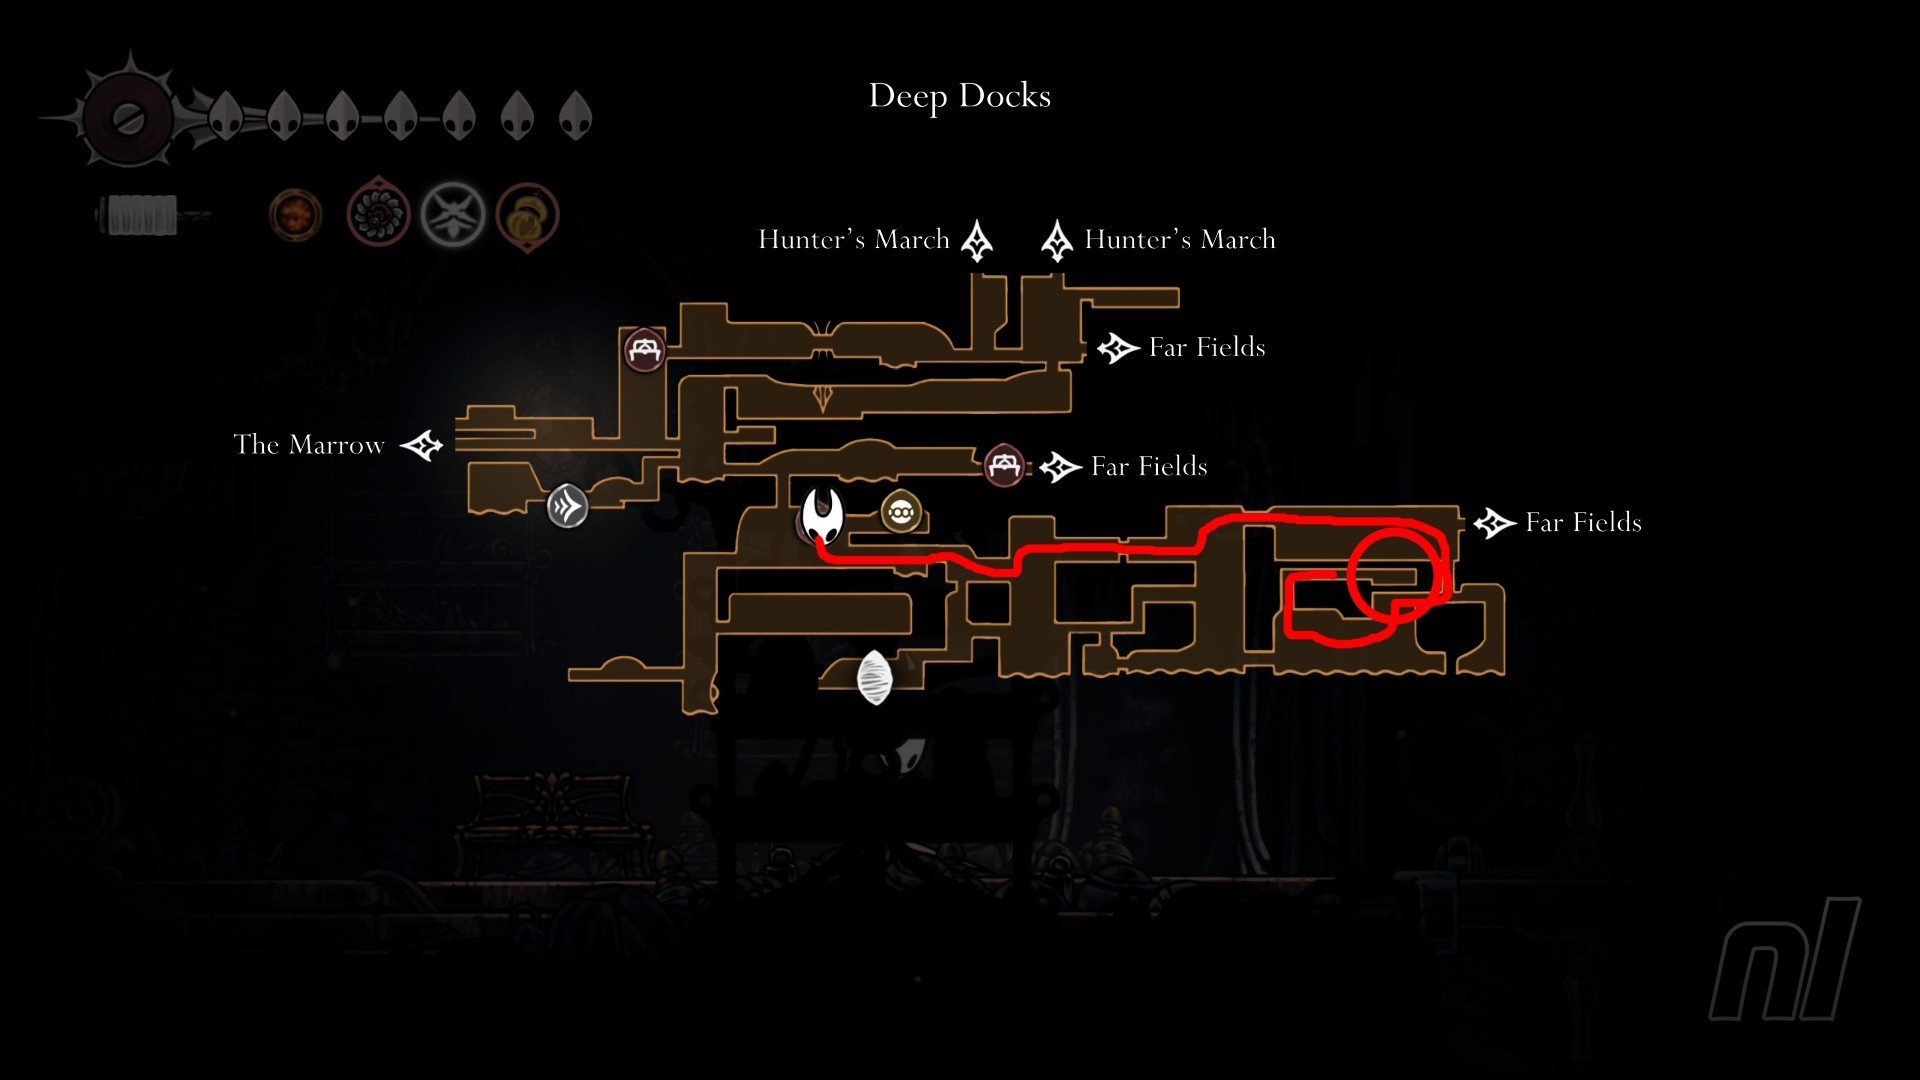
You'll want to grab a Simple Key to unlock the door inside Deep Docks, below the Forge Daughter's store. But you'll need Clawline to get this Flea, and Double Jump is preferable, too.
Make your way to the far right of the area, three rooms in, and then find the trap door in the bottom right corner. Drop down here and then head left down the platforms (carefully).
Eventually you'll see some rings that you can Clawline too. Jump onto the platforms after these and then make your way to the left until you can go up.
Follow the path to the right here and you'll find the little Flea
Far Fields (2 Fleas)
5) Ant Cage
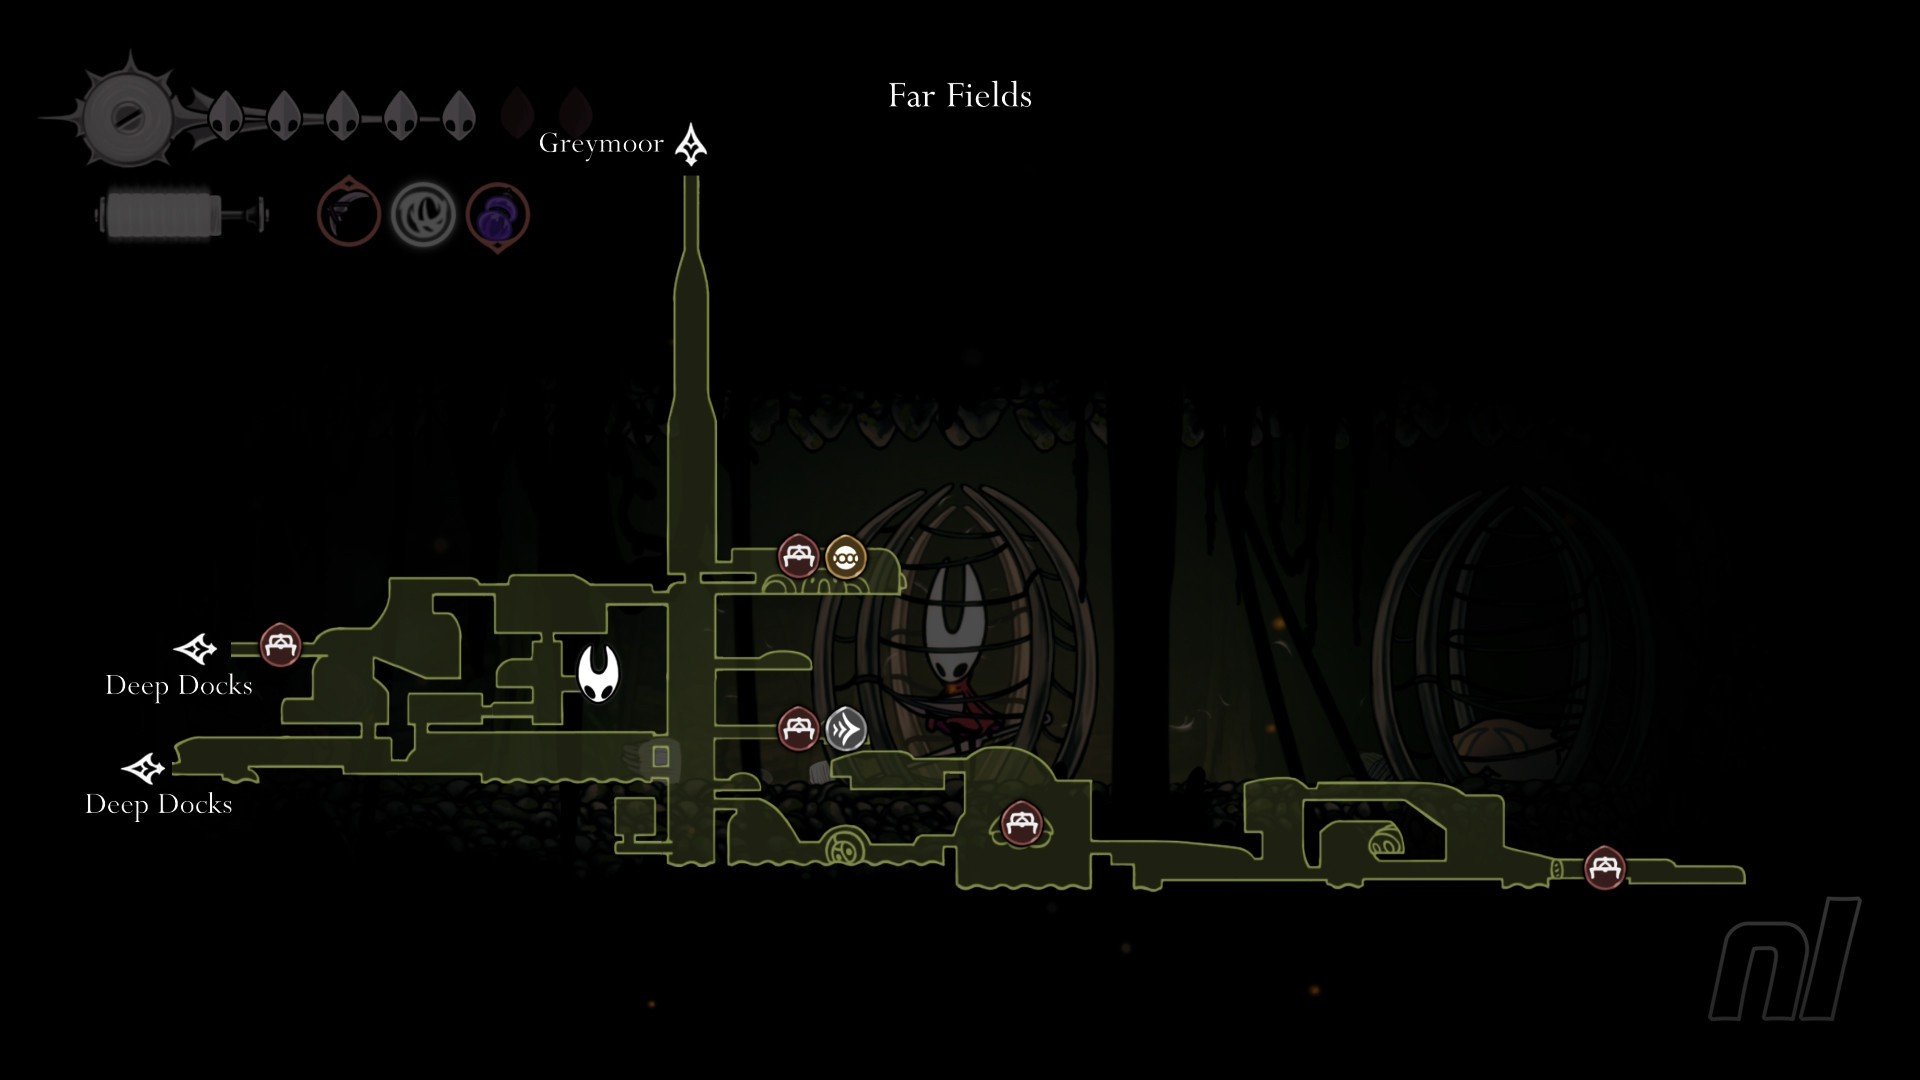
In the central room (the tall one with all the wind currents), head through the third door on the left and make your way across the platforms to reach a hidden area in the ceiling.
Here, go right, and then jump up and head through the first right gap in the wall. Walk towards the caged Flea and you'll be captured by an ant! Break the cage and then defeat the ant before freeing the little Flea.
6) Hidden Bellway Path
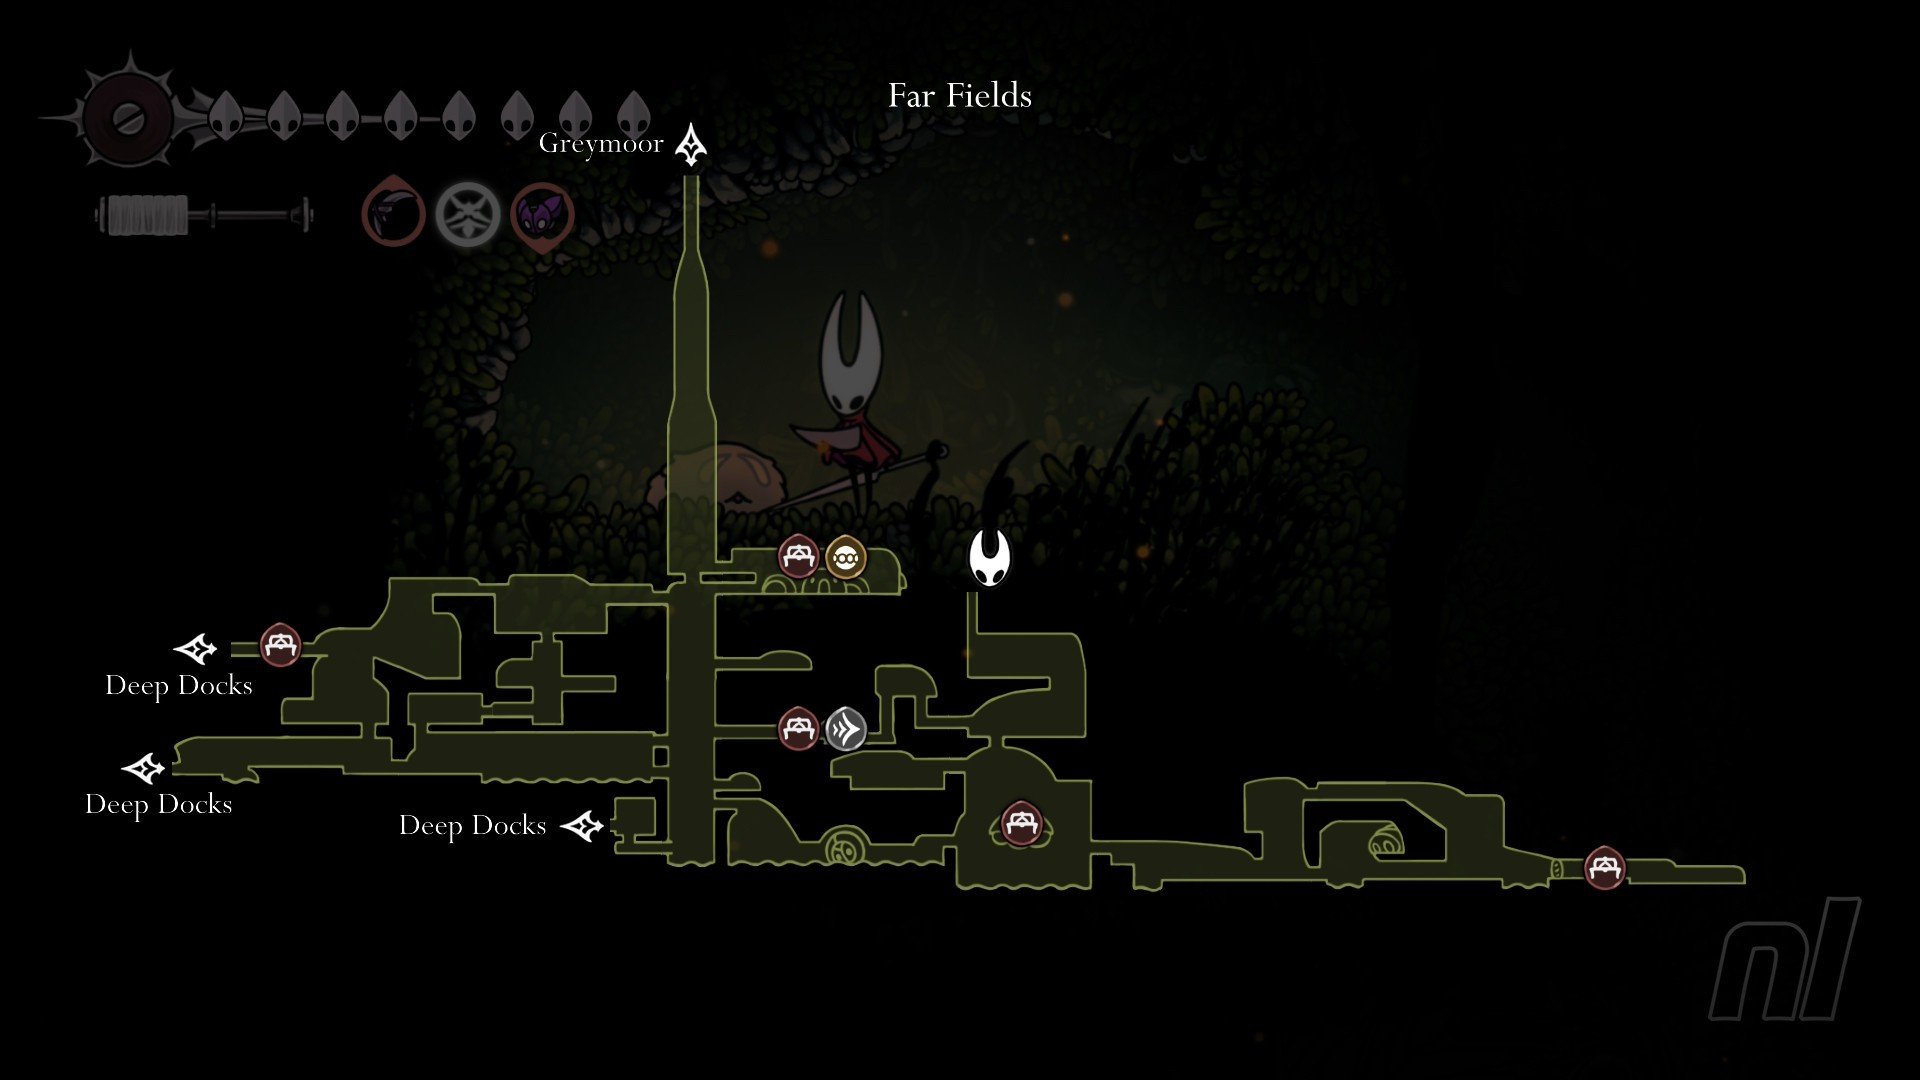
While you can access this room as soon as you're in Far Fields, we recommend coming back once you have Cling Grip, Clawline, and Double Jump.
At the Bellway, where the Bell Beast waits patiently, go under the left platform to find a hidden pathway. This is a spike jumping puzzle, and it's a little frustrating! So be patient.
The first pogo-ing section requires you to jump just low enough to miss the spikes above, and then drop down carefully on the other side so you can double jump to recover. Then dash.
The path upwards gives a little breather, but then you need to carefully navigate more weaving thorns. Keep your dashes precise and time your double jumps just right and you'll make it through.
The Flea is at the very end of the path, on the right, when you enter a new room. Left? Well... a big rhino beetle. And a shortcut to Pilgrim's Rest.
Greymoor (3 Fleas)
7) Balloon Jumping Puzzle
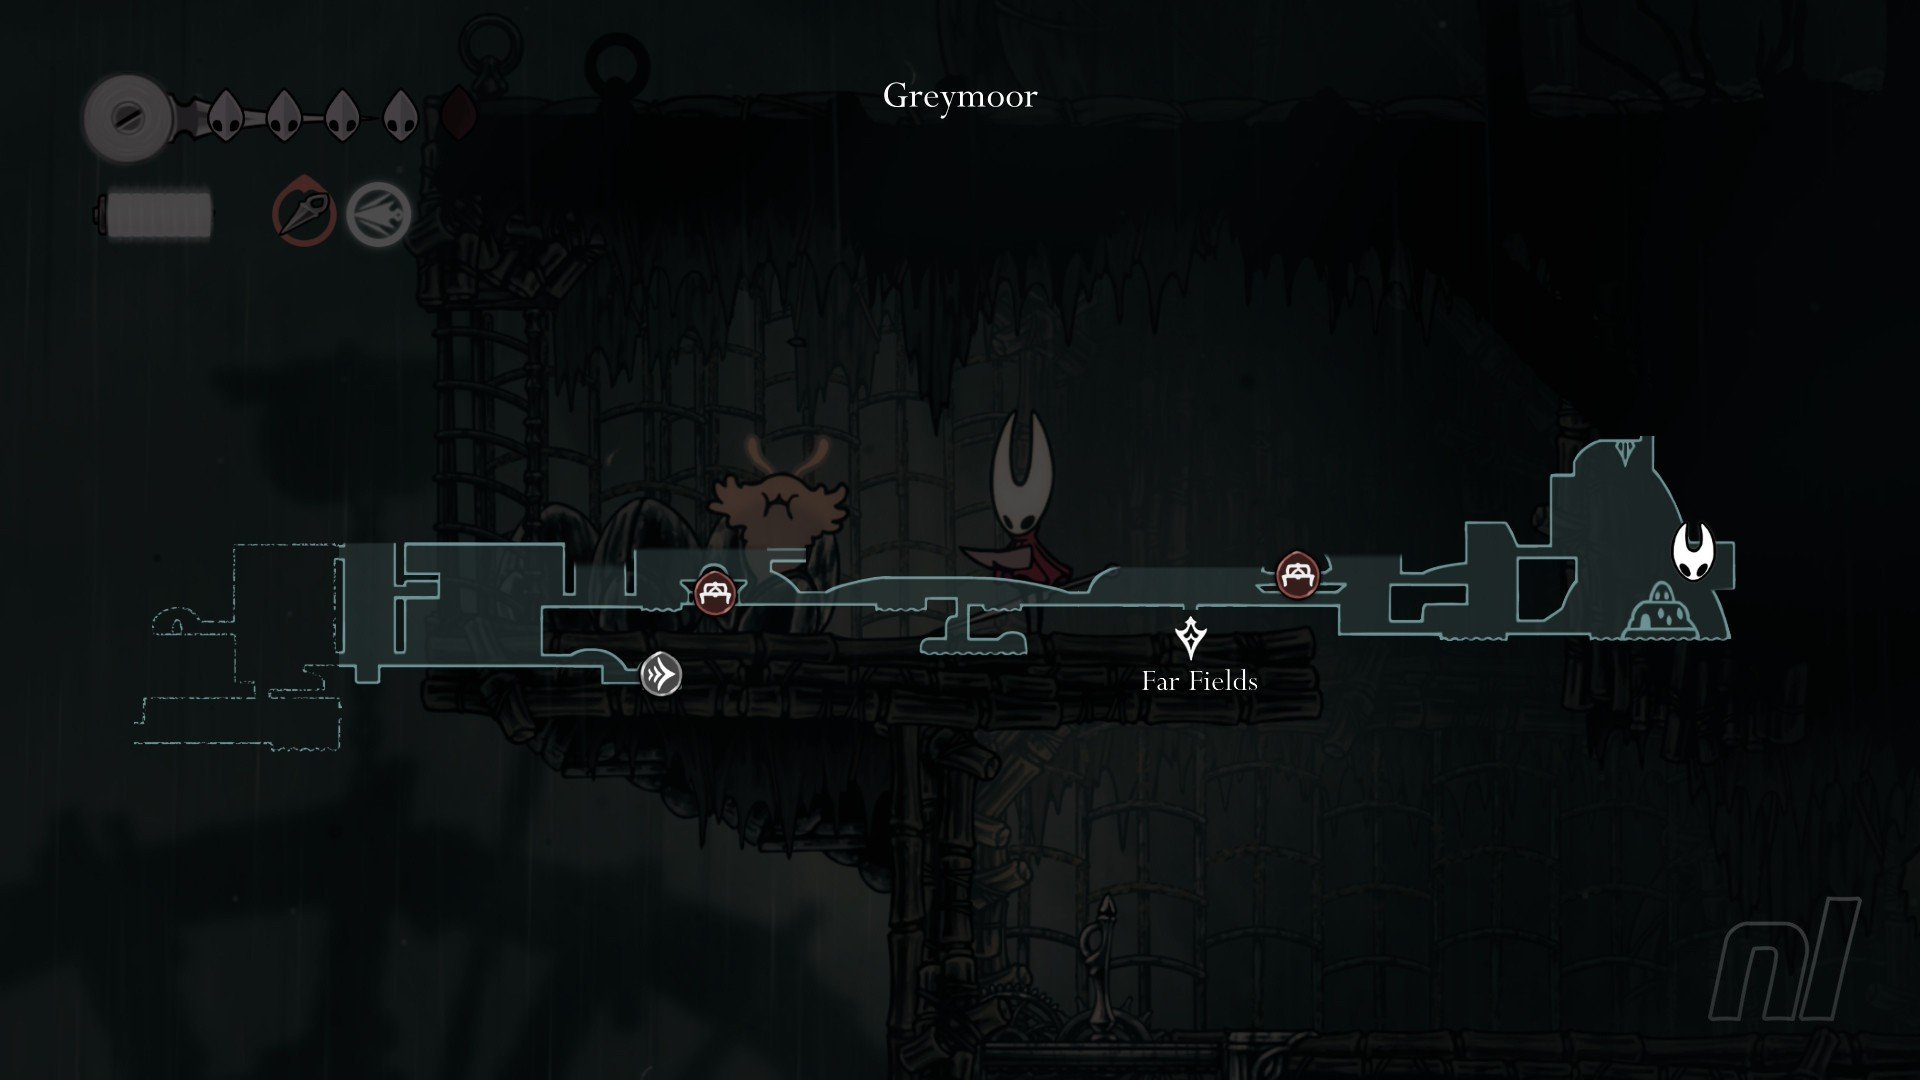
After defeating the craw enemy gauntlet inside the house on the east side of the map, you'll unlock a balloon jumping puzzle.
Using these balloons (and being careful of those craws, they're a pain!), jump up about halfway and then head to the right side, where you'll spot a trapped flea beneath you.
Head right, drop down, hit the nearby switch to gain entry to the flea, and then break it out of its trap.
8) Path Above Halfway House
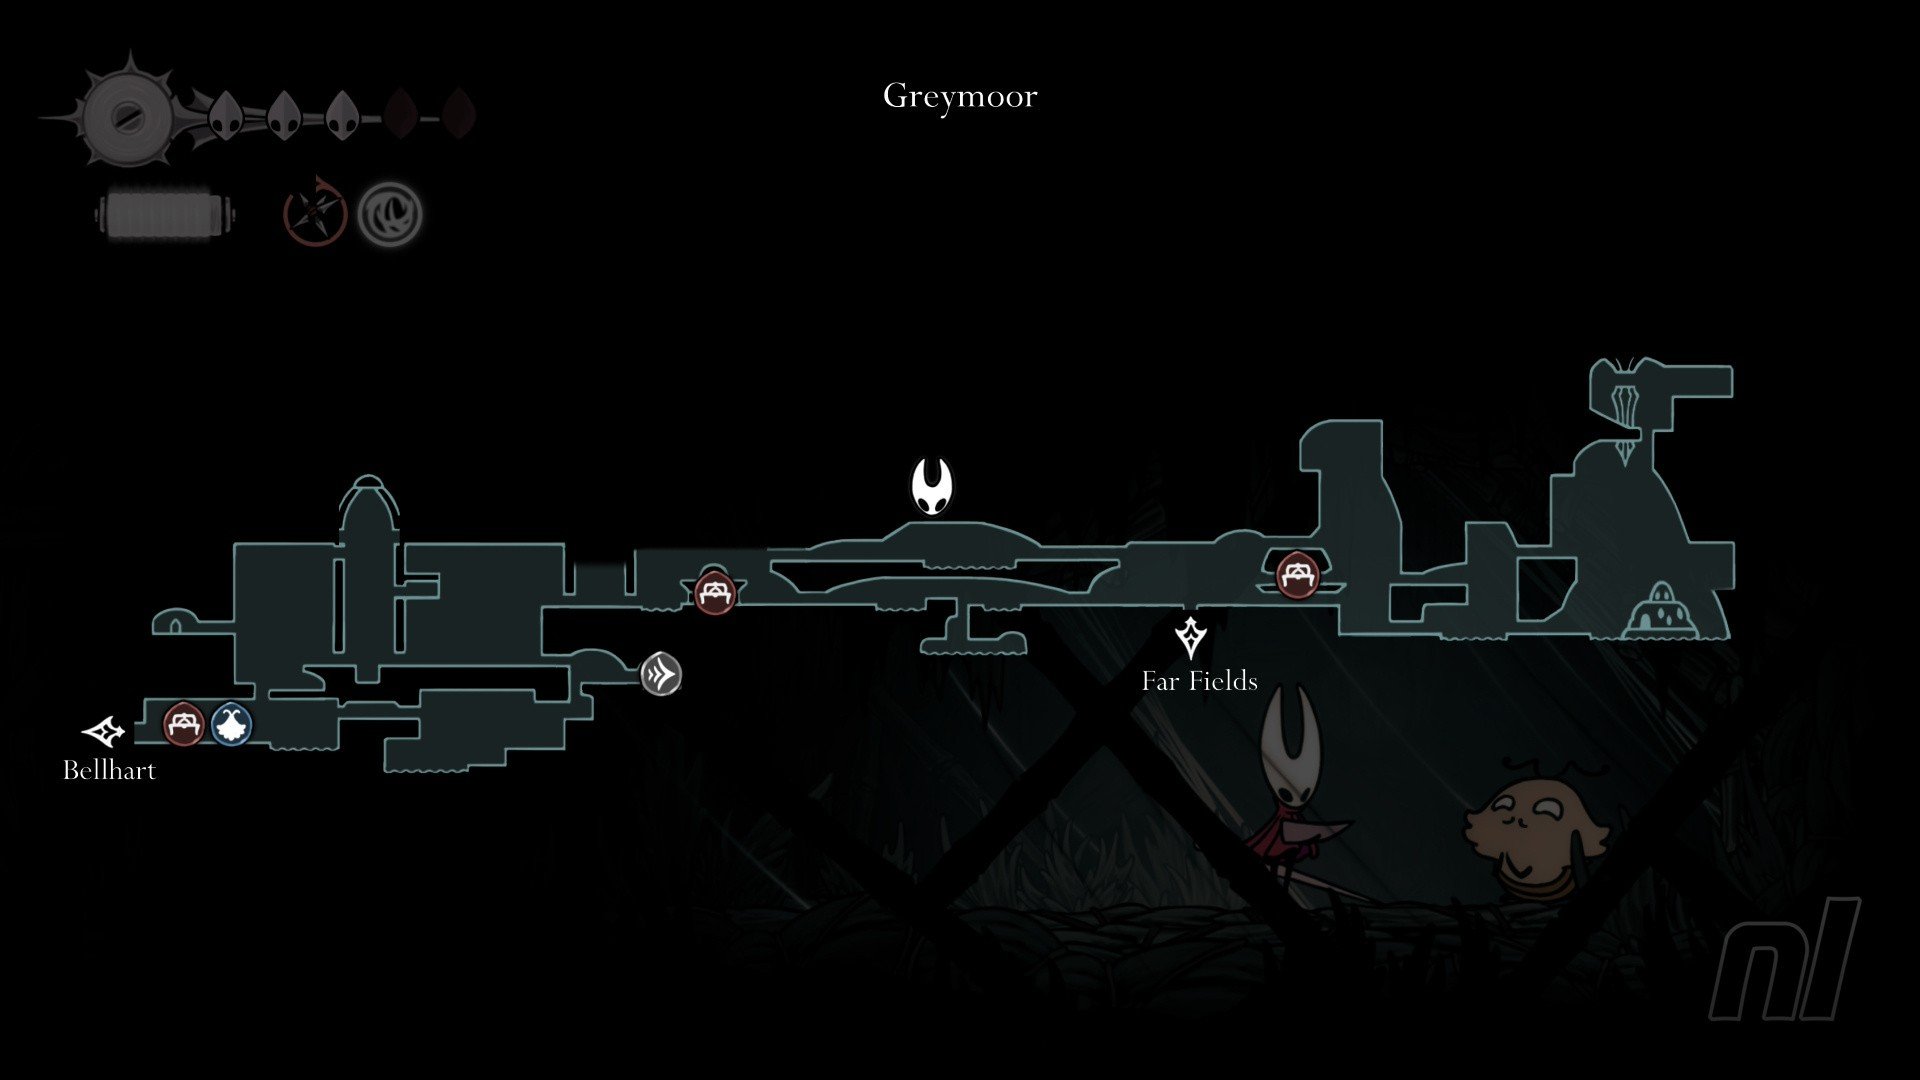
When you have Cling Grip, you can make your way further into the towers on the west side of Greymoor.
Headout the second door on the right and follow the path to a switch, activating an elevator outside of the Halfway House.
Ignore than and platform across to the right, entering the first doorway you see. Then head to the end of the path to find Kratt, a Flea that will offer additional services at the Caravan. He'll head over there once you talk to him.
9) Top of the Tower
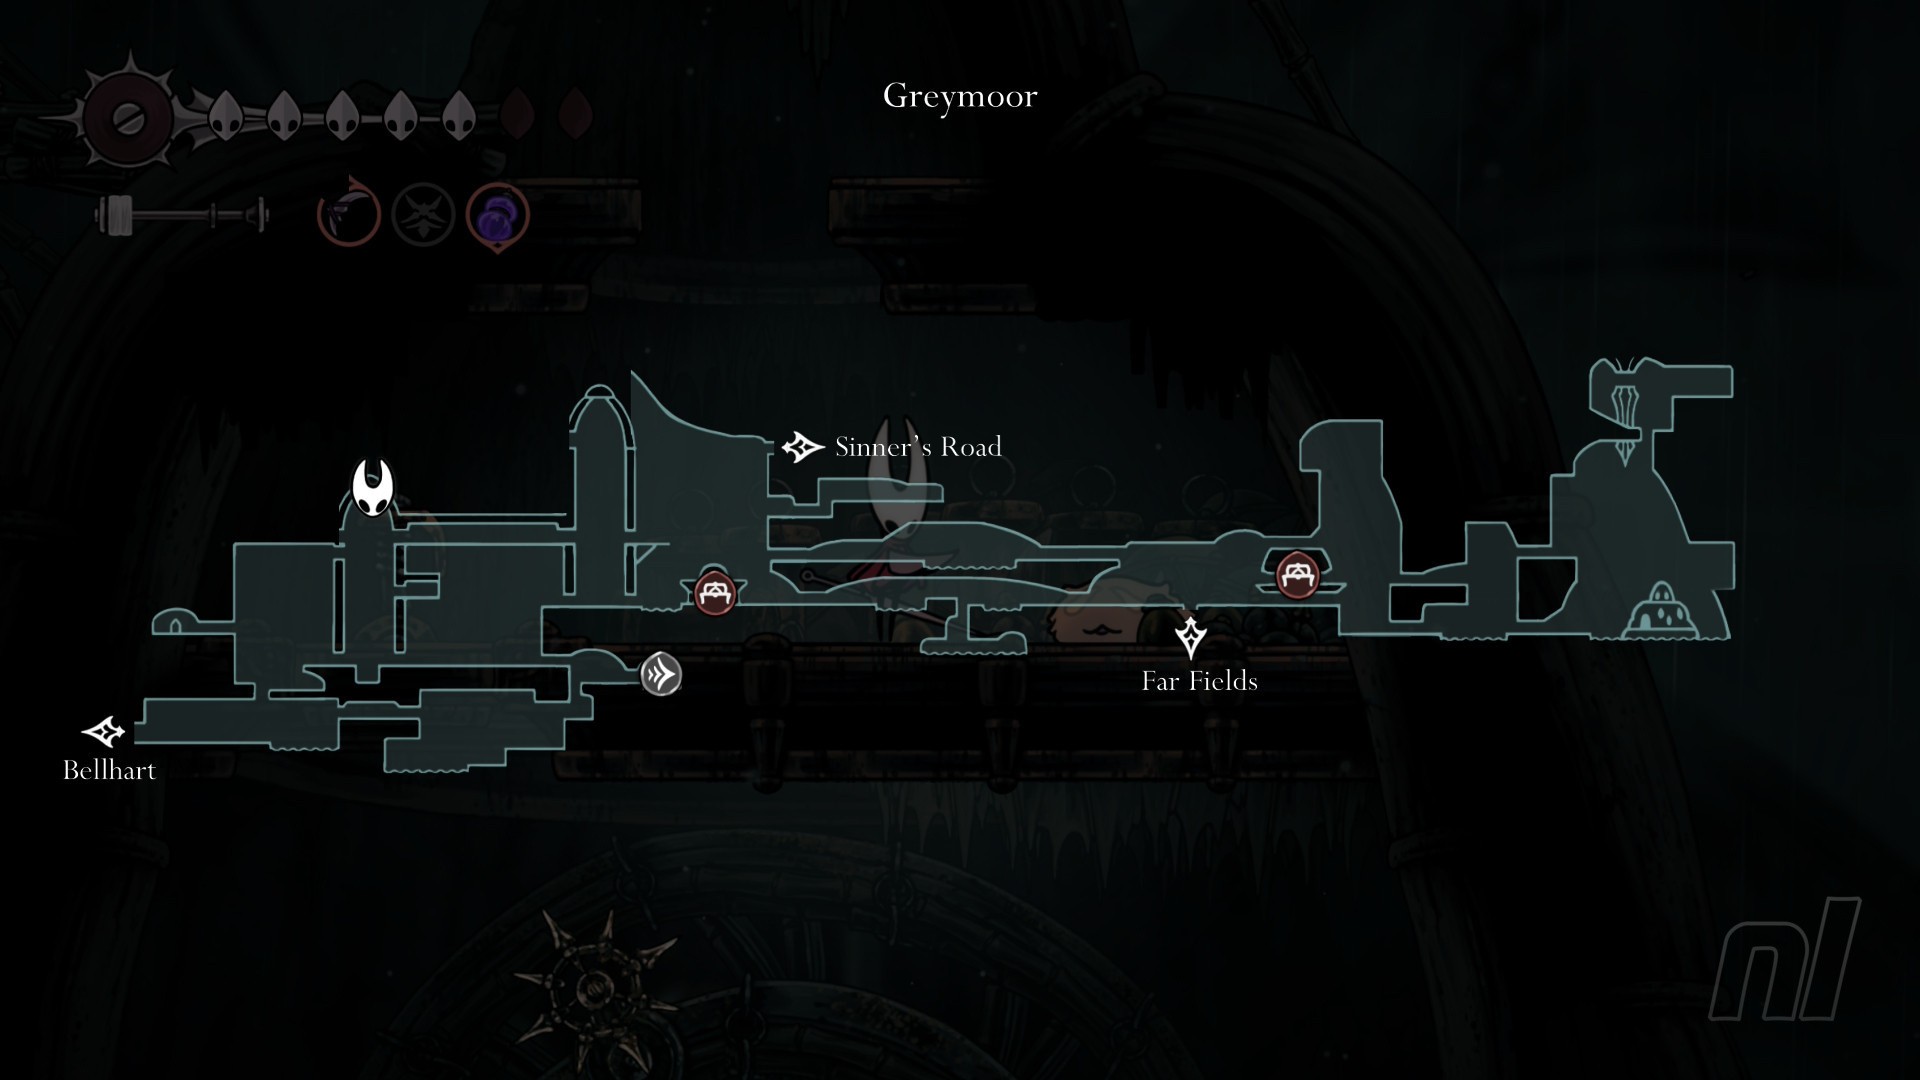
You'll need Double Jump to rescue this Flea, so make sure you go and unlock that first!
In Greymoor, head to the first tower (the one on the right) and then climb all the way up until you reach a door on the left. Go through it and then make your way through the jumping puzzle.
When you can, you want to turn on the fans as you go and the second fan will take you up and over the tower on the left.
Follow the path here and carefully drop down to find the Flea inside the dome.
Shellwood (1 Flea)
10) White Flower Jumping Puzzle
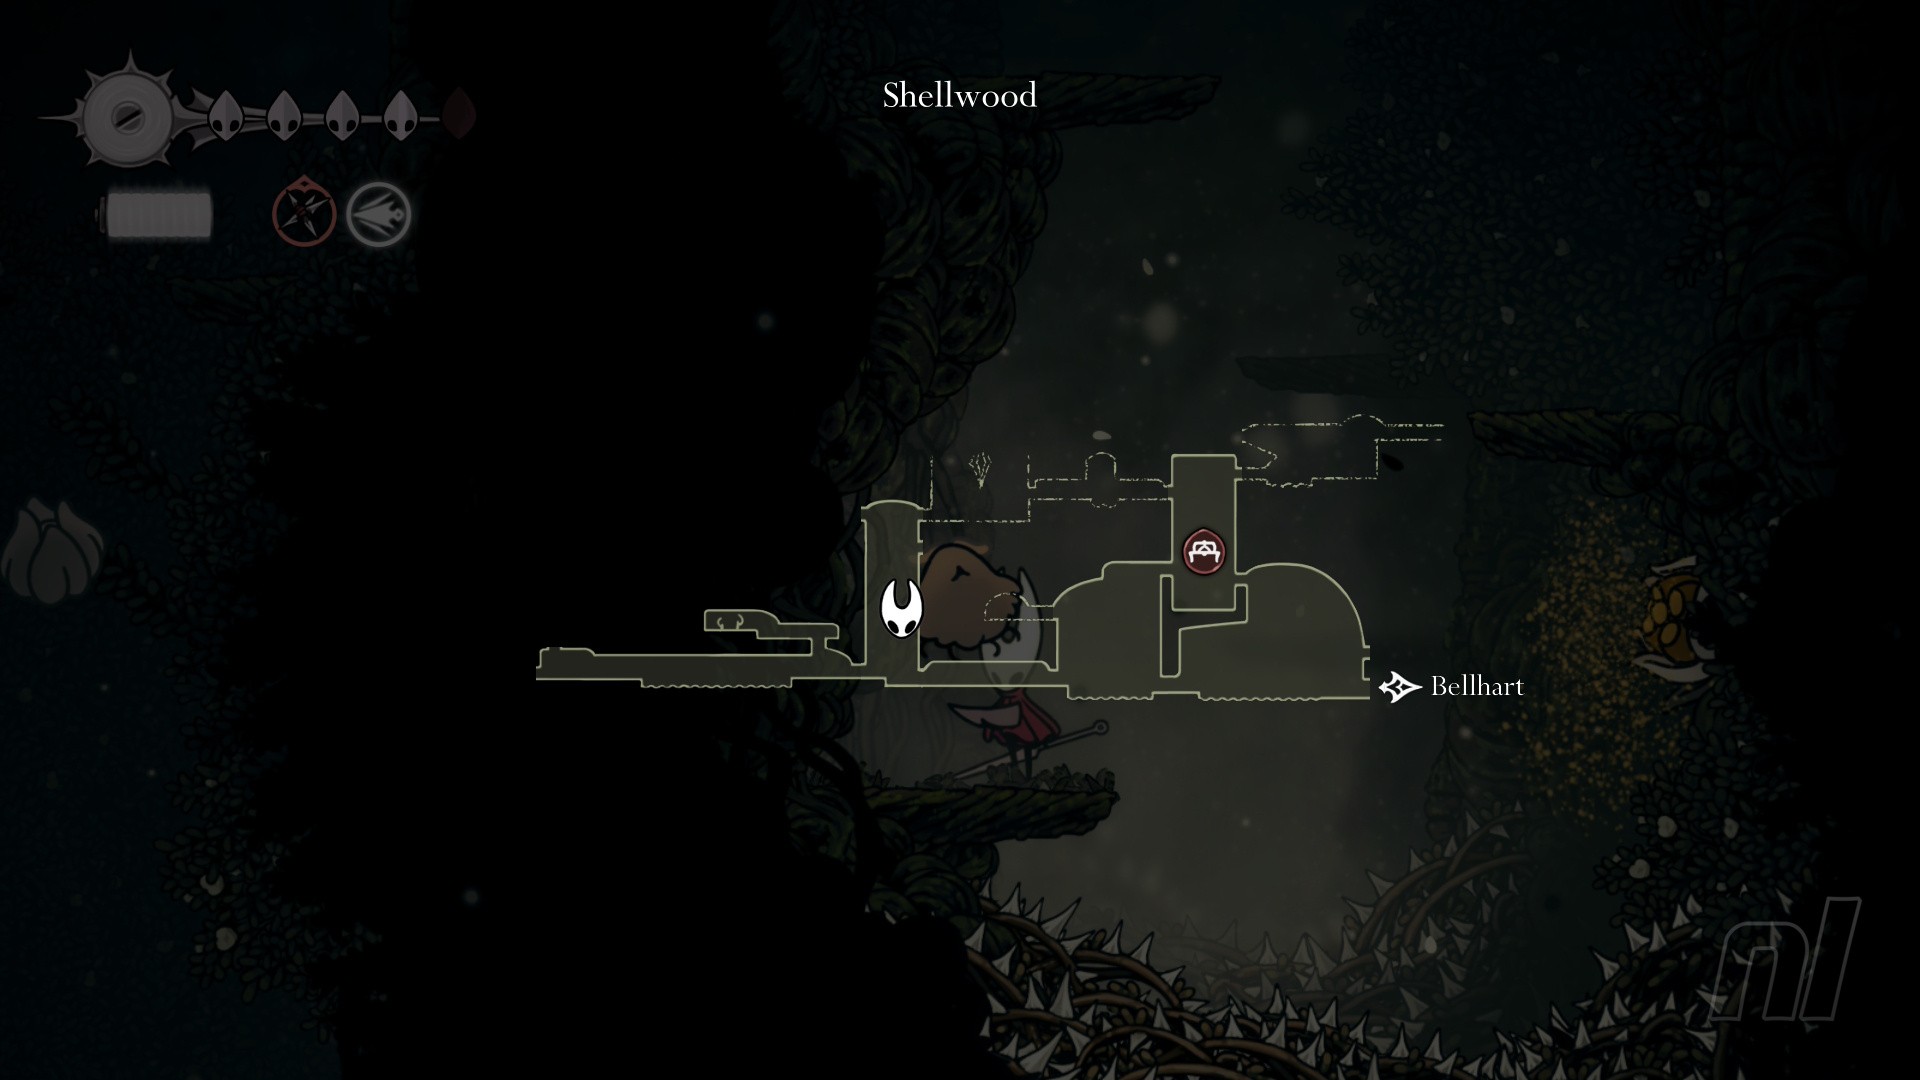
After finding Shakra (and buying the Shellwood map off of her), head right one screen to find a room with thorny vines and white flower buds. Use these buds to pogo-jump upwards, defeating and avoiding enemies along the way.
When you reach a platform in the middle of the vines, drop down the right-hand side and carefully make your way down, defeating the enemies along the way.
The Flea is caught up in some vines right at the bottom.
Bellhart (1 Flea)
11) Buried in Bell Corridor
We can't imagine it's comfortable being buried in a pile of bells, but that's where this Flea is hiding.
You'll reach the bell-filled halls above Bellhart via Shellwood, after getting the Cling Grip Ancestral Art. Keep heading to the far right to reach it, and break the wall with the bells sticking out.
Then, follow the paths through the bells carefully, heading up and left as and when you can, to eventually find the Flea. Free him and he'll go home.
Wormways (1 Flea)
12) Above the Locked Door
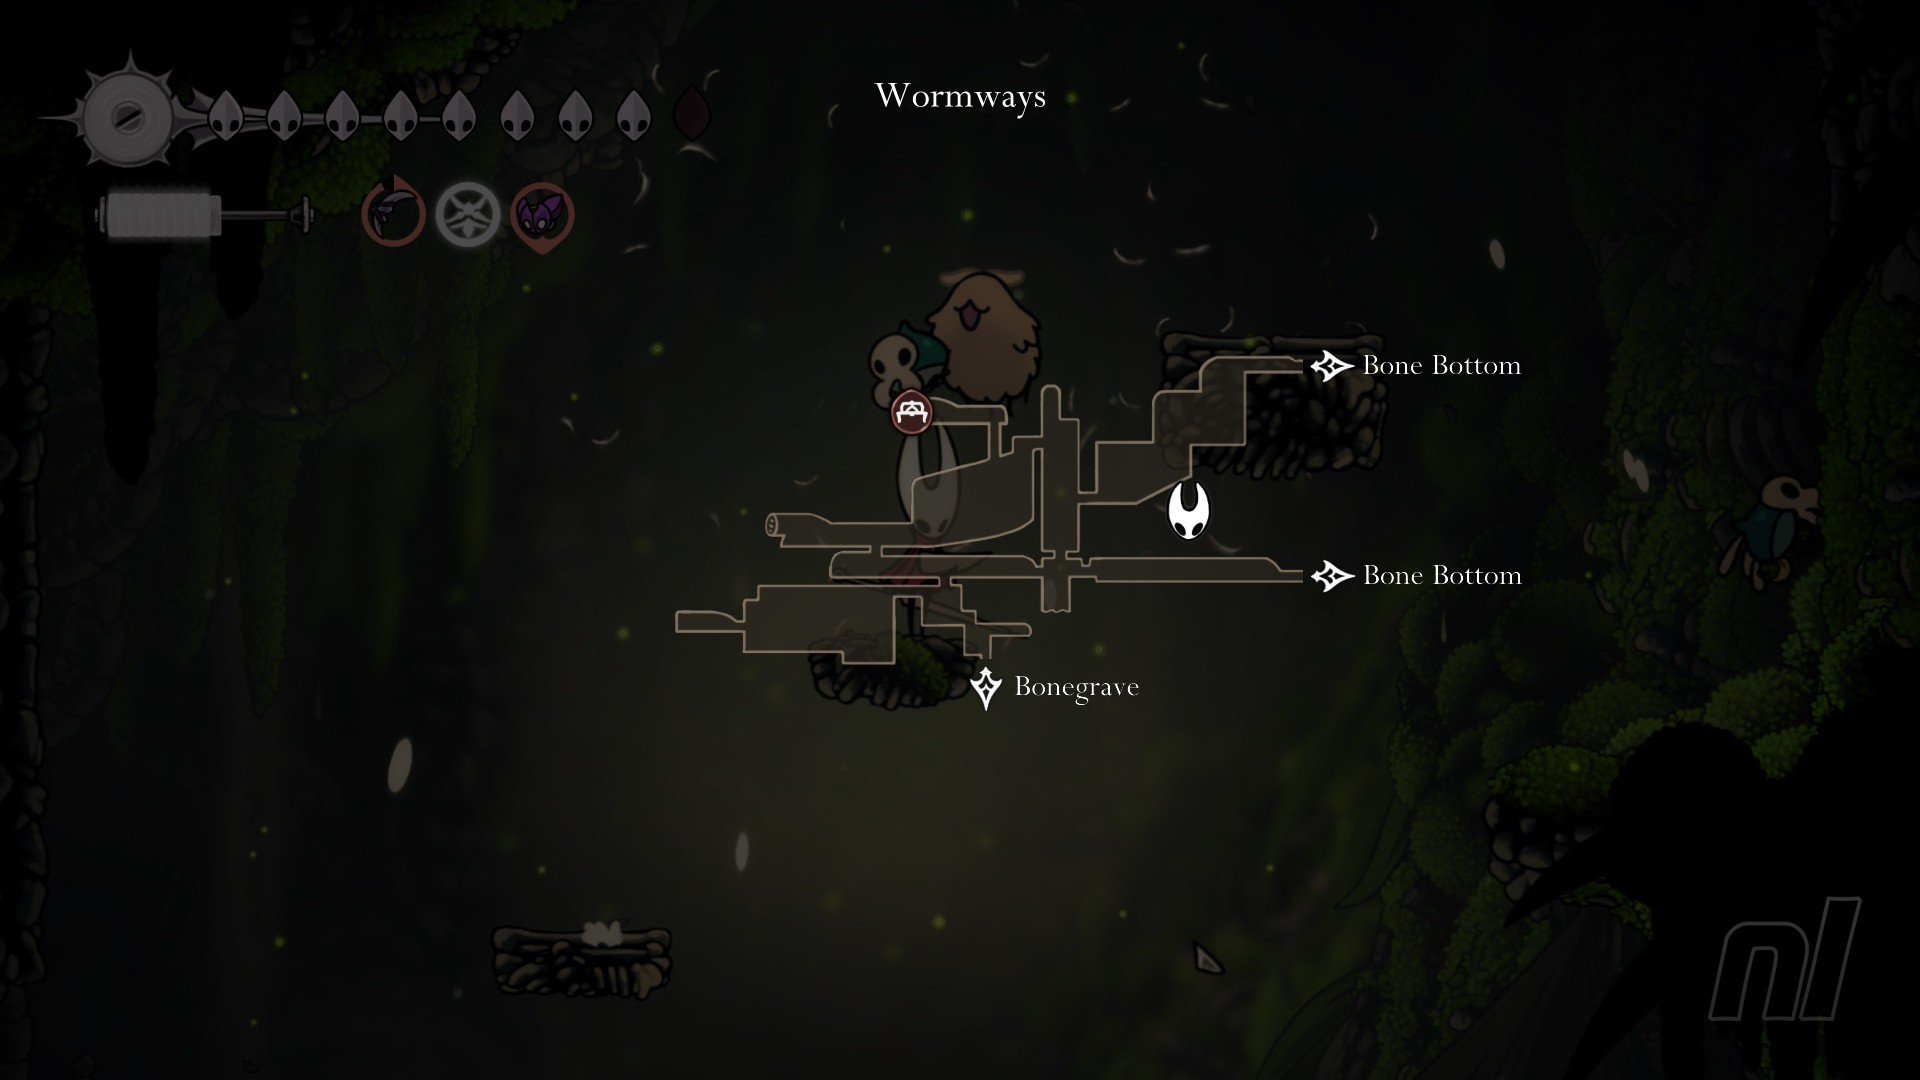
You need to approach this Flea from the Wormways above, which you can access via Shellwood and Bone Bottom.
Simply make your way carefully through the worm-ridden passages, navigating down and left until you reach a tall room without any worms in it. Drop down and eventually you'll reach a switch. Hit it to create a shortcut back to Bone Bottom, but don't drop down. Break the wall on the right to enter a hidden room.
Head inside and you'll fight some simple enemies. One of the flying ones is holding the poor Flea captive! Kill it and free him.
Hunter's March (1 Flea)
13) Red Flower Room
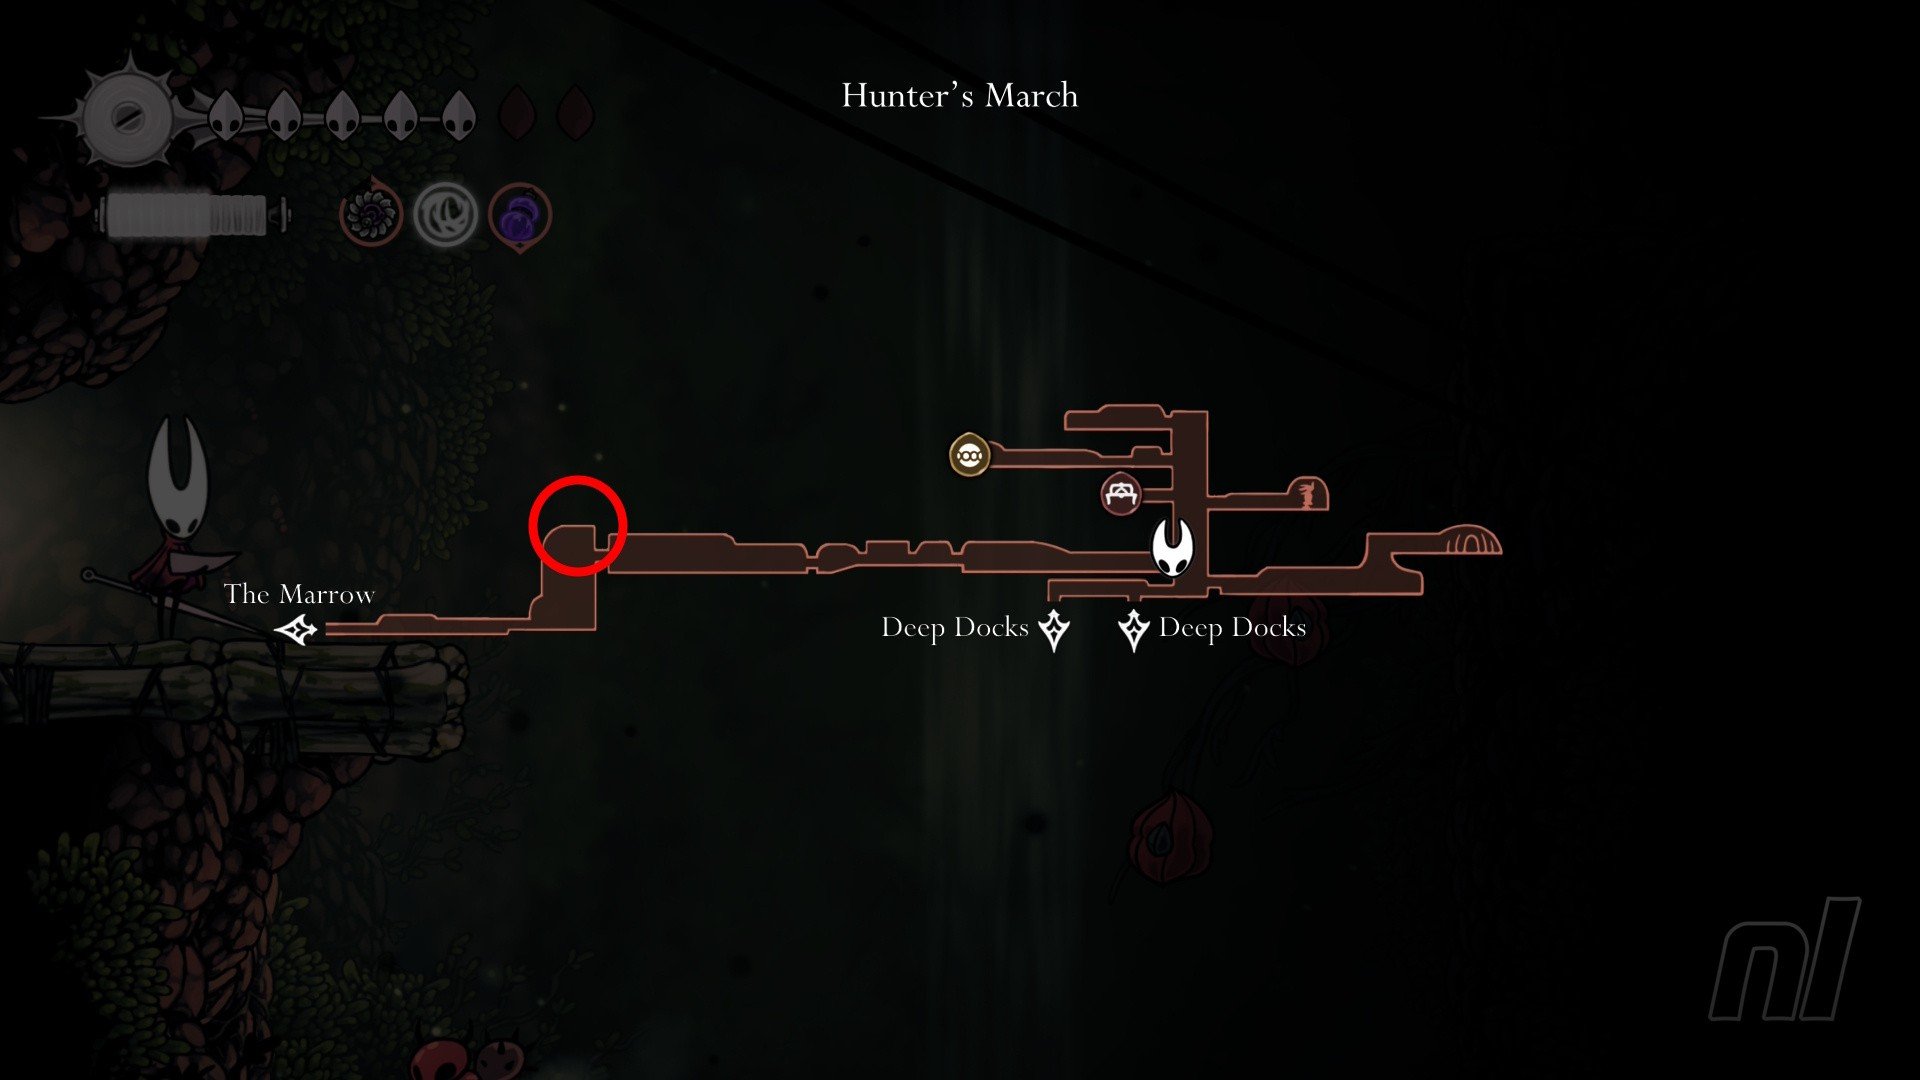
In the first room of Hunter's March, where you need to use the red flower buds to pogo up, you'll eventually reach a junction.
Go left and follow the flowers up, avoiding the enemies as best you can, and break the Flea free when you land on solid ground.
Blasted Steps (1 Flea)
14) Tall Spiked Room
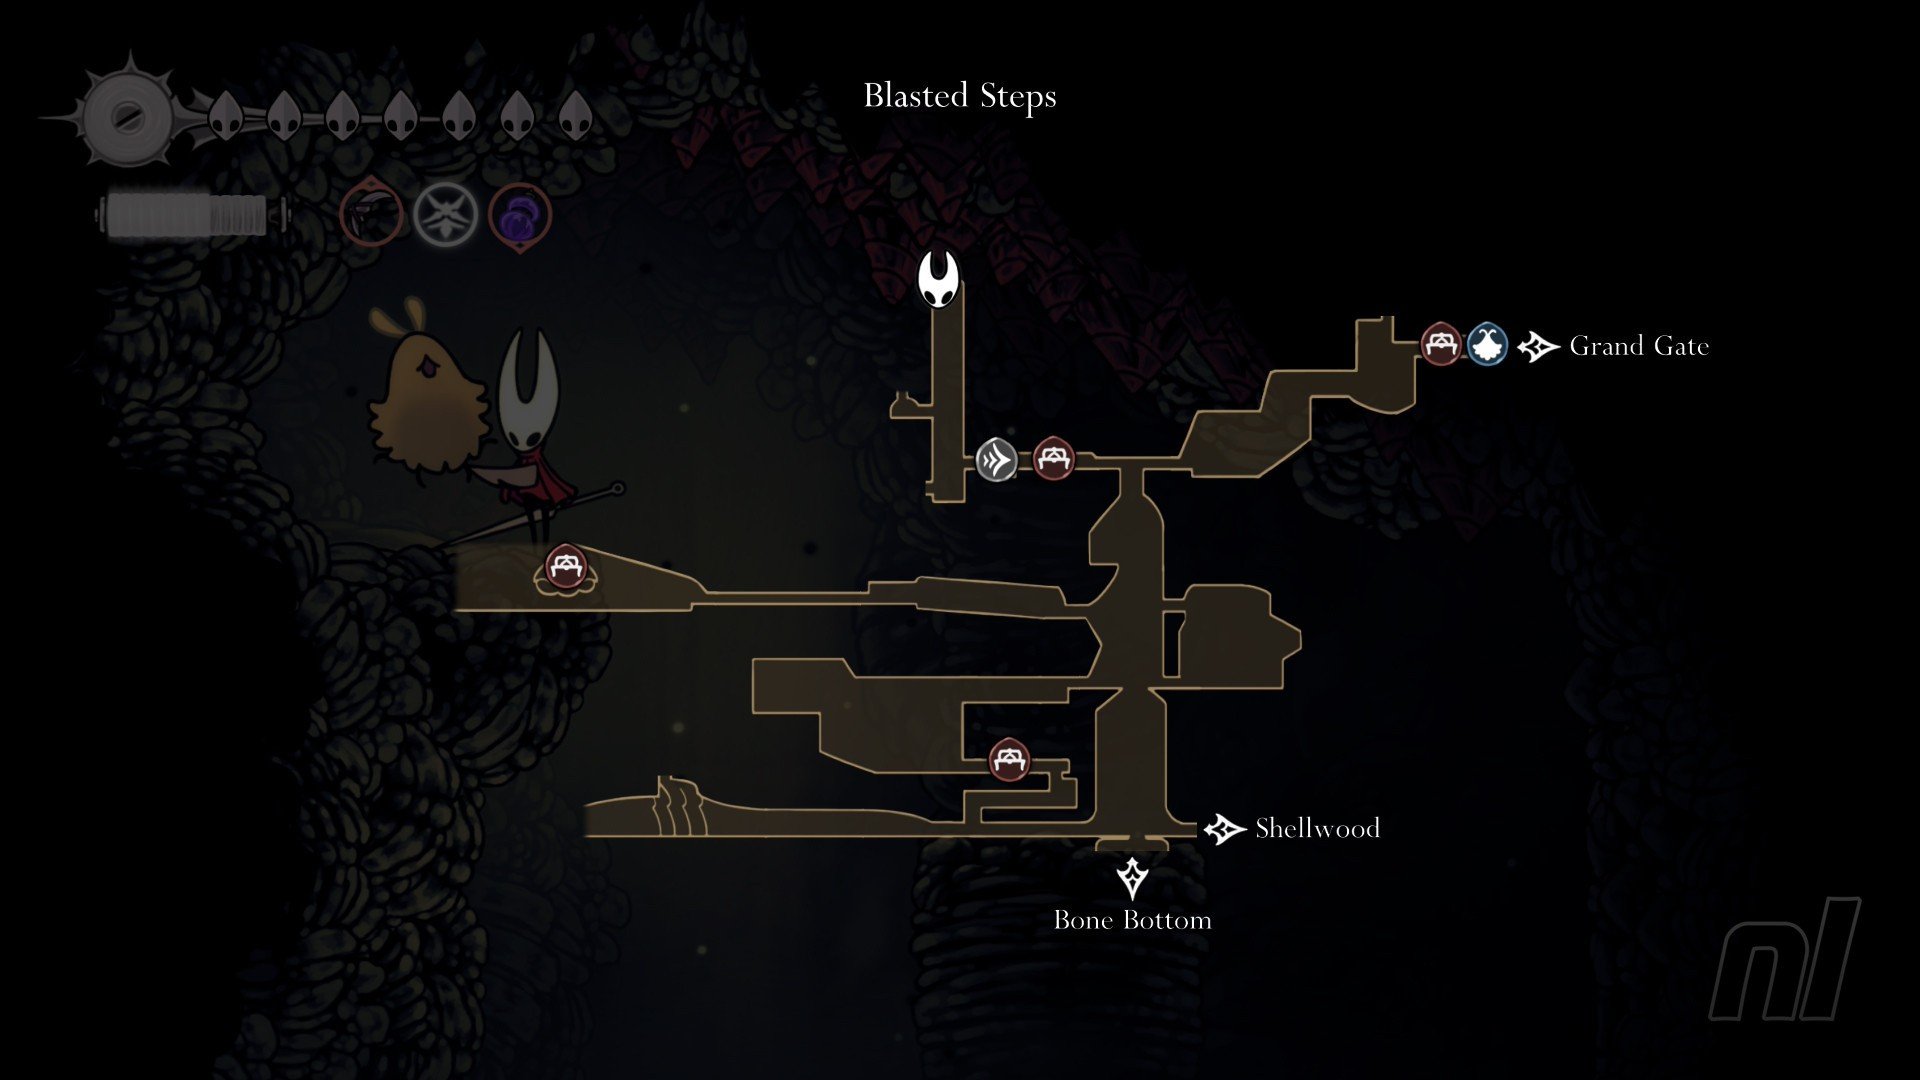
Once you reach the Bellway, head left and you'll find yourself in an extremely tall, narrow room. You want to climb to the top of this room.
Once you reach the spikes, you're almost there — this is easy with Clawline and Double Jump, but you don't need them. The Flea is sleeping at the very top left here.
Sinner's Road (1 Flea)
15) Caged with Roaches
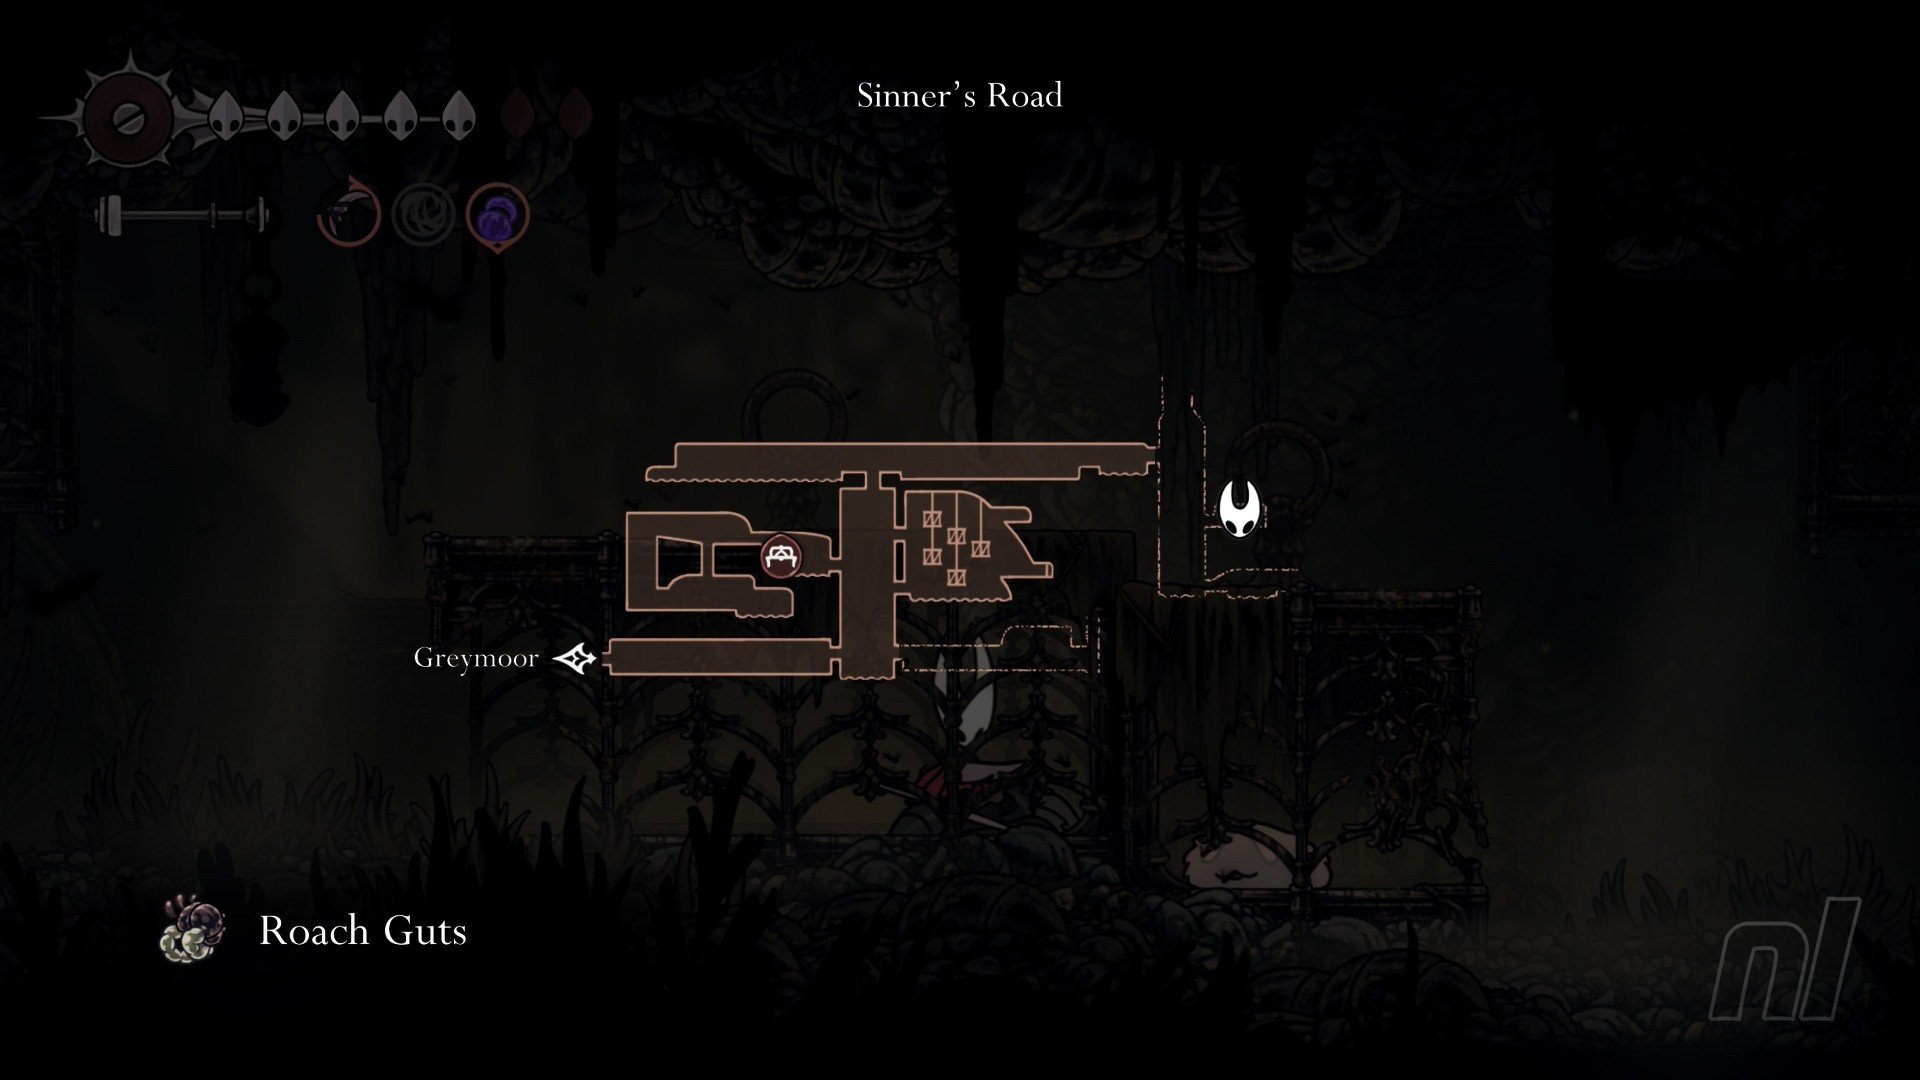
Once you reach the right-side of Sinner's Road, drop carefully down the right-hand wall of the tall room, and then enter the door.
You'll want to try and defeat the roach ahead of you before you jump around to the other side to break the cage door.
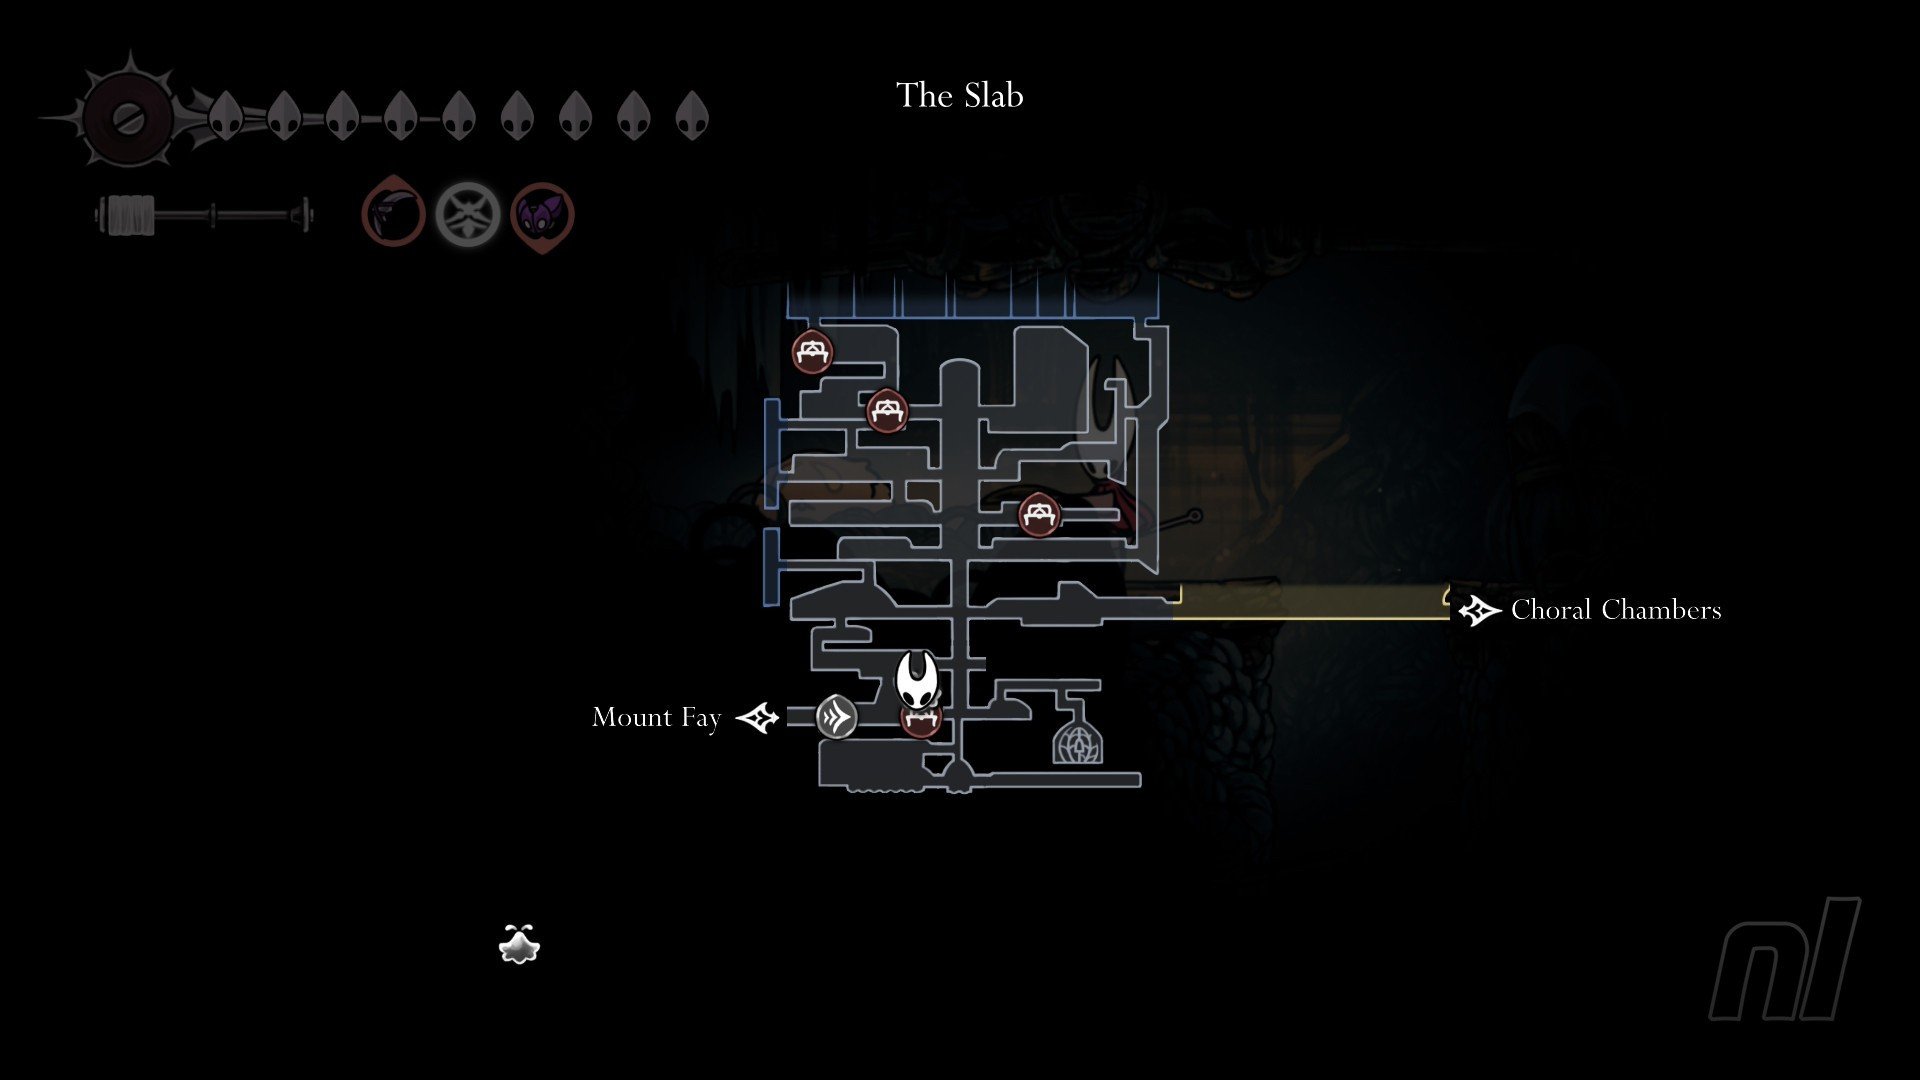
The Slab (1 Flea)
16) In Prison

You should find this when you're exploring The Slab pretty naturally — whether you were captured or not. If You miss this Flea, you'll find him in a room on the bottom-left room of the tall chamber.
There's a hidden room within a room, basically. Head inside and break the cage he's trapped in.
17) Above the Bellway Bench
We're amazed we missed this one initially as it's right under (or, above) our nose. At the Bellway Bench (it's to the right of the Bell Beast), you should look up and you'll see some light coming through the ceiling.
Jump up here (you may need Double Jump), and the Flea is having a little snooze. Wake up, buddy! It's hometime.
Underworks (1 Flea)
18) Left of Lava Room
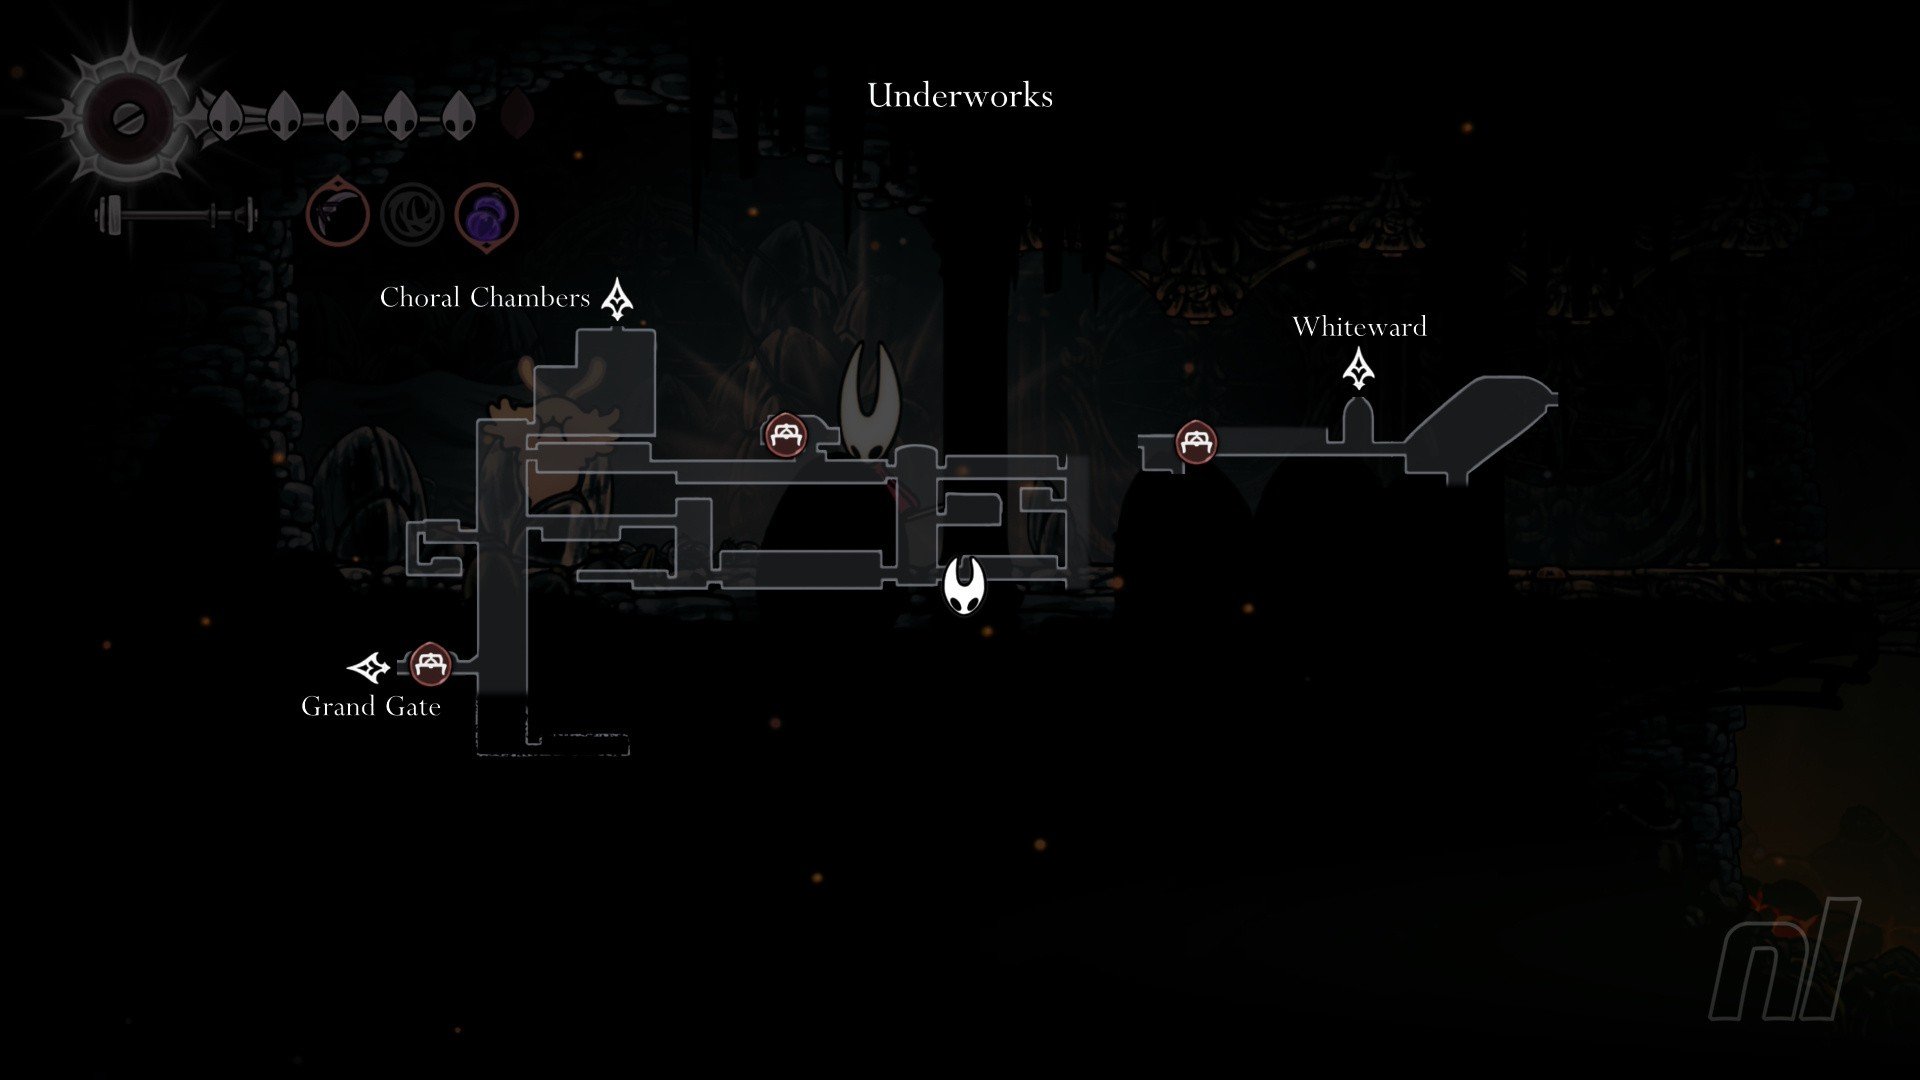
When you enter the Underworks from Whiteward, head to the large chamber full of lava (by riding the updraft up and left).
In this room, you want to make your way all the way to the bottom of the room — be careful of the exploding bugs as you go down! Then, head through a door on the left. You'll be ambushed by a large foe, so be careful and defeat him.
Once he's been dealt with, free the Flea!
19) Via the Wisp Thicket
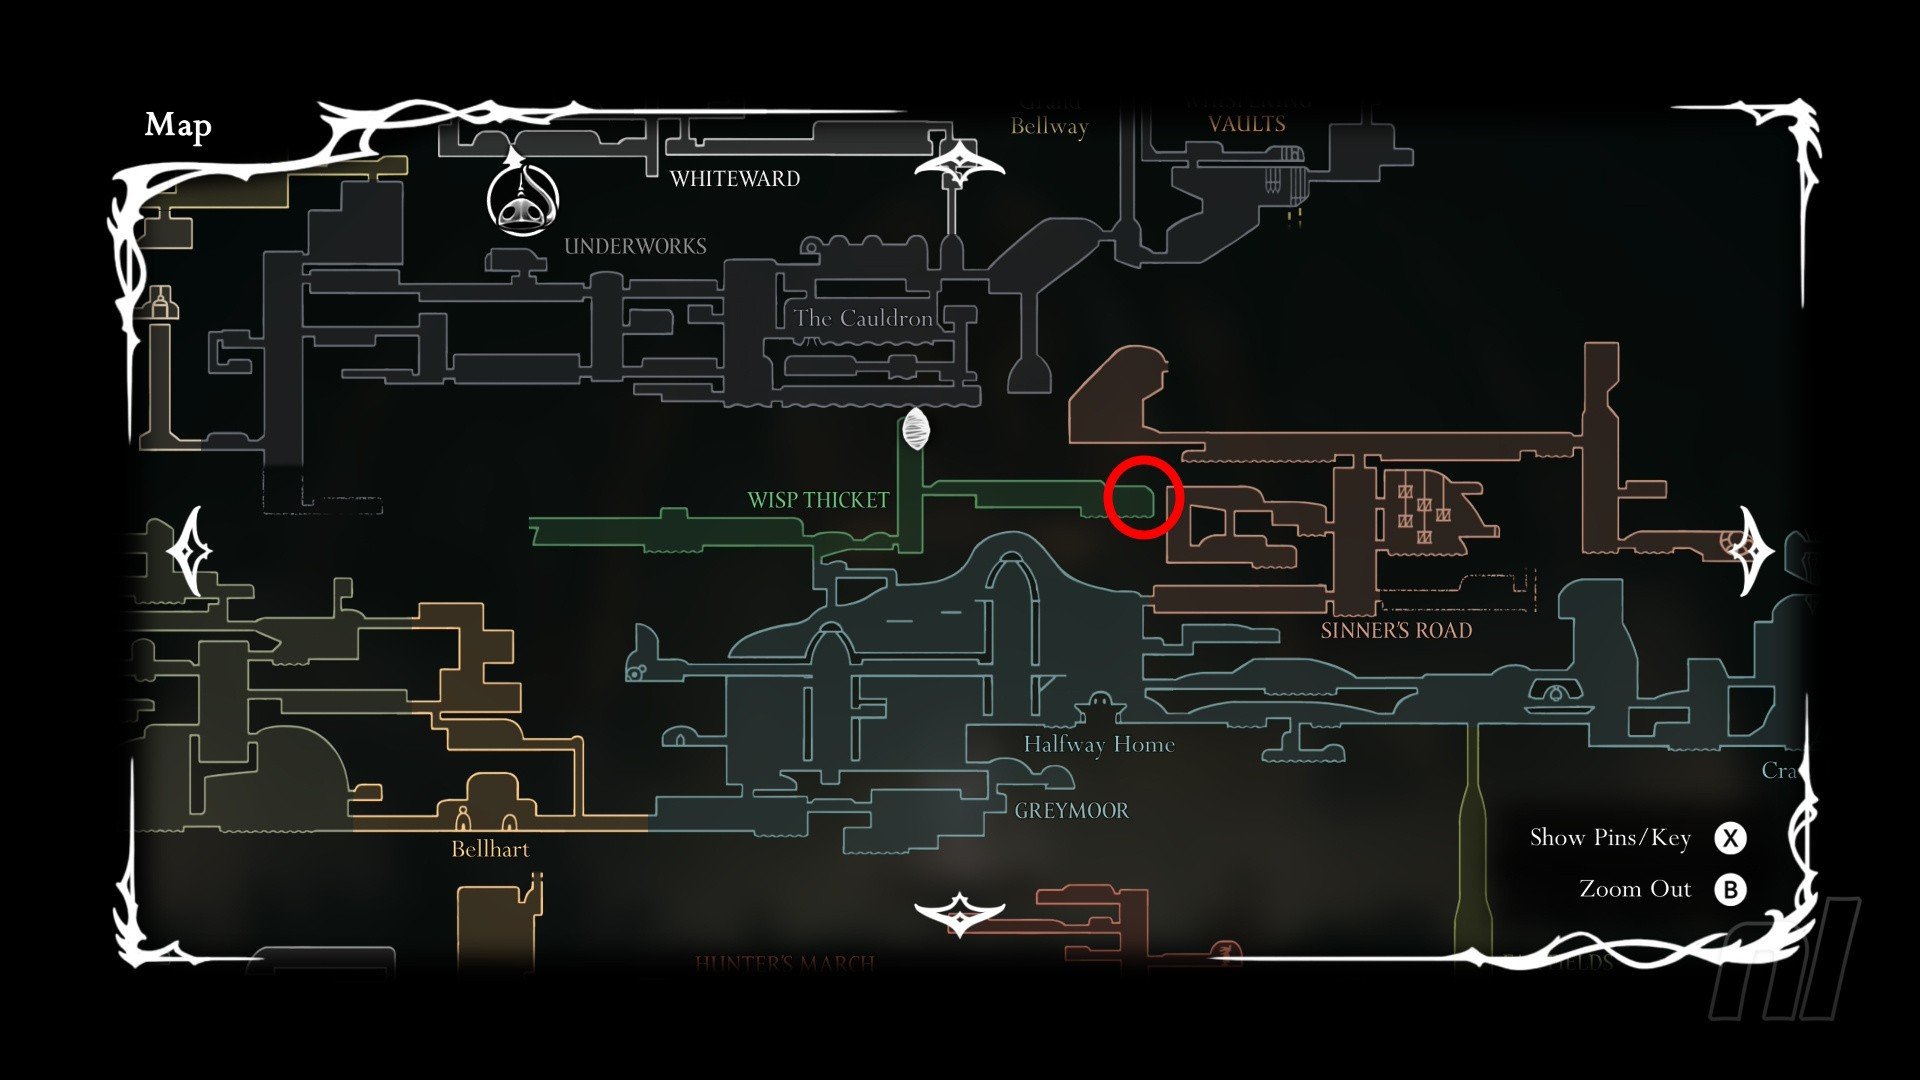
You'll need Double Jump to even reach this Flea, as it requires going through Greymoor and a secret area called the Wisp Thicket.
From the Bellway in Greymoor, head up the tower on the left of the map and climb to the very top (where you found a Flea earlier). In the top-left corner is a hidden pathway. Up here is the entrance to the Wisp Thicket.
Make a detour right and break the bag on the wooden platform to free the bench. Sit on it, then head left into a room. Ignore the first fire enemy and you'll soon approach a wooden building with two fire lamps inside. Jump to the top platform here (try and avoid the fire, but these can be frustrating to deal with) and break the ceiling in the top-left corner to open up a pathway.
Climb up to a stony area, then go right for a Craftmetal, then left until you reach a familiar-looking area in the Underworks.
To the left you'll see some saw blocks moving very fast that you have to navigate through. There are three sections of these, and they get progressively harder. The very last one, you want to go to the bottom first and then wait for an opening to jump up.
When you reach the end, hit the trap door switch, jump up and you'll see the Flea on the left.
Choral Chambers (2 Flea)
20) Spiked Hallway
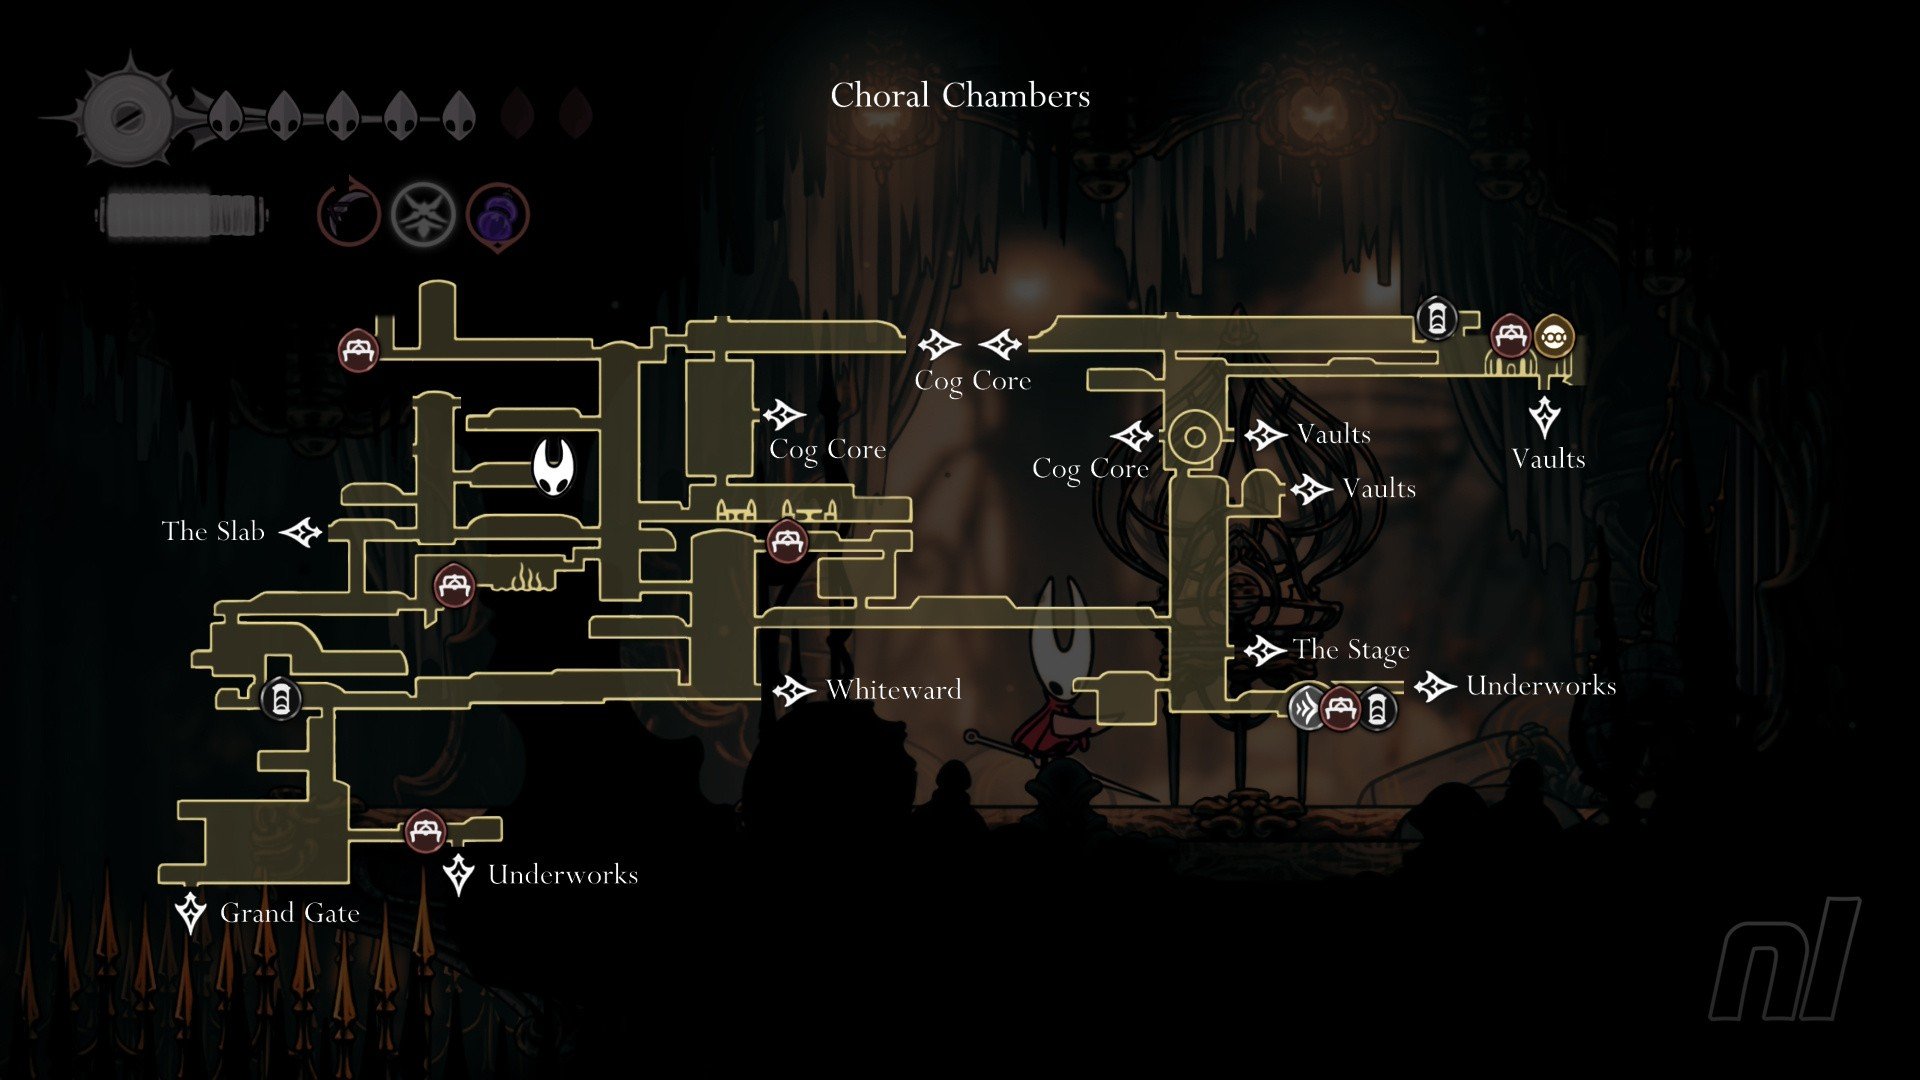
As you make your way to the Slab, you'll enter one last tall room with multiple doors on the left and right side of the room.
On the right side, jump up to the second door and you'll enter a hallway of spikes and flying enemies. Simply make your way to the end to find the caged Flea. Break him out!
21) Hidden Saw Blade Path
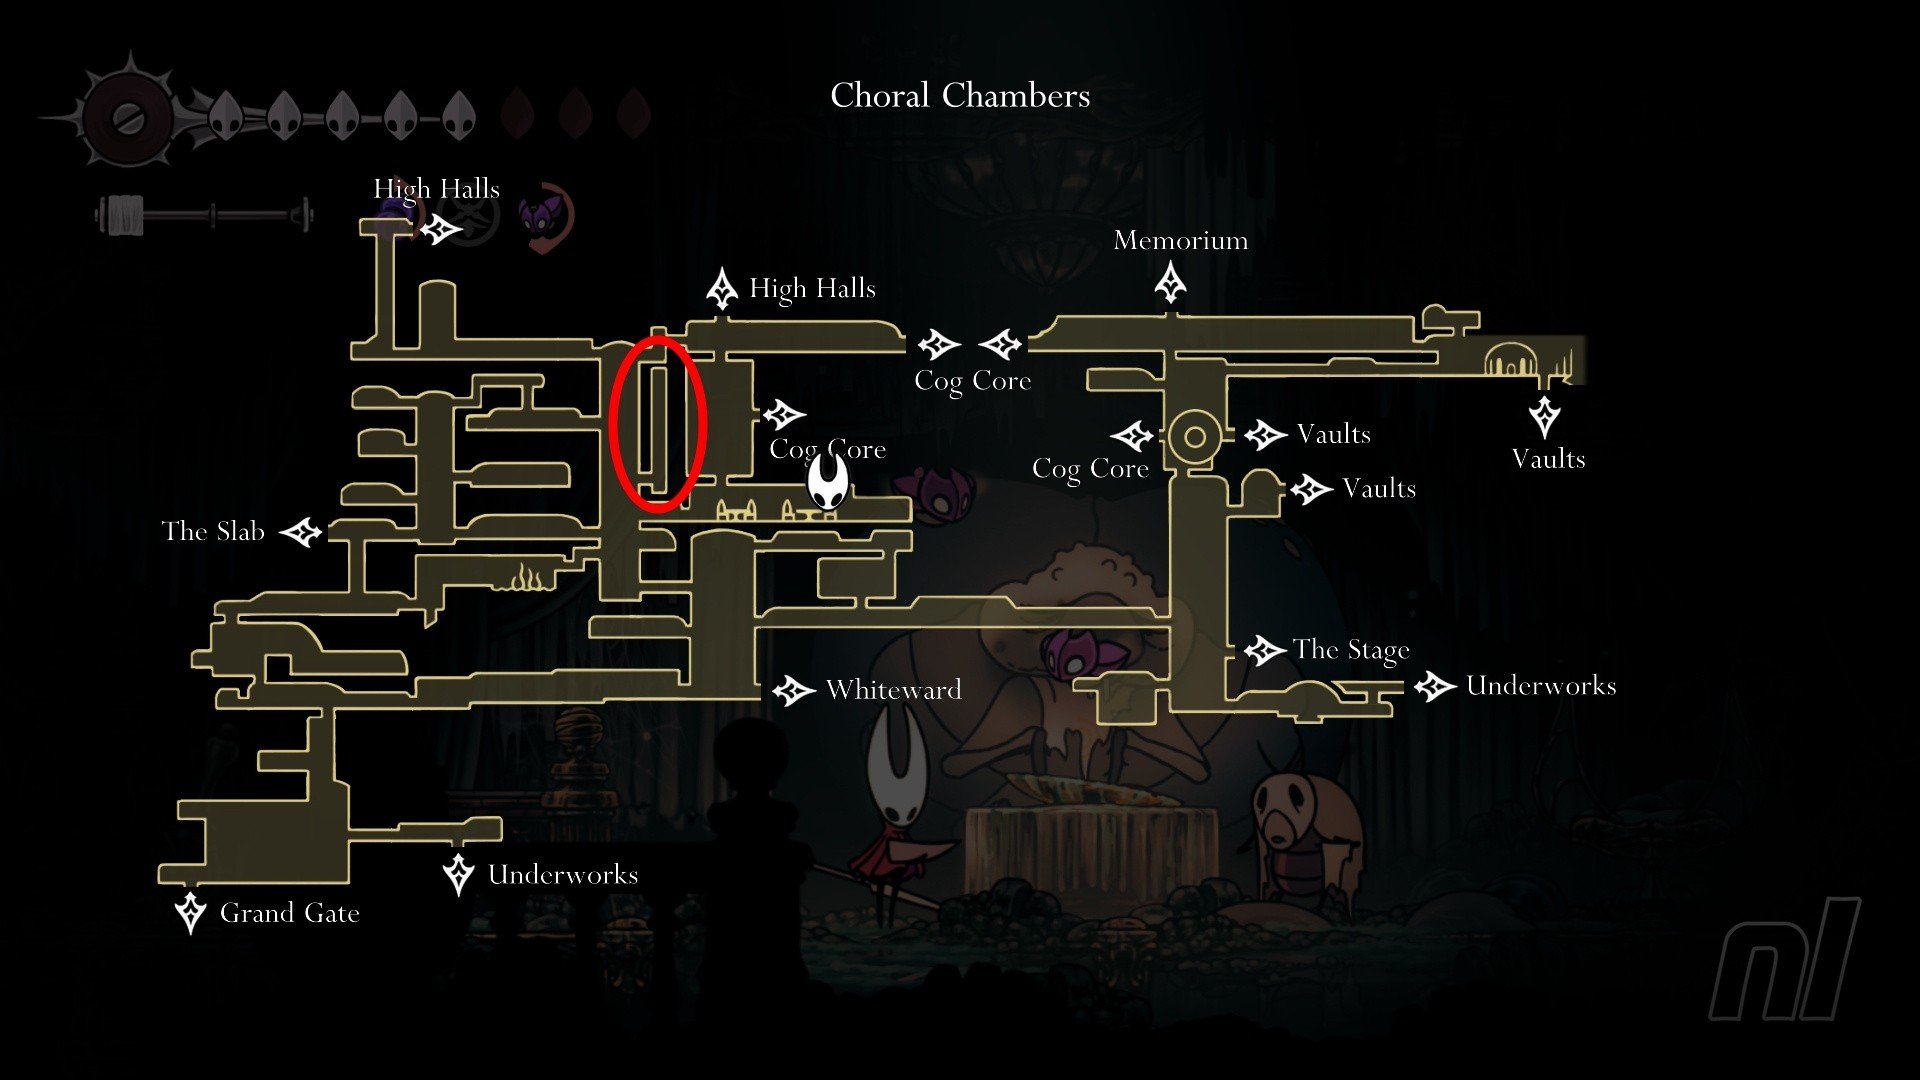
If you're coming from the east from Songclave via the Cogwork Core, then you might hear some squeaking from a little flea when you enter some ducts.
Head left until you are out in the open, then drop down to a platform on the right side. Break the wall here and you'll enter a room with some saw blades above you.
Carefully drop down here and blow up the floor to reveal an upward draft. Drift up to save the Flea.
Whispering Vaults (2 Fleas)
22) Pushing Block Puzzle
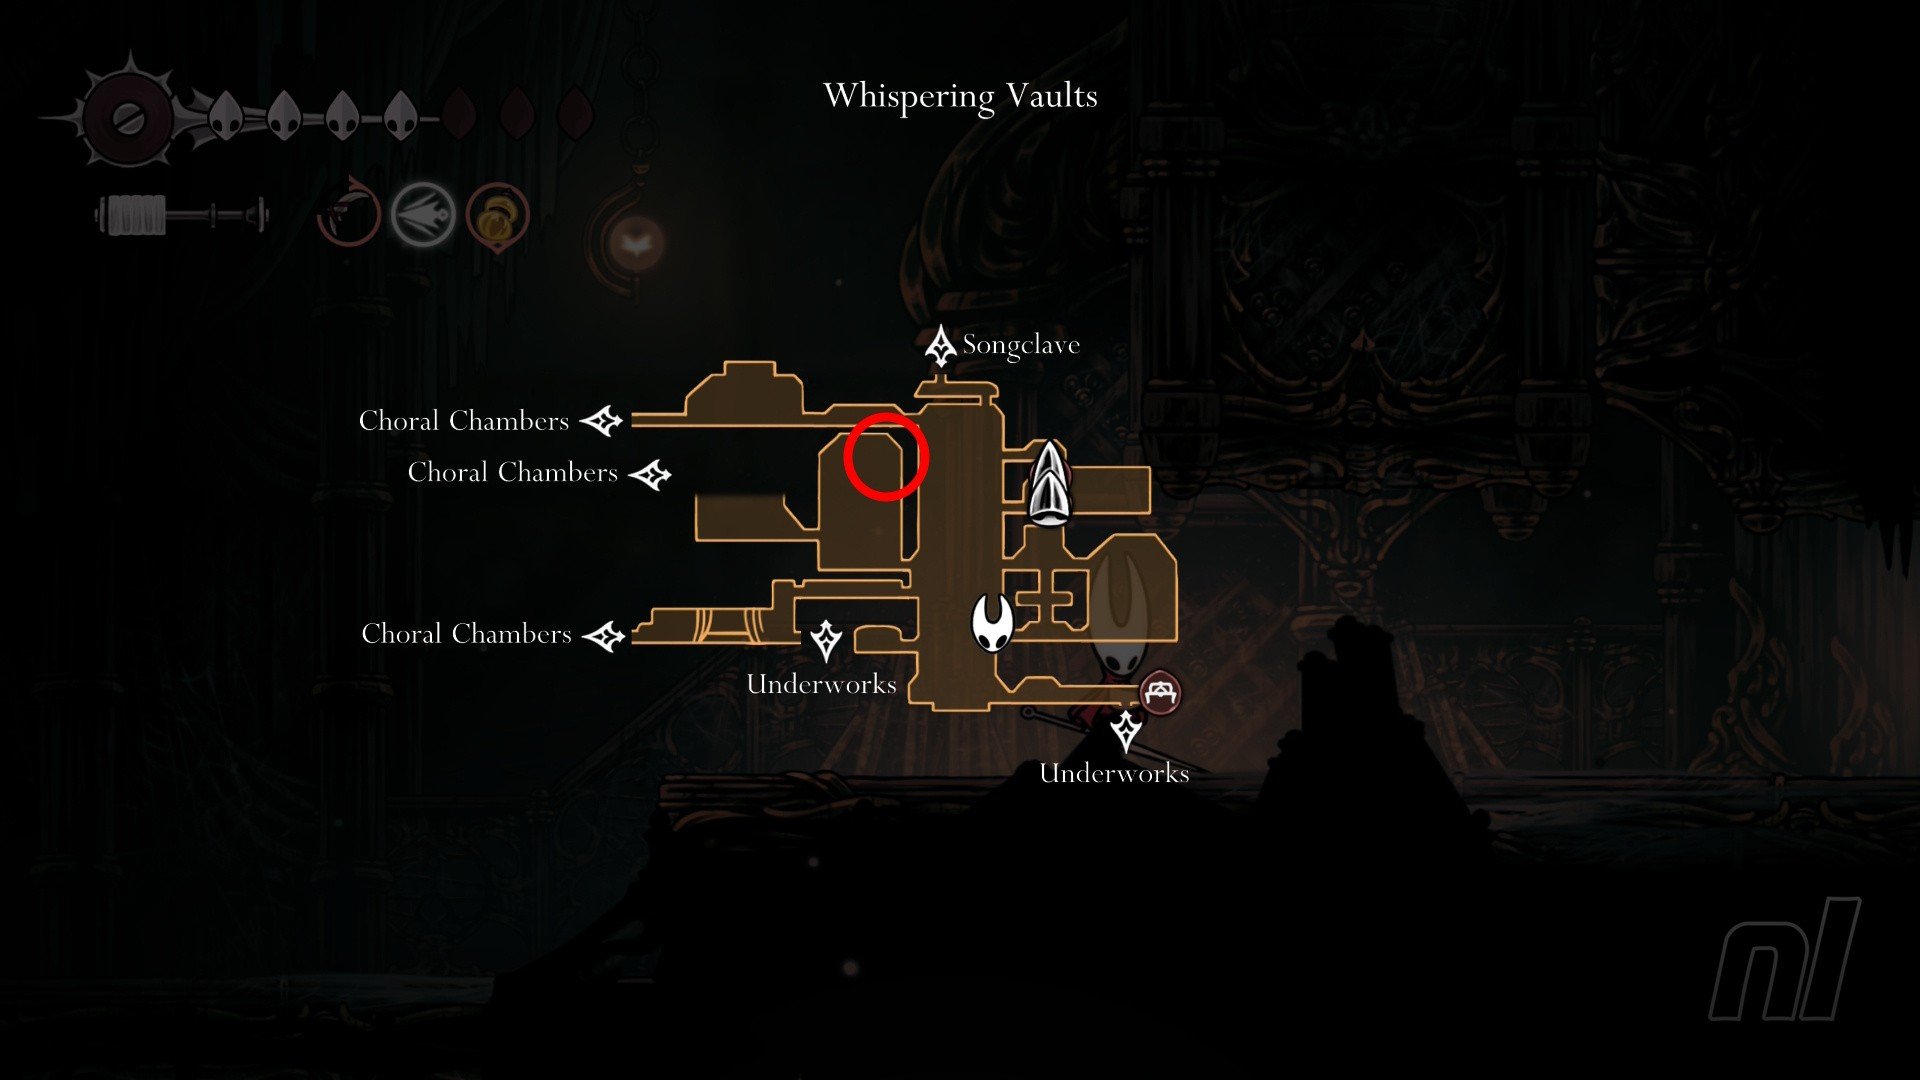
Once you enter the largest chamber in the Whispering Vaults, make your way down and head left through the first opening (not the one you entered from).
In here you'll need to push the blocks around the room — you can tell which way to hit them as you'll see the rails in the background.
Keep doing this until you get to the very top of the room, and the Flea will be in the top right corner.
23) Outside Songclave
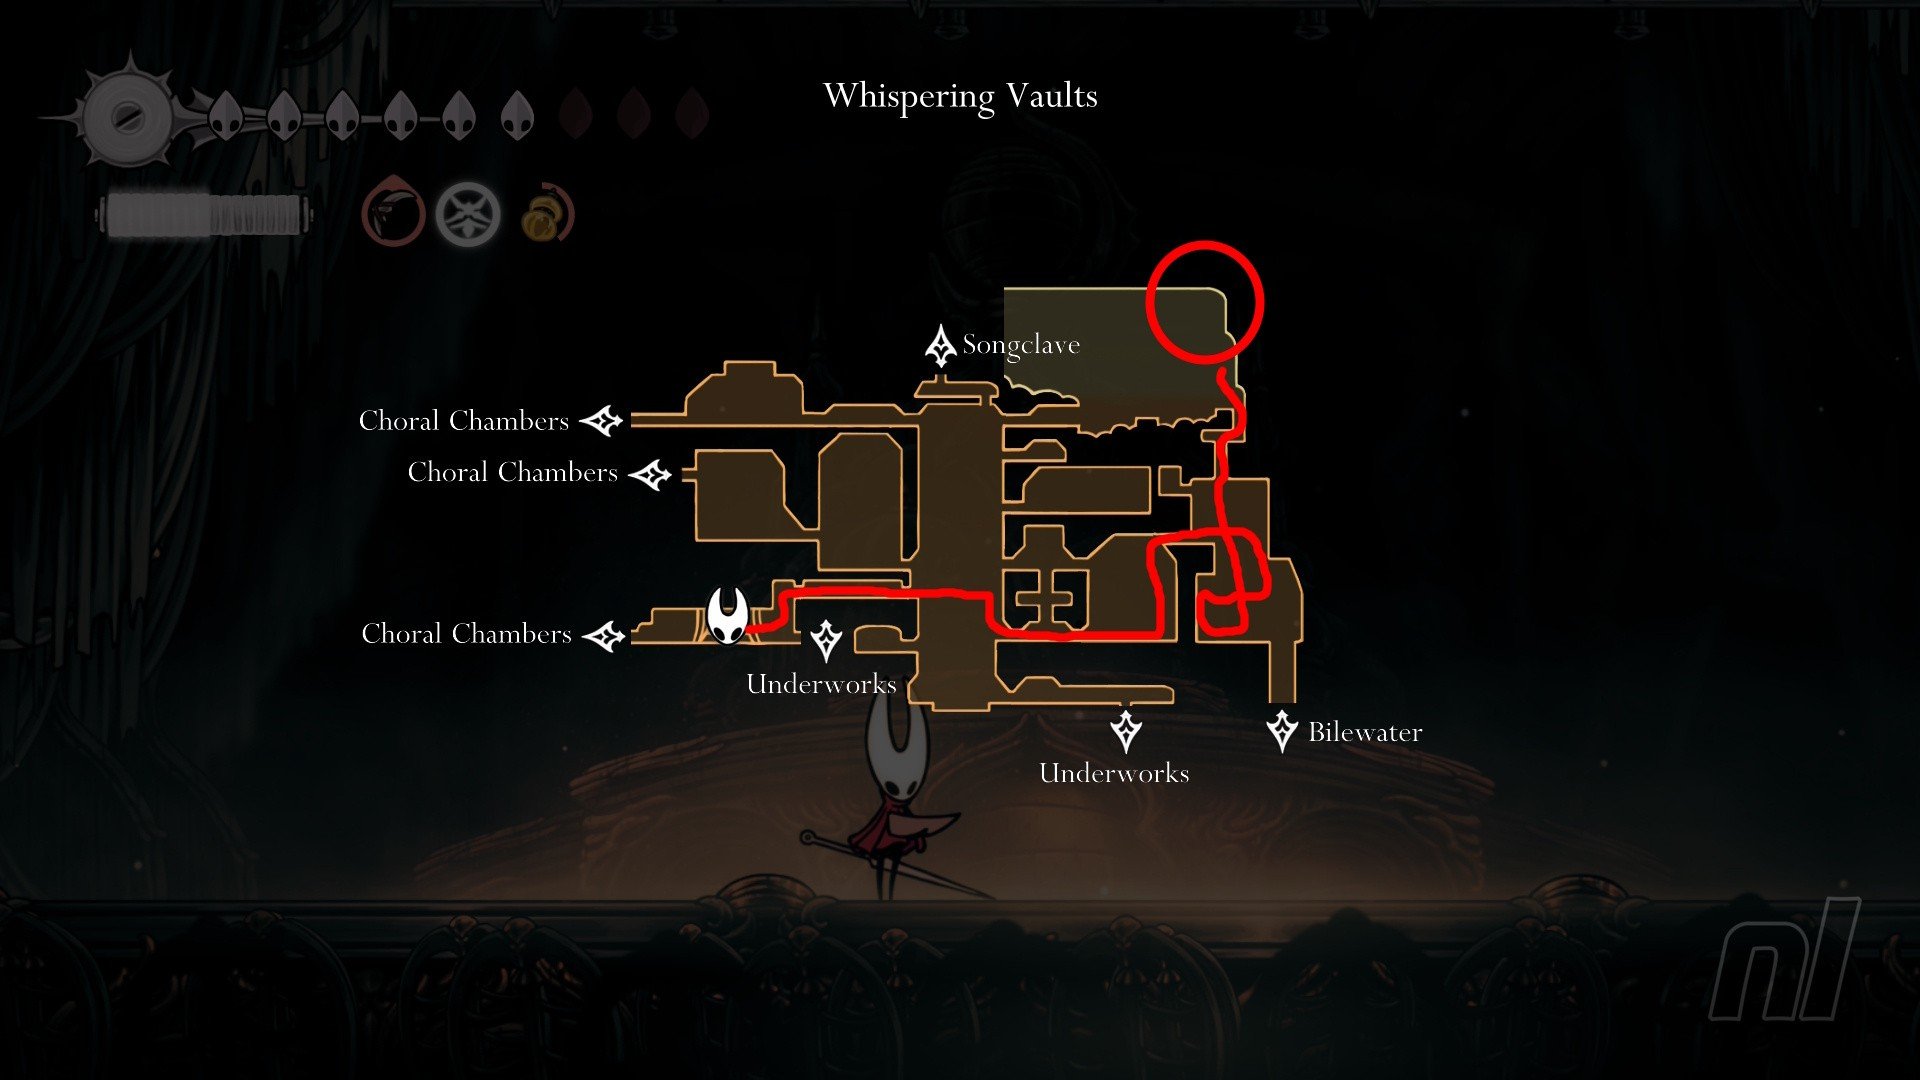
This one's sort-of in-between Songlclave and the Whispering Vaults, but as you can only access it from the Vaults, and it shows on the Vaults map, we've popped it here.
You'll want to come back for this when you have Double Jump as it involves going through a hidden path in the top, right corner of the bottom-right room and navigating some spikes and saw blades.
When you glide down past some spikes, you can go either left or right. Go left and follow the path around until you flip a switch.Make your way down on the left here and hit the switch here, then press the button to create an upward draft you can ride to the top of the room, then climb out.
You'll be outside here, and you want to climb up the wall on the right. The Mask Shard is right at the top here, just to the left of the wall.
Mount Fay (1 Flea)
24) Frozen Hidden Room
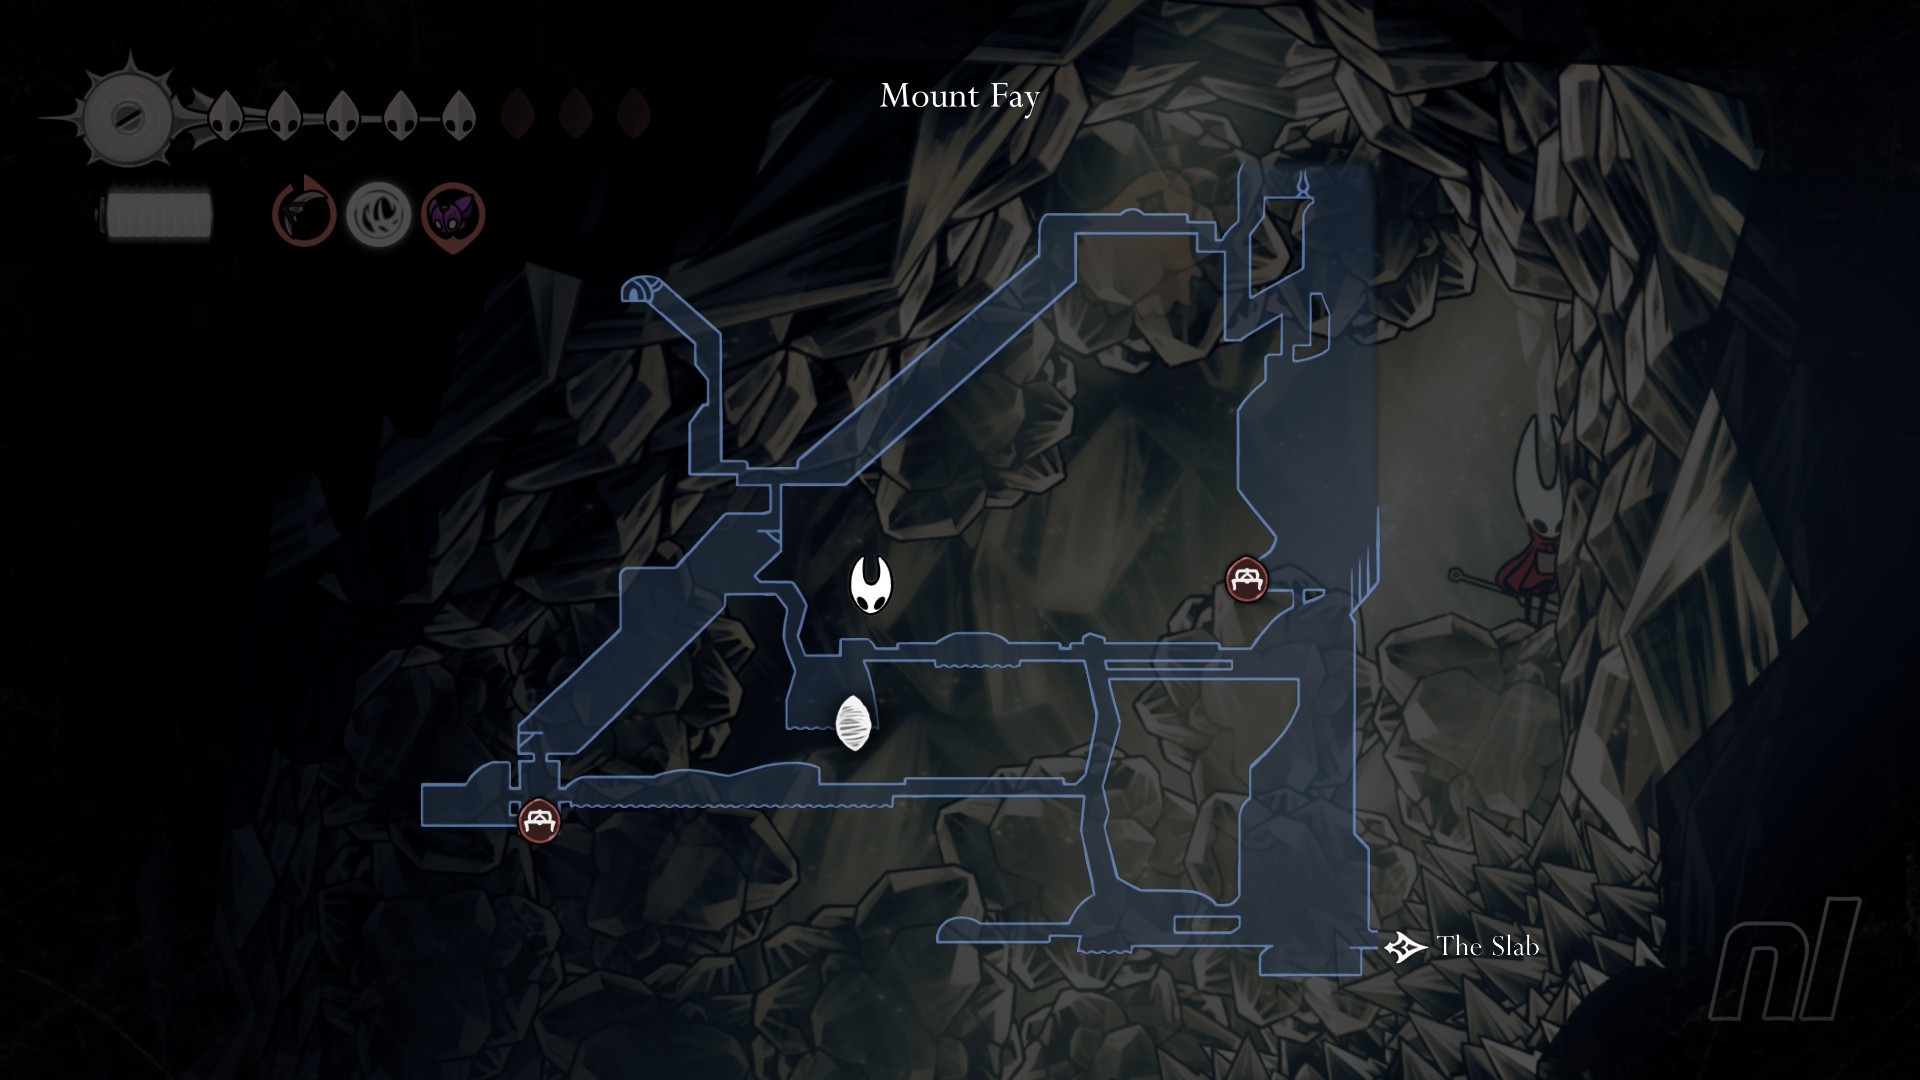
This is much easier when you have Double Jump, so go get that first at the peak of the mountain.
Then, you want to head back to the interior of the mountain — the straight section roughly in the middle of the map. Head to the large room with icy water and ice bugs and come to a flat left wall.
Use Cling Grip and double jump to hop inside a very hidden room above in the left corner. You'll see the Flea encased in ice. Break it and he's free! And probably a lot warmer...
Sands of Karak (1 Flea)
25) A Hidden Path above the sands
Once you reach the central tall room in the Sands of Karak, you'll want to head right. Hit the first root and travel across the coral seeds until you reach a second seed. Do the same here: hit it, go right, stop.
Here, you want to jump up to the platform above. Go left and then use Clawline and Swift Step to make it to a broken pillar and another root. Hit the orb and then follow the root and coral around to another pillar with spikes.
Cling Grip up, avoiding the spikes, and you'll reach the Flea.
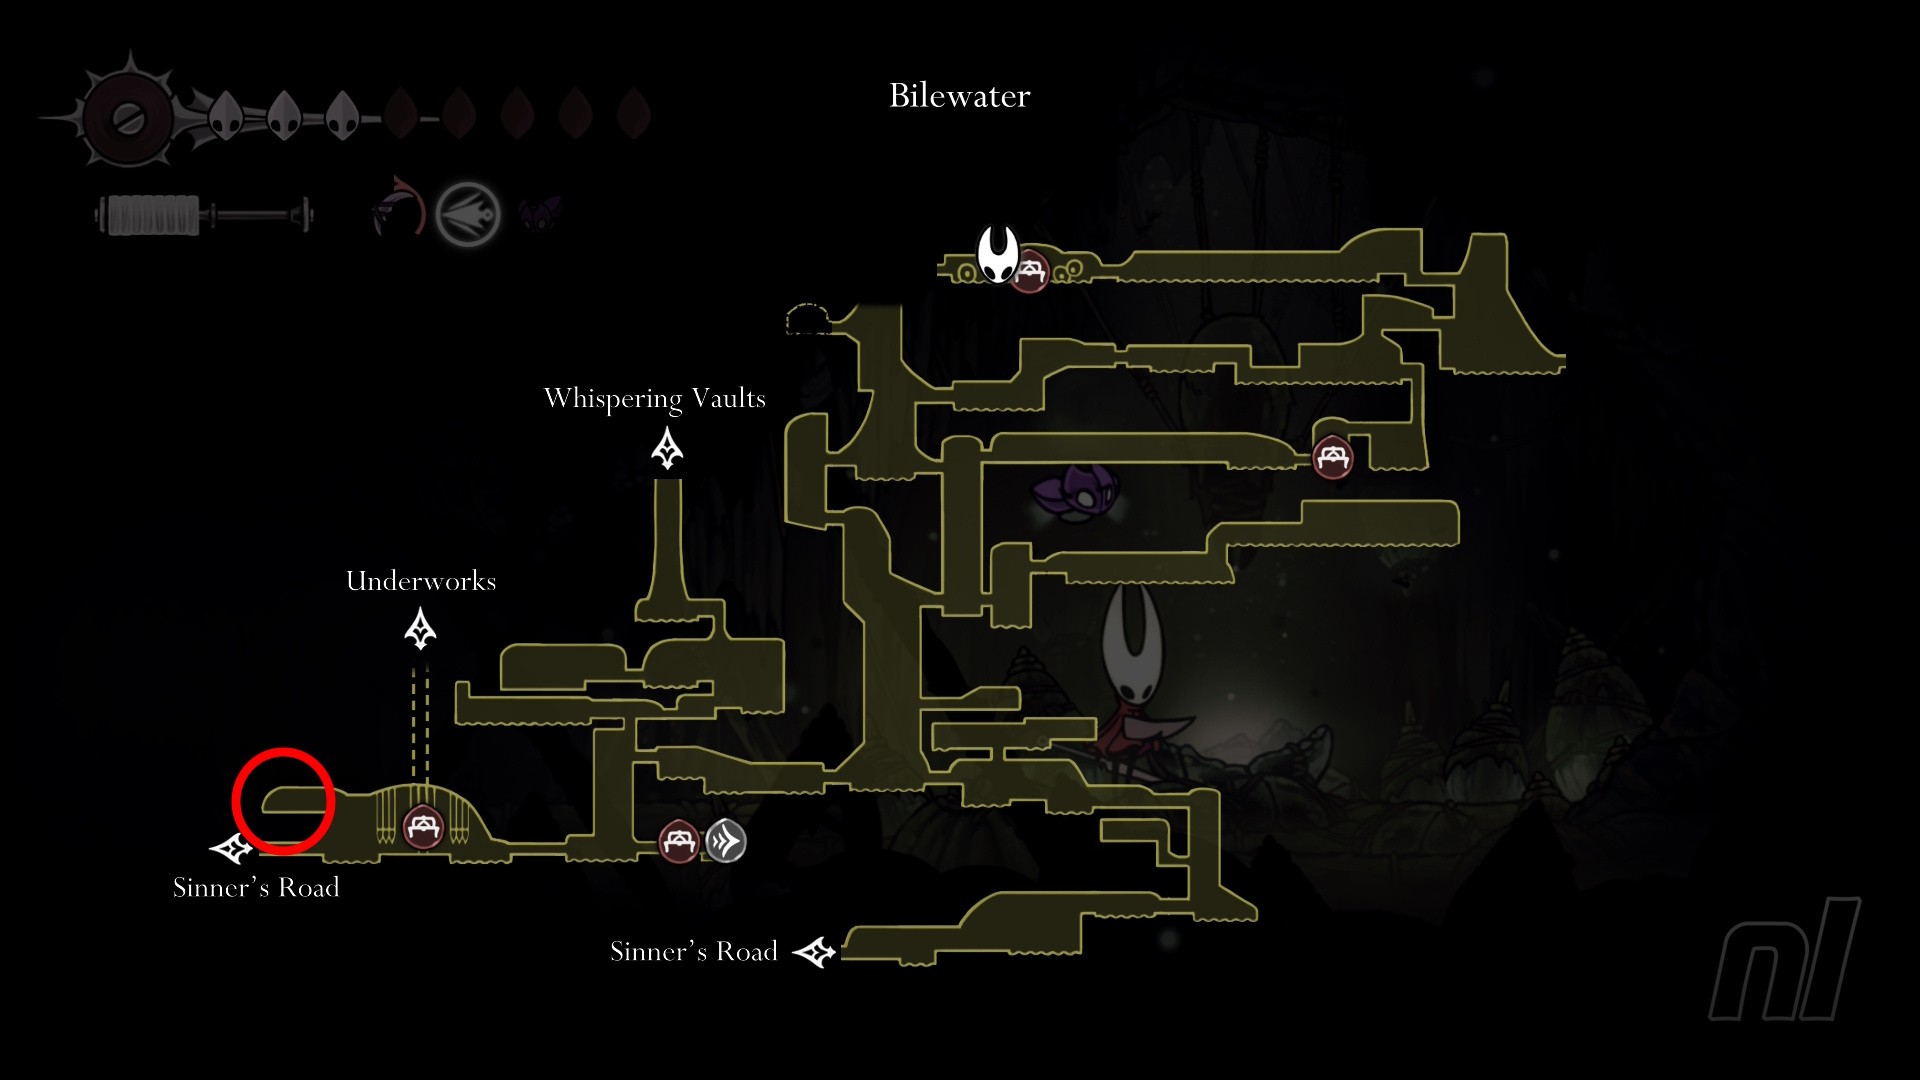
Bilewater (3 Fleas)
26) Outside the Exhaust Organ
You can get this extremely early — if you're taking the Sinner's Road route to The Citadel that is. Otherwise, you can get it either when you explore in Act 2 or when you need to come for Bilewater for the Key of the Apostate or Shakra's Maps.
Enter the Exhaust Organ and make your way through the pipes carefully, head up and left the whole time. In one of the chambers, there's a hidden room in the top-left corner that will take you to a path that leads back outside.
Here you'll be on a platform just above the entrance to the Organ; follow the platforms to the left and then hop over the spikes to find the Flea at the end of the path.
27) Captured by thieves
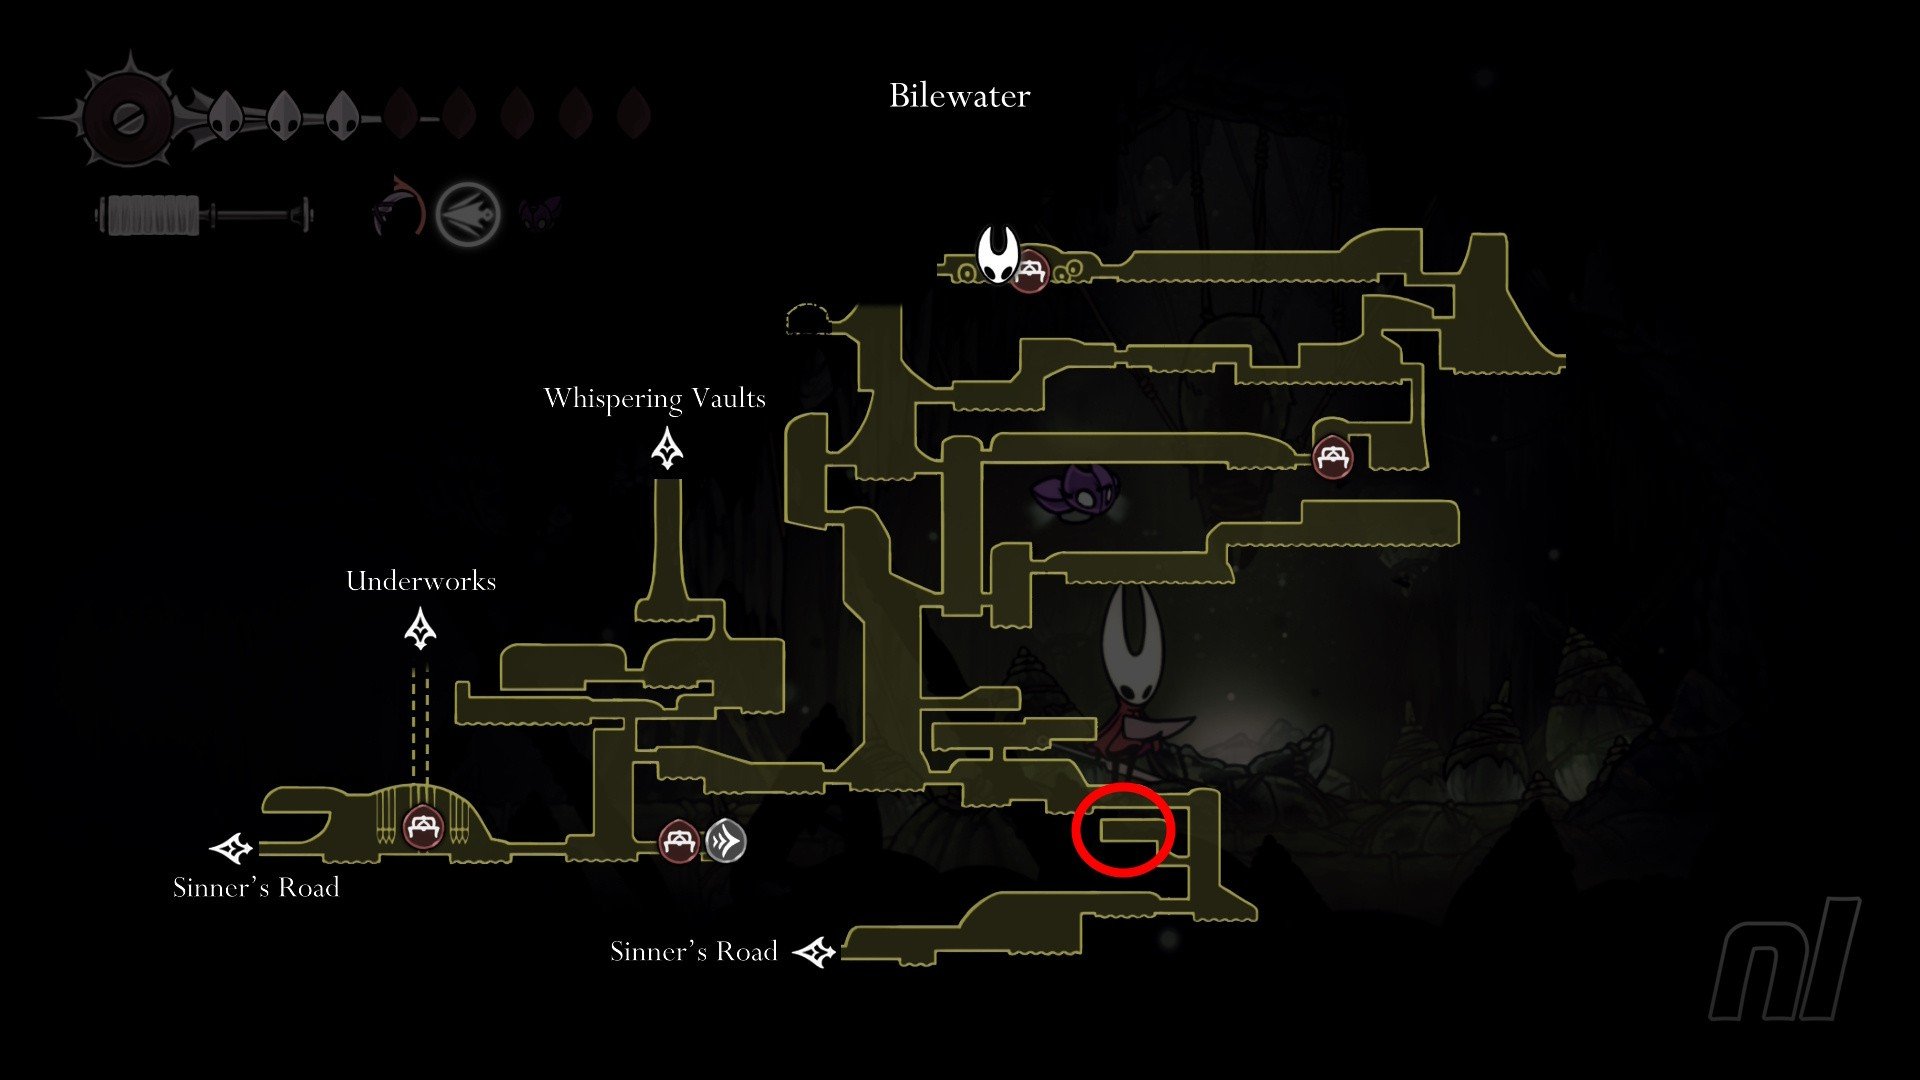
This poor little guy did nothing wrong! He's hiding behind some loot and a couple of Snitchfly enemies, who are hiding in a small room. Now, depending on how you entered Bilewater, this might take a little longer.
If coming from Sinner's Road, then all you need to do is head right through the first room (be careful of the maggot water and enemies here, they explode) and then, in the first tall room, look for an opening on the left side to find the Snitchfly hideout.
If coming from the Whispering Vaults, your path is a little longer. We recommend heading all the way to the Bellway so you have a bench — it's down four rooms from where you start, and then on the right when you reach a second tall room.
From the Bellway, hop back up the tall room and follow the path right. Keep going right for three rooms until you reach another tall room (not the huge one on the map above). Now drop down and again klook for that left nook for the room.
You'll need to kill the Snitchflies to save the Flea; they're very fast and steal your Rosaries. Not annoying at all.
28) Hiding behind traps
In the long room filled with traps and pin-throwing enemies (you know what we mean), there's a hidden room at the top where a ton of spears will emerge when you hit a button. The walls and floor are wooden so it's hard to miss.
Dodge the spears and then jump up to find a hidden pathway on the left. Then run; there are a few traps on the way to the little Flea.
Once you make it past the traps, save the Flea.
Memorium (1 Flea)
29) At the Top of the Memorium
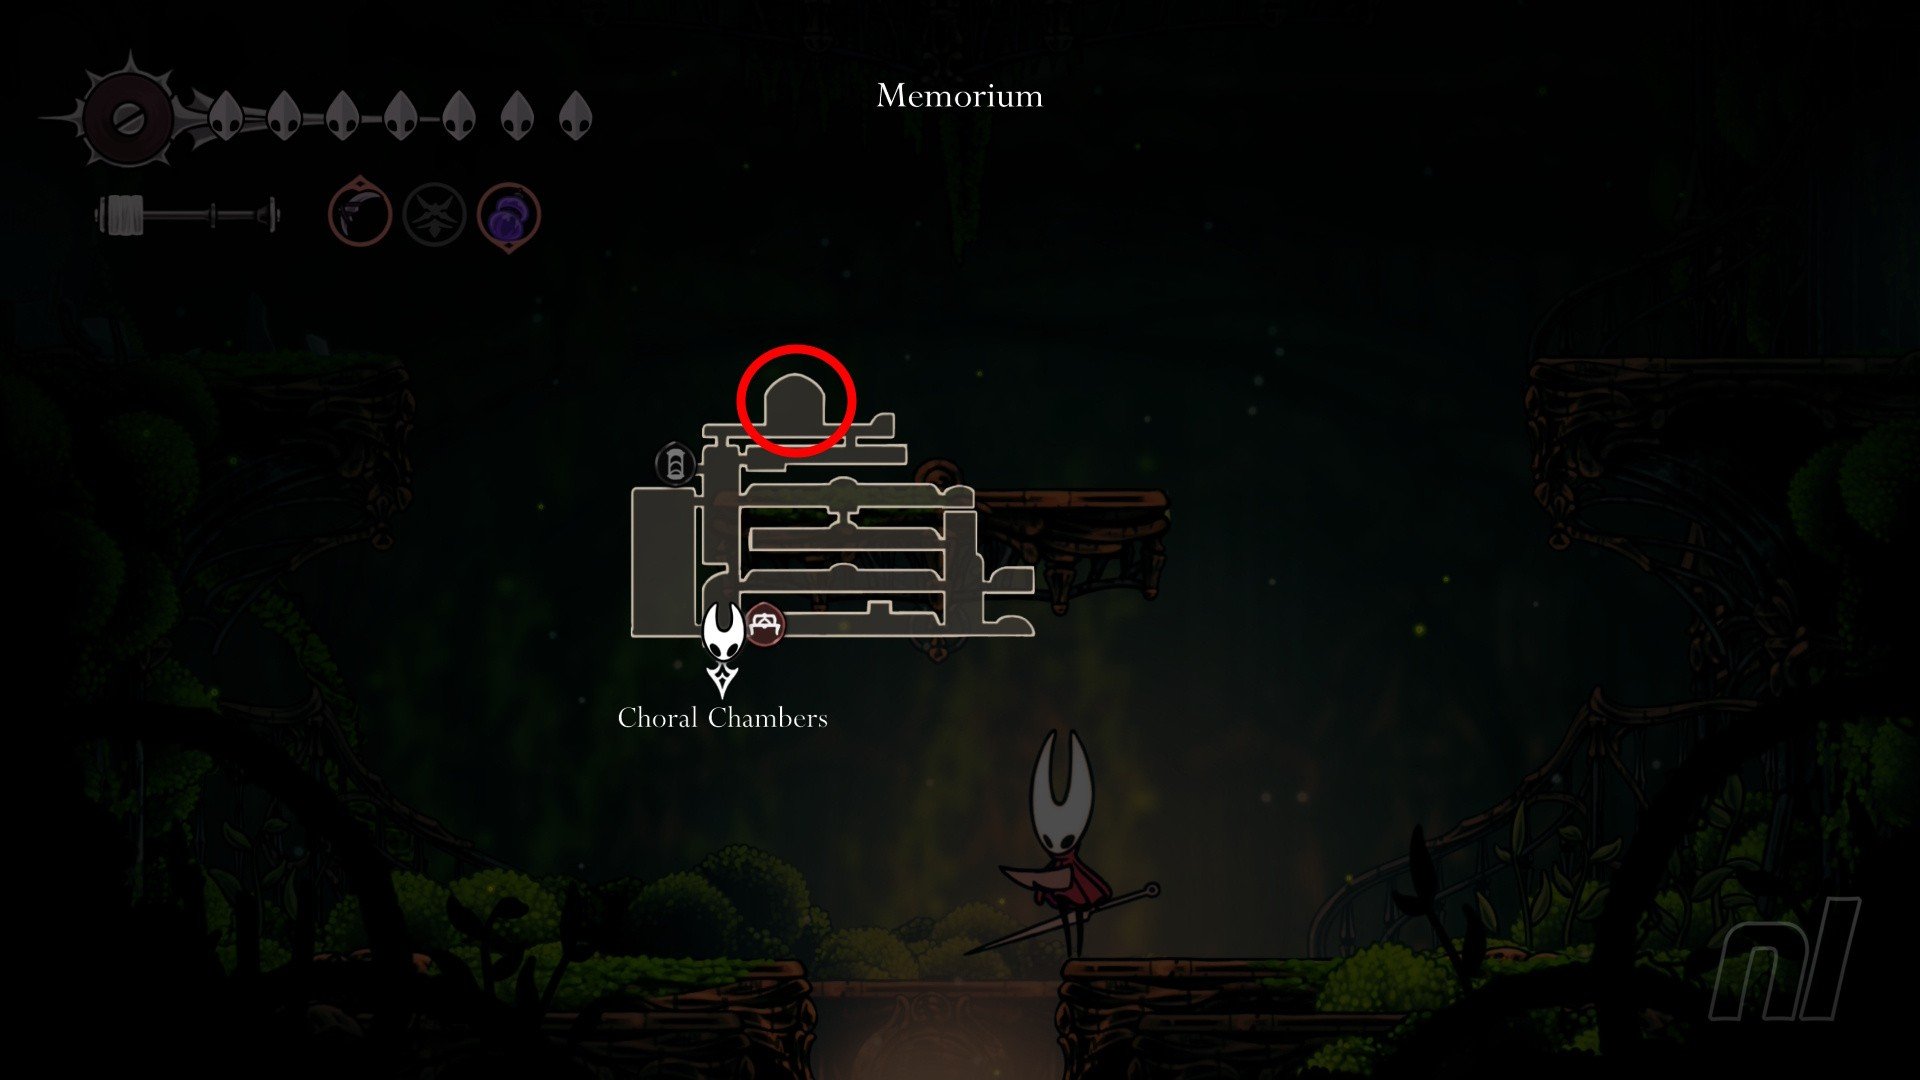
To reach this Flea, you need to explore the Memorium in its entirety until to you notice you can't go any further up from the left side.
Go right and make your way through an electrified room, thenhead up through a vent when you spot it. Continue left towards the top and you'll see a room with a gigantic caged Flea. Make sure you're healed up as when you free it, it will fight back.
This is actually pretty easy, as you can bait the Flea by going underneath the bit platform. It's too big to fit under there so it will try and attack from above with no luck. Swipe up until it calms down and flies off.
Putrified Ducts (1 Flea)
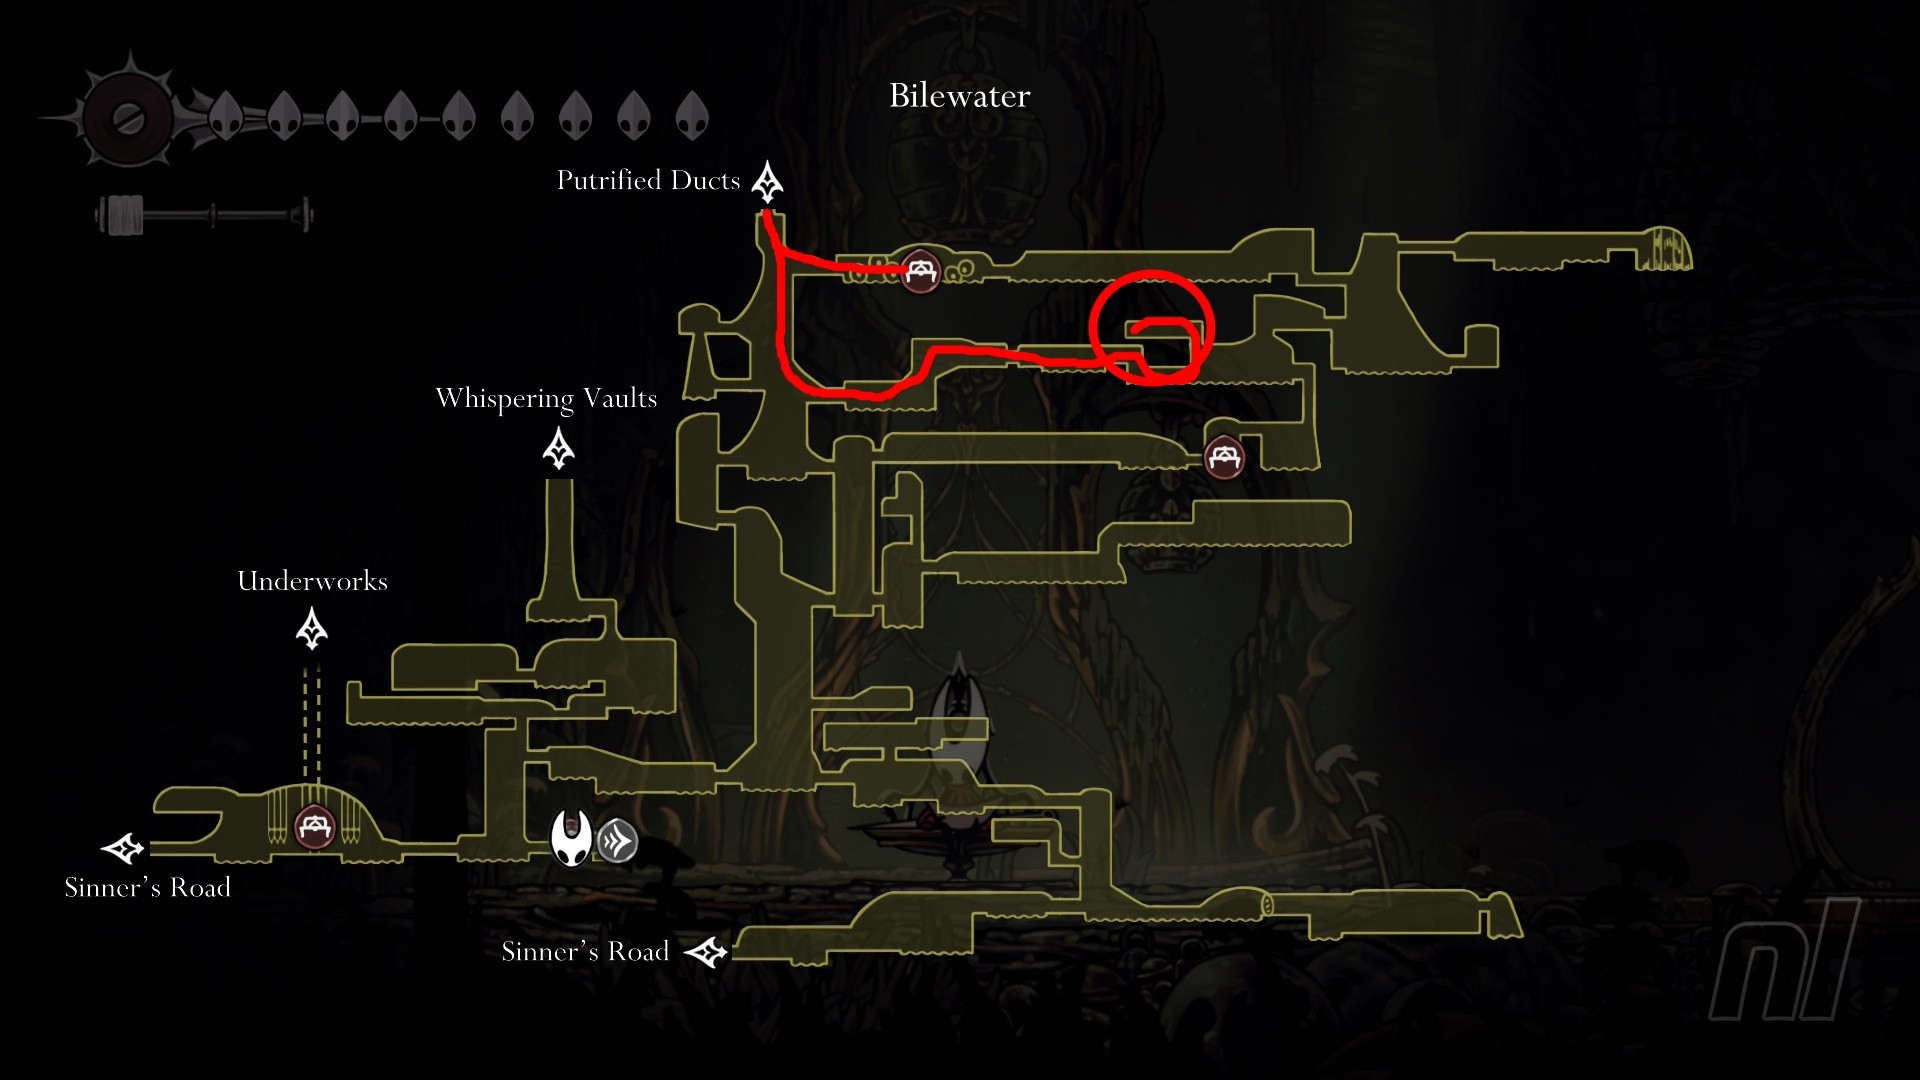
30) Camping at the top of the vine plant path

Vog is a very useful Flea to get, but they're seemingly pretty content with staying near their home. You can sway them pretty easily, but it involves getting caught by plants and dragged up through some spike-ridden paths.
We've drawn out a rough path on how to get to Vog, going from the Huntress' house. It's also a pretty easy bench to run from if you happen to die.
When you speak to Vog at the Caravan, they will tell you the location of any missing Fleas you haven't found yet. You'll have to give them Rosaries, though.
The Lost Fleas Quest
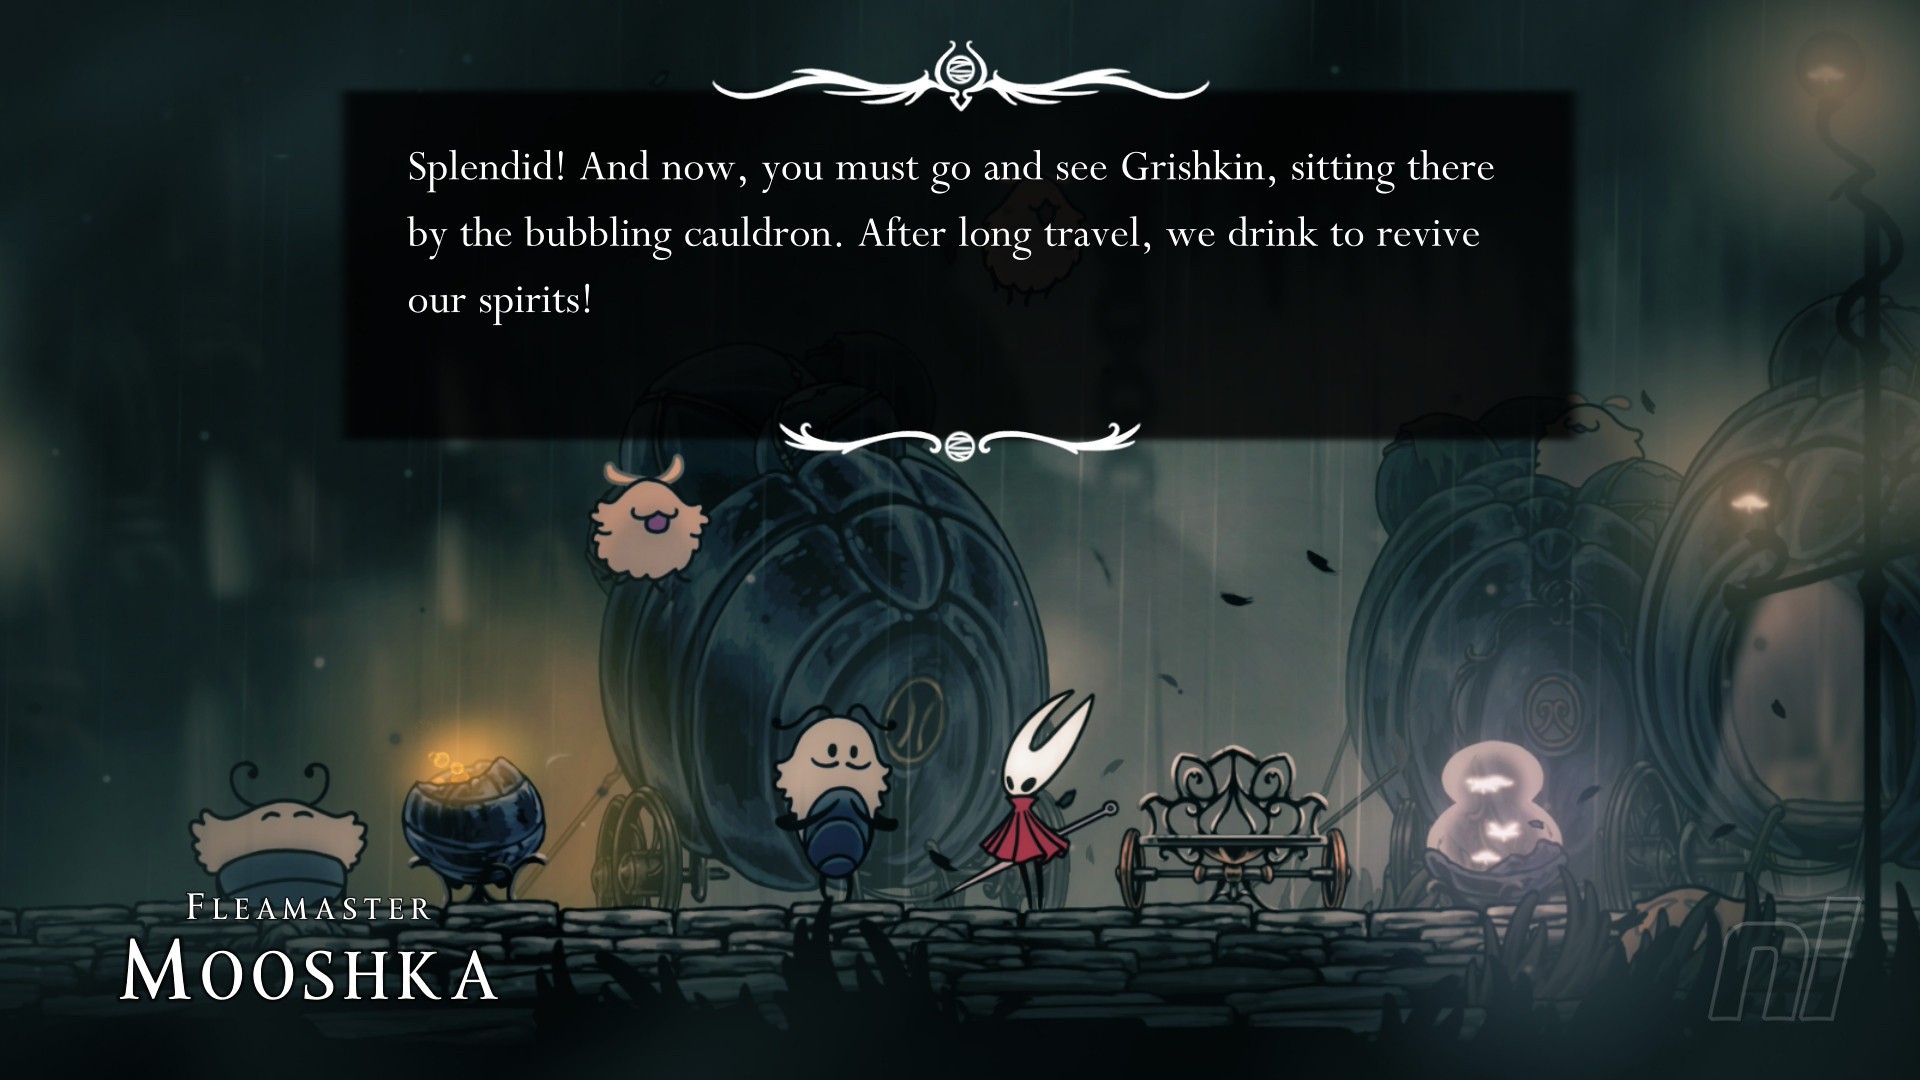
The first time you come across the Flea Caravan will be in The Marrow, on the far east side.
Speak to Mooshka, the moustachioed tall flea at the front of the group, and he'll ask you to keep an eye out for any missing Fleas. You'll then get The Lost Fleas Wish, a quest to find five missing Fleas across Pharloom.
Once you've found five (or more) Fleas, return to the caravan in The Marrow and speek to Mooshka. He'll thank you and tell Hornet that he plans to move the Caravan. Accept his offer to travel with him and you'll be taken to Greymoor, where the Moorwing boss is situated.
(Note: If you complete this quest before defeating Moorwing, you can skip the boss until Act 2.)
The Lost Fleas reward
Finding five Fleas will reward you with the Flea Brew Tool, an extremely good piece of equipment that doesn't use any Shards, but you can refill at the Caravan for a small Rosary cost.
What do you get for finding every Flea?
Mooshka will give you a few rewards as you collect all the fleas. Not many, but some! And a couple of Fleas also bring their services to the Caravan, making it a nice little hub for you to nip back to.
- 5 Fleas - Flea Brew, cauldron
- Kratt - Hot Springs (10 Rosaries per use)
- 15 (?) Fleas - Spool Fragment
- Vog - Marks location of missing Fleas on map (Price varies)
- 25 Fleas - Tool Pouch
- 30 Fleas - Egg of Fleelia Tool
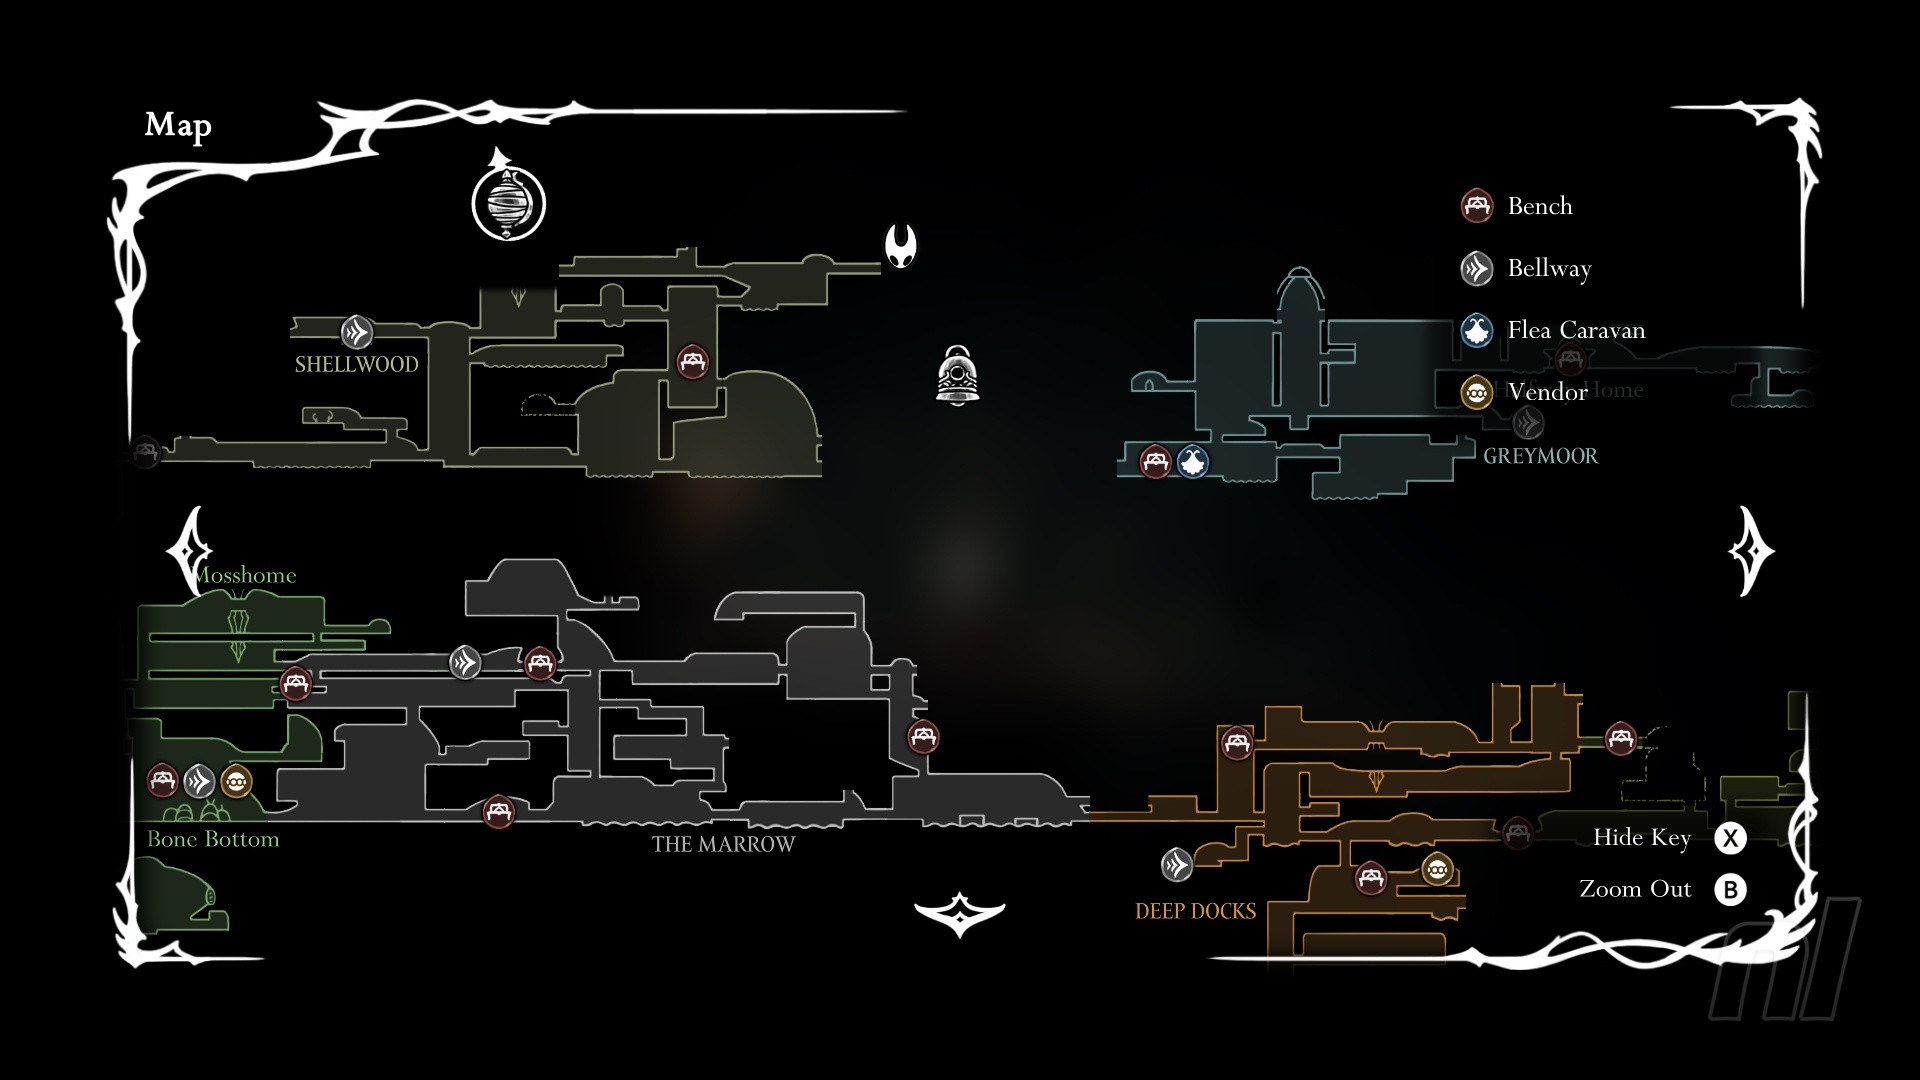
Flea Caravan Locations
The Flea Caravan will move around as you progress through the game. They won't move unless you talk to Mooshka, and you'll always be offered a ride, too. That's nice!
Here's where the caravan will move to the more Fleas you save.
- The Marrow - on the east side of the map.
- Greymoor - the west side, right before the Bellhart area and where Moorwing is fought
Move after completing The Lost Fleas quest - Blasted Steps - right at the Grand Gate entrance, where you fought The Last Judge
They'll move here once you've rescued 15 Fleas - Putrified Ducts, Blue Lake - the far east side of the Ducts, where the clean water is
The Flea Caravan will settle here after finding 25 Fleas
Awoooo! That's every single Lost Flea, found. If you need more help hunting things down, we have a range of Hollow Knight: Silksong walkthroughs for you to enjoy and use, so make sure you check them out.