If you need to upgrade Hornet's health in Silksong, then you'll want to gather as many Mask Shards as you can.
You'll need four of these to boost your health by one mask, and some of them are tricky to find. This guide will show you where to find every Mask Shard in Hollow Knight: Silksong.
Subscribe to Nintendo Life on YouTube834k
All 20 Mask Shard Locations in Silksong
There are 20 Mask Shards to find in Silksong, taking Hornet's total health up to 10 Masks (without the aid of the Plasmium Phial, of course).
Note that you can only get 16 of the 20 up until Act 2. The final four shards are exclusive to Act 3.
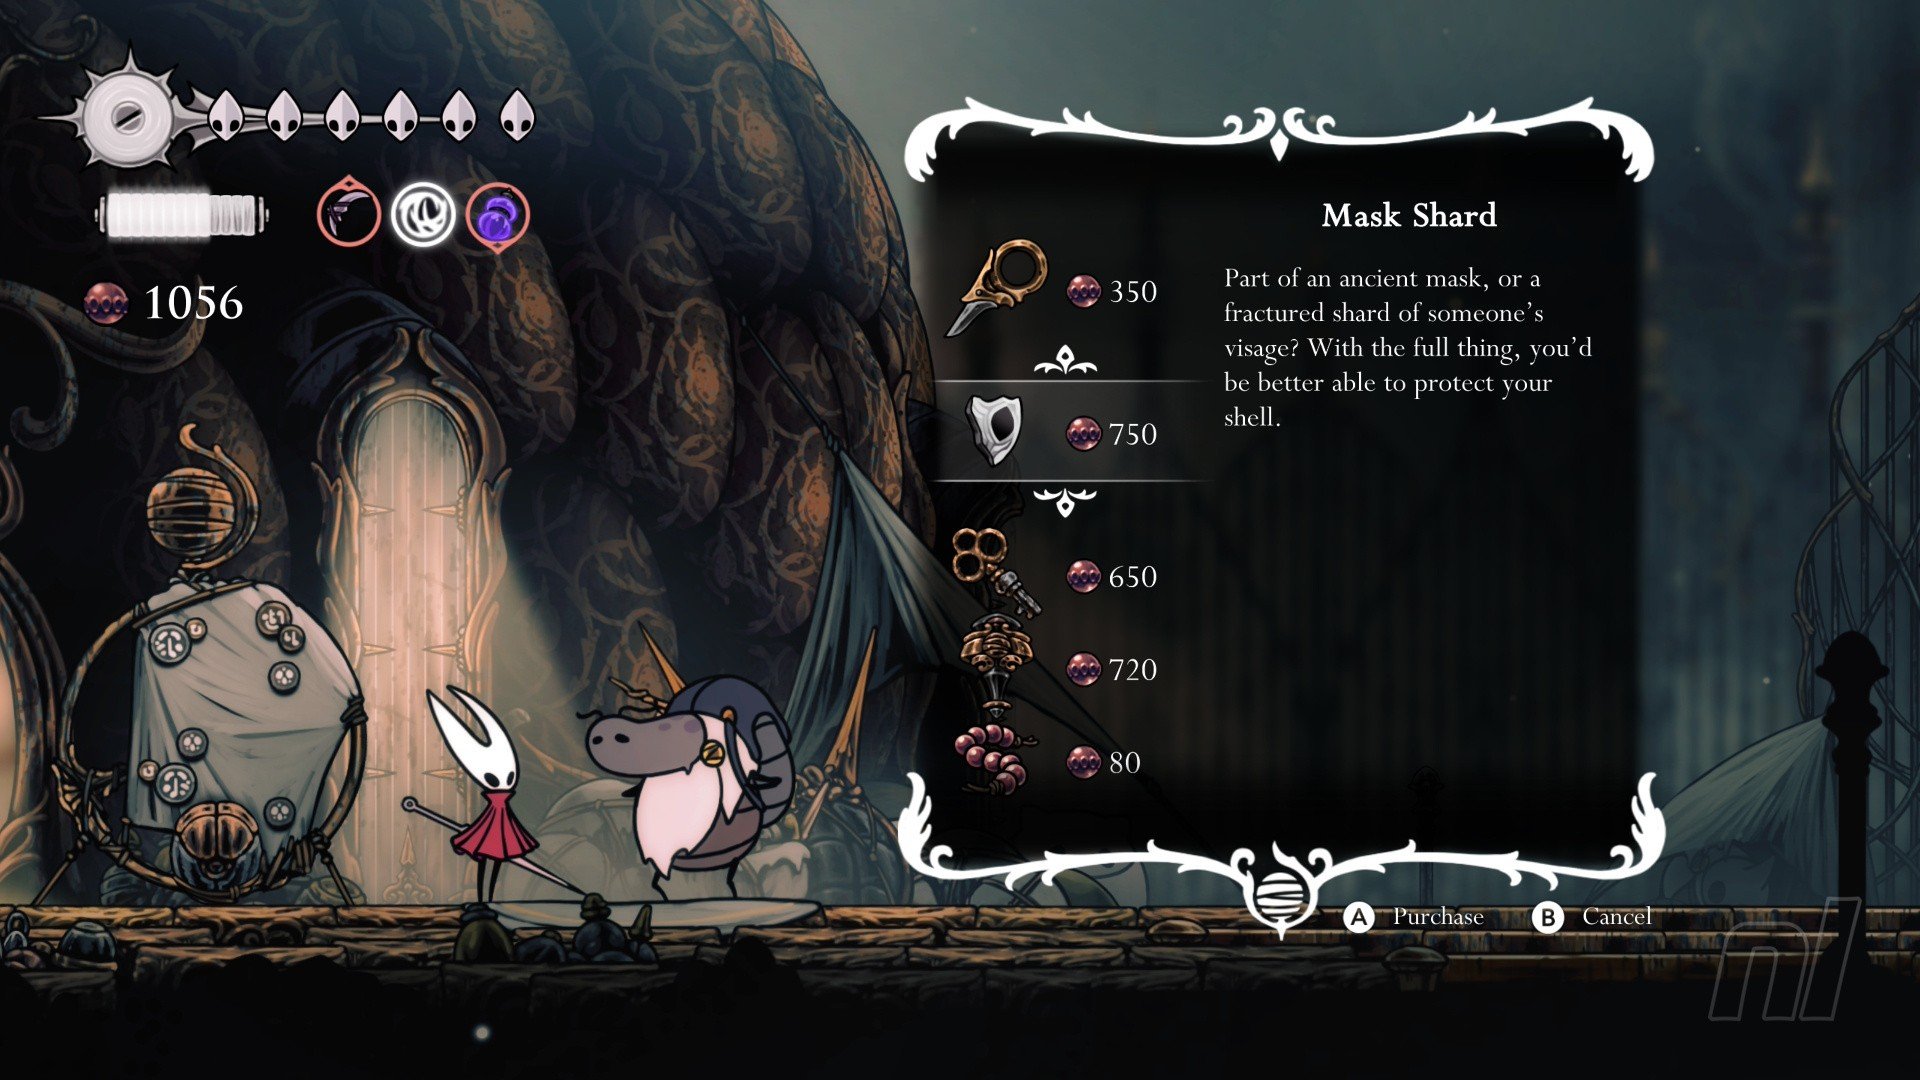
Shard 1 - Bone Bottom Shop
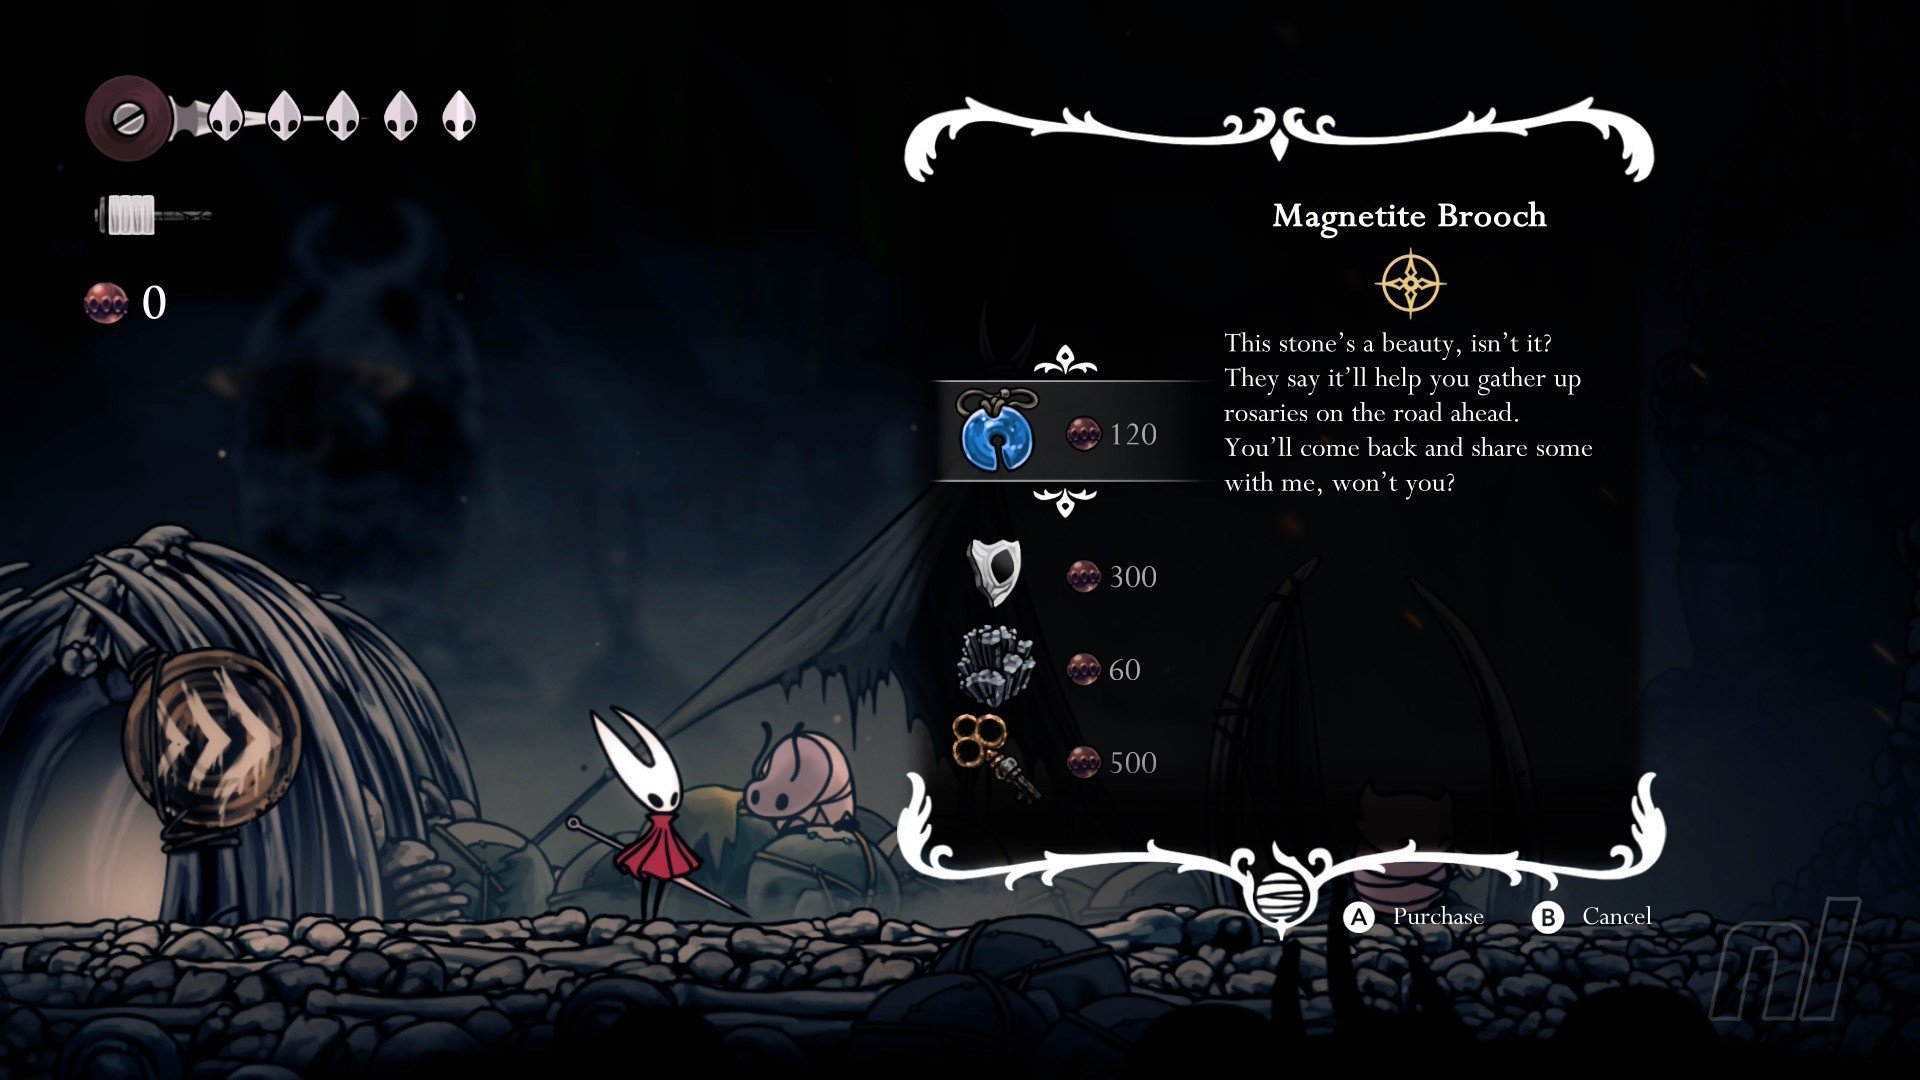
You can purchase a Mask Shard from the shop in Bone Bottom for a rather pricey 300 Rosaries.
Shard 2 - Far Fields, above the Seamstress
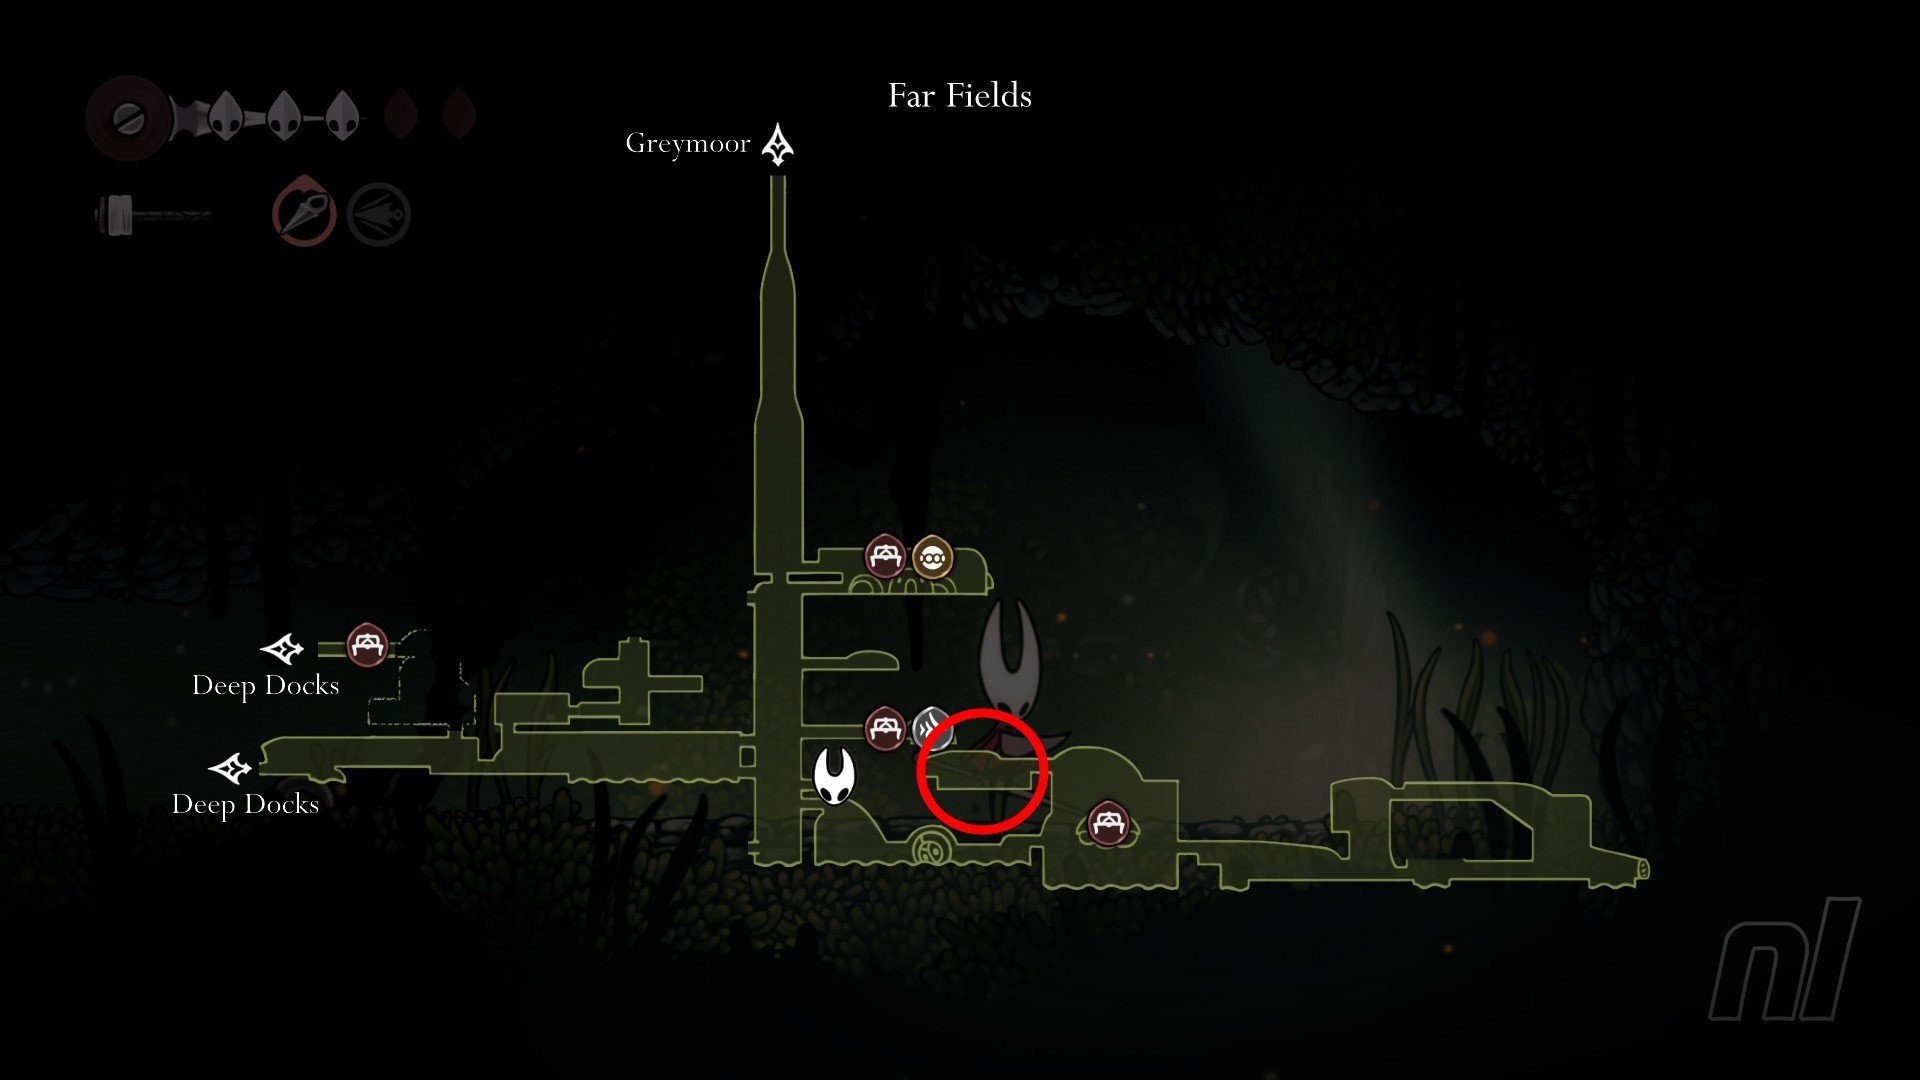
You'll need the Drifter's Cloak for this one, which you get by completing the Seamstress' quest. The location is marked on the map above with a red circle.
One you have this, use your new cloak to glide to the very top of the room where the Seamstress is located. You'll need to blow some holes in some platforms using the explosive ground to get all the way to the upper left corner of the room.
Then, in this next room, complete the puzzle and blow a hole in the ground by dropping the hot coal from the ceiling to reveal the shard.
Shard 3 - Wormways, hidden pool room
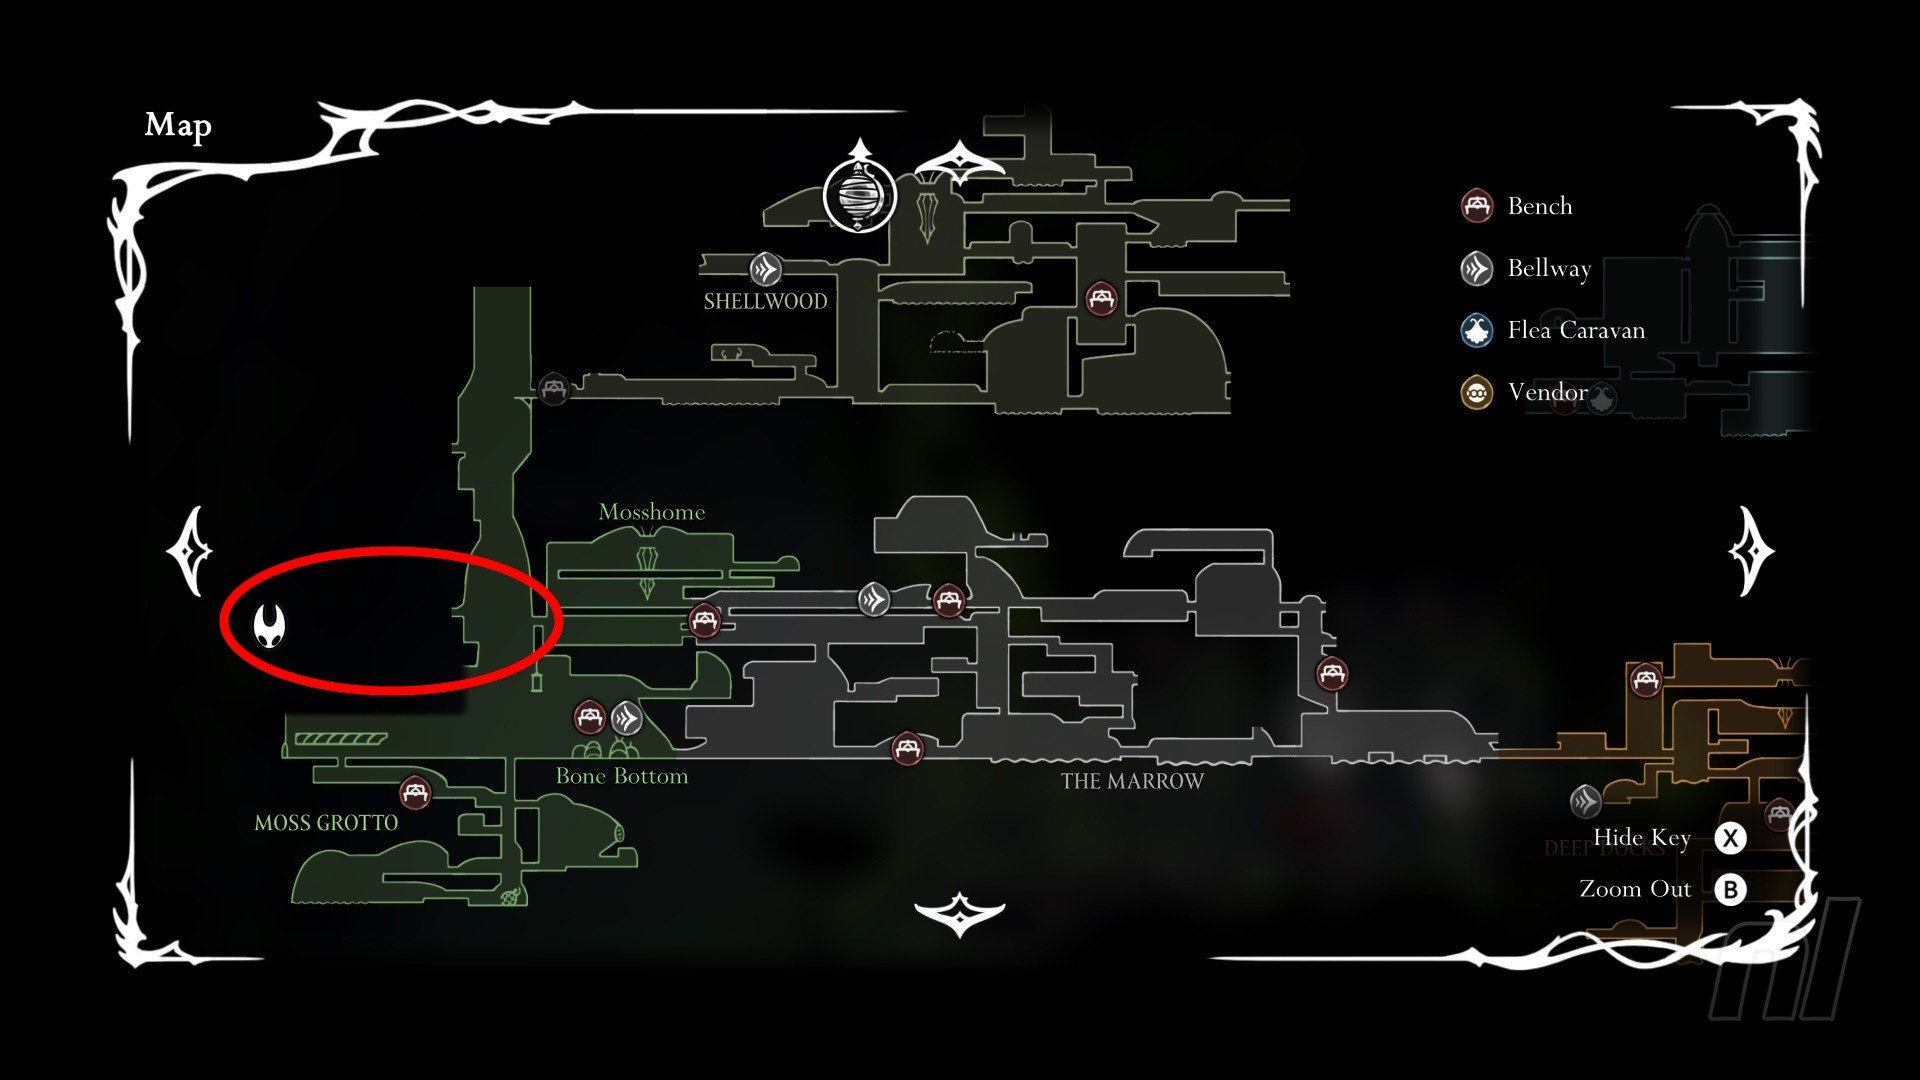
You can access this shard as soon as you have Swift Step, but it's easy to miss! West of Mosshome, you can jump across some abandoned lifts to reach the entrance to a new area, which is part of the Wormways map.
In this room, start dashing immediately as a huge beast will chase you from the ceiling and drop acid. You can wait under the platforms if you need to too.
Jump at the end and go through the door to reach a tall room. Drop down to land in a pool and attack the wall on your right for a hidden room.
Shard 4 - Shellwood, in a hidden room
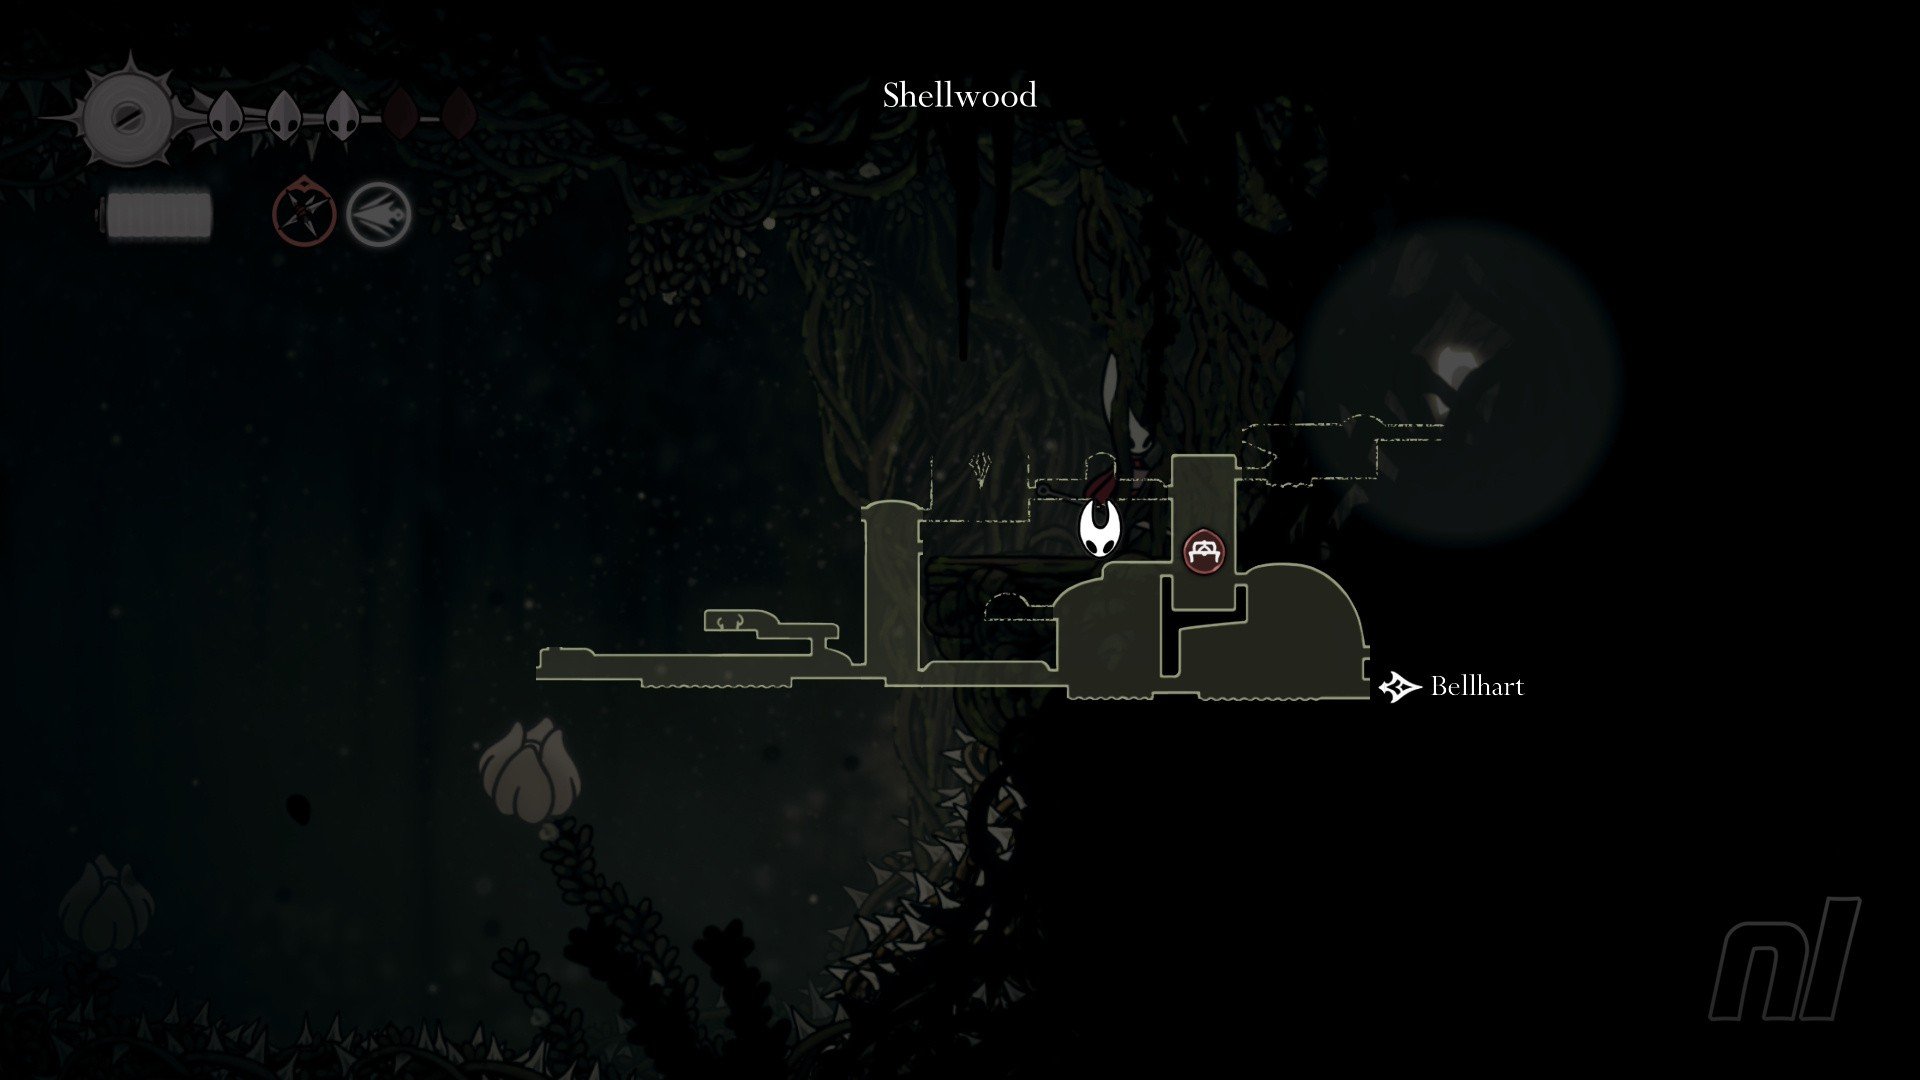
In Shellwood, in the tall room where you can find Shakra and a Flea.
You want to jump to the upper right side of the room where there's a breakable wall. Break it, then make your way through the jumping puzzle to find a mask fragment buried in the room.
Be careful on your way back, as enemies will spawn!
Shard 5 - Deep Docks, combat trial
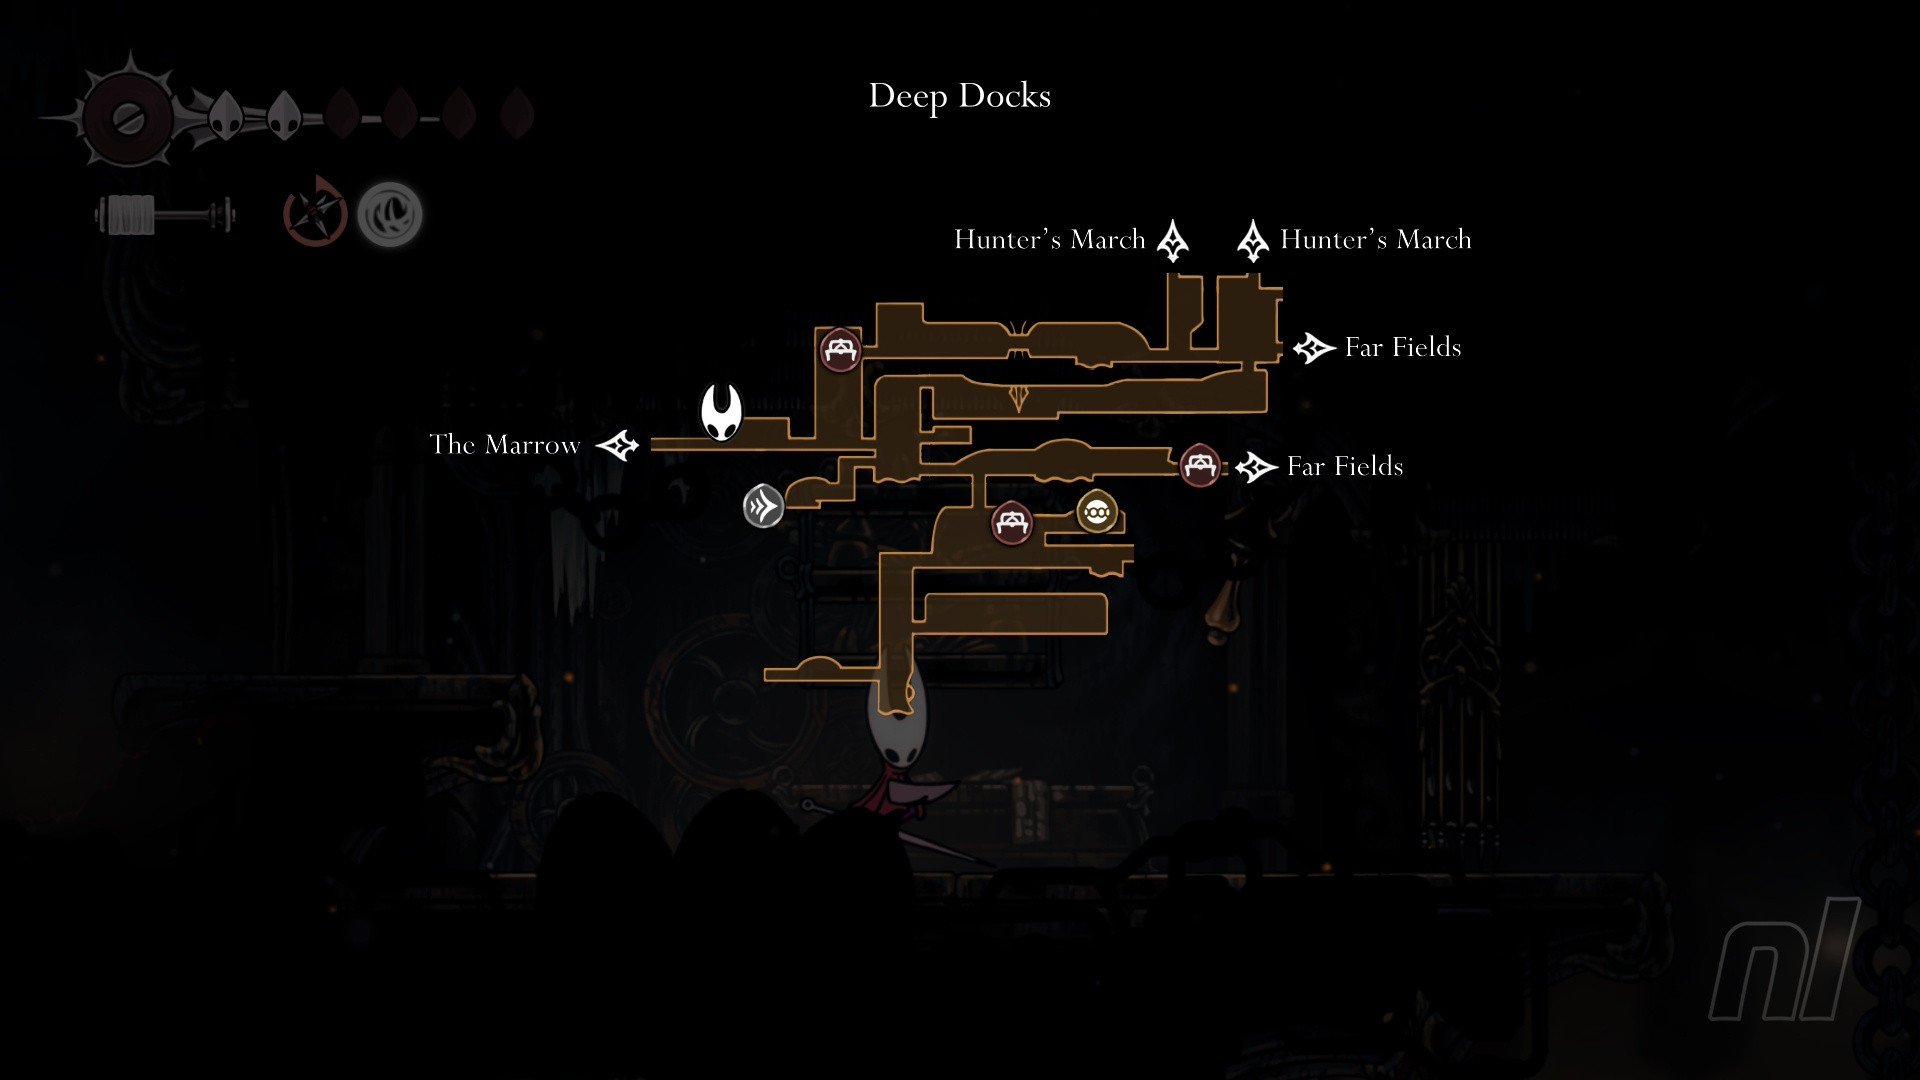
In Deep Docks, you'll see a Mask Shard hiding behind a locked door. You can't open it from this side, but you can get to it from The Marrow. So head there and then, using drift and wall climbing, make your way to the top right of the areas (below the hole that takes you to Hunter's March).
Go through the door here and you'll be locked in a room. You'll need to fight four waves of enemies — this is a lot easier than some of the trials you've likely already faced!
Defeat them, then head right for your Mask Shard.
Shard 6 - Weavenest Atla, lava room
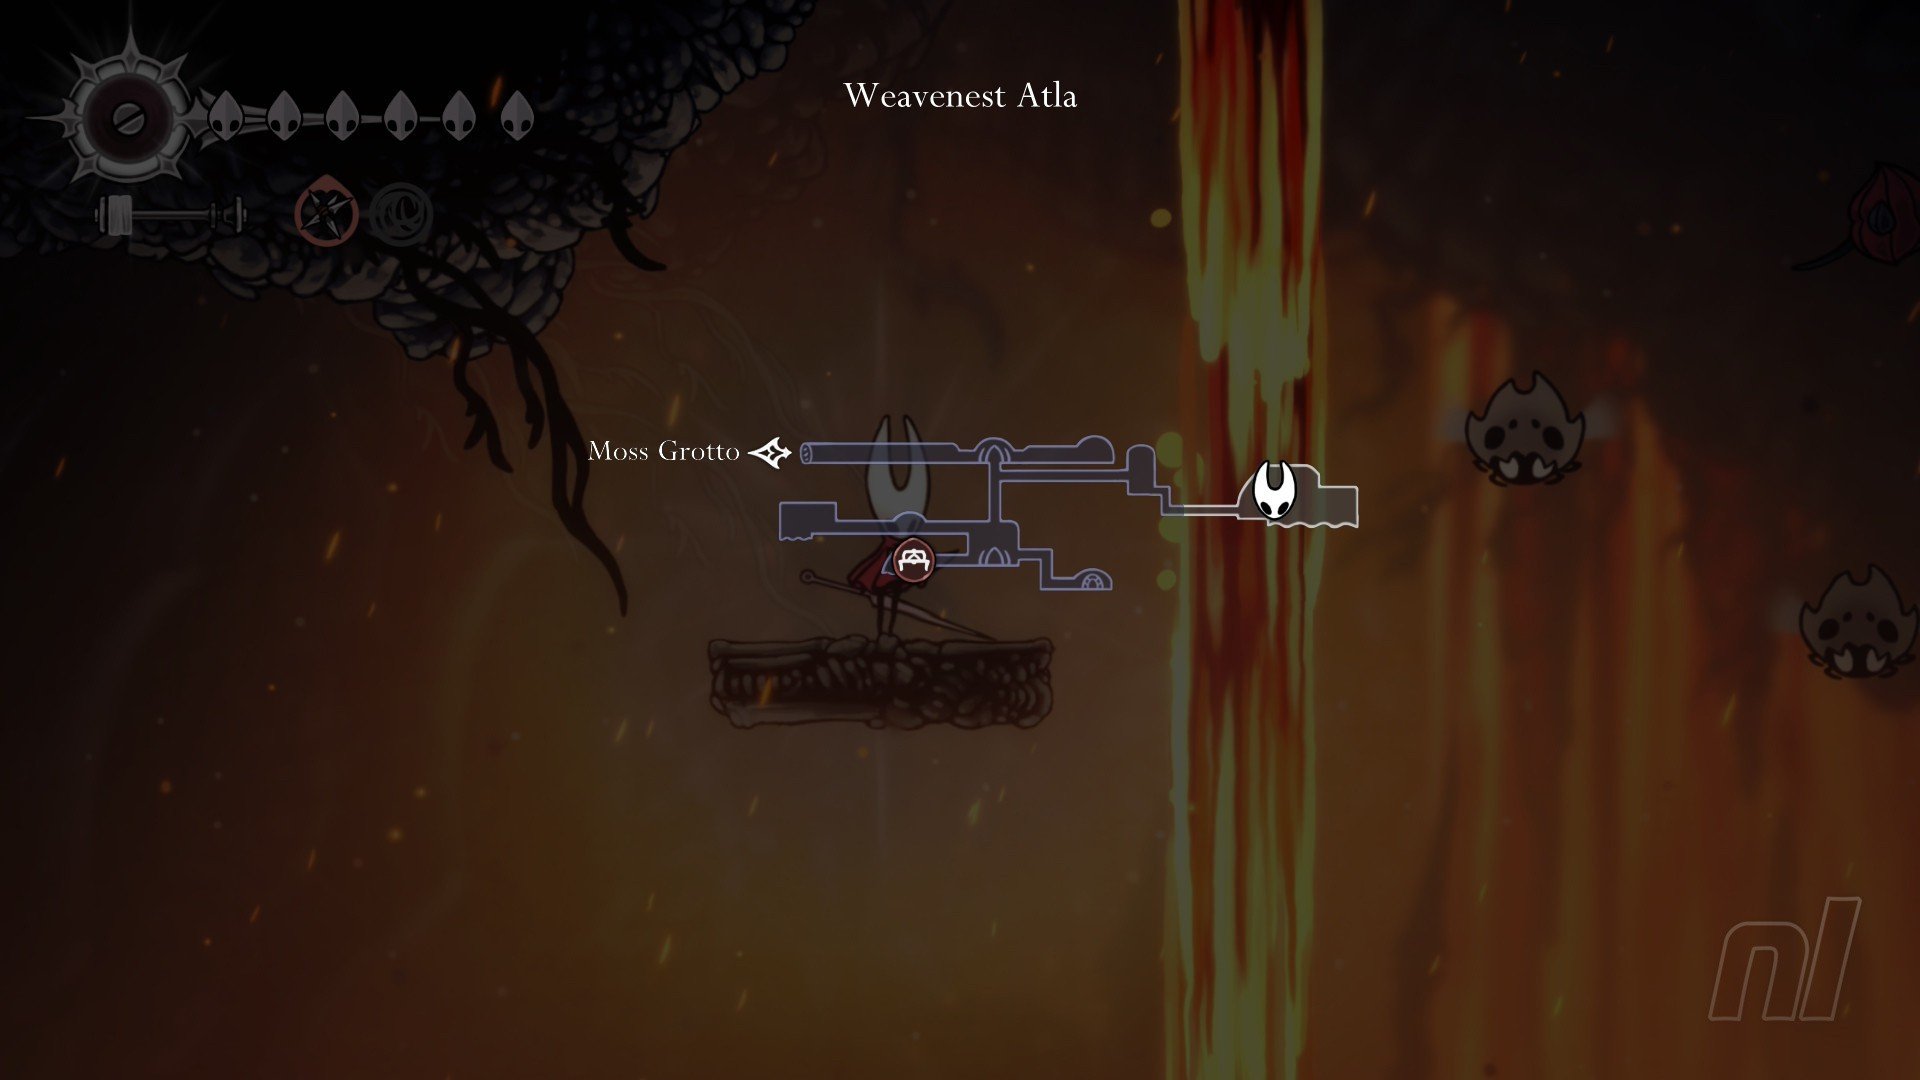
In the Weavenest Atla, east of Moss Grotto, at the bottom of the light elevator shaft you want to climb up and go through a door on the right. Follow the path until you reach a room full of lava — you'll know you're then when you get scratched to death by a spider in the ceiling. Yes, not scary at all.
Anyway, you need to complete a lava jumping puzzle, so make sure you're adept ad using Hornet's downward slash. When you reach the bugs, head to the wall on the right and pogo to the left, avoiding the lava stream, to reach the shard.
Shard 7 - Cogwork Core, left path
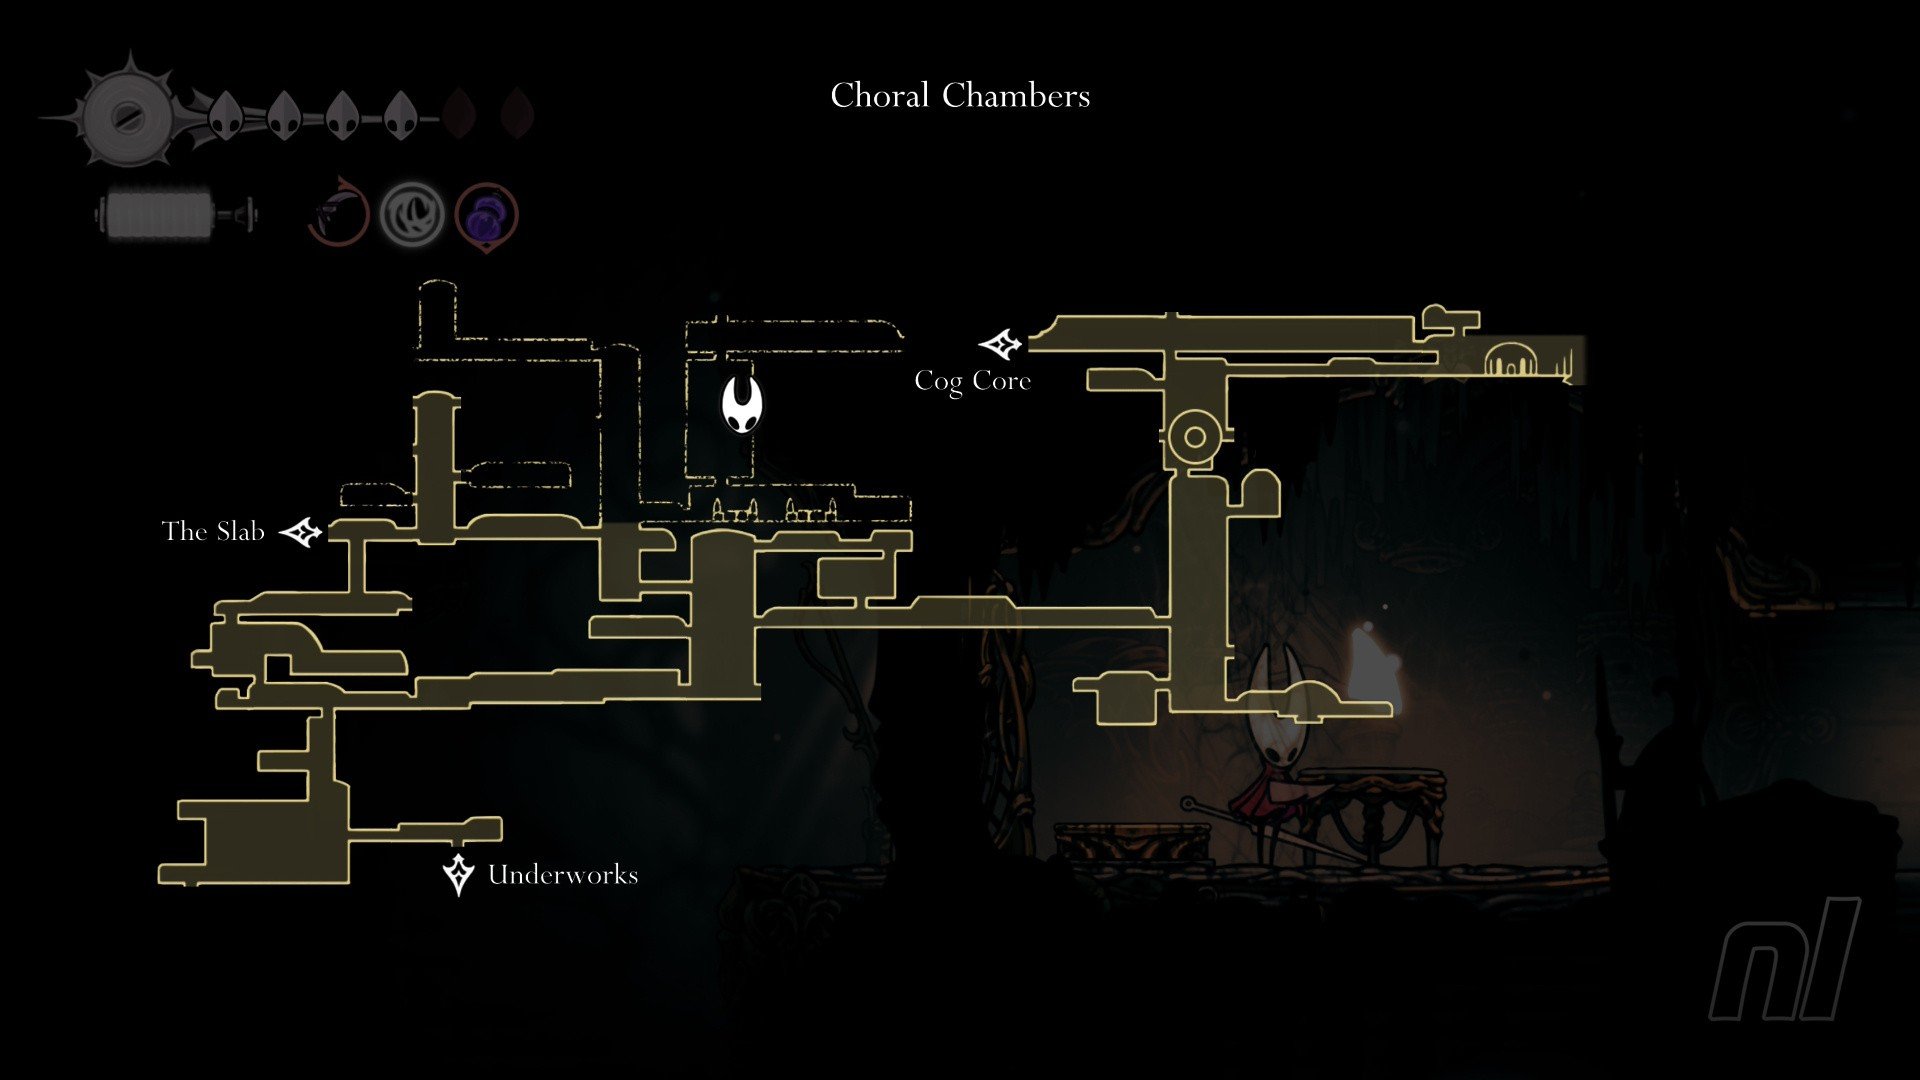
After you rest at the bench on the bottom half of Cogwork Core (the area you drop down into after the Cogwork Dancers boss), drop down on the left side carefully until you see an opening. Follow the path along here and eventually you'll reach the outside of a tall room in the Choral Chambers, and a Mask Shard
Shard 8 - Choral Chambers, Songclave Shop
Complete The Wandering Merchant Quest, then return to Songclave, and the new Merchant will sell you a Mask Shard for 750 Rosaries.
Shard 9 - Whispering Vaults, hidden block
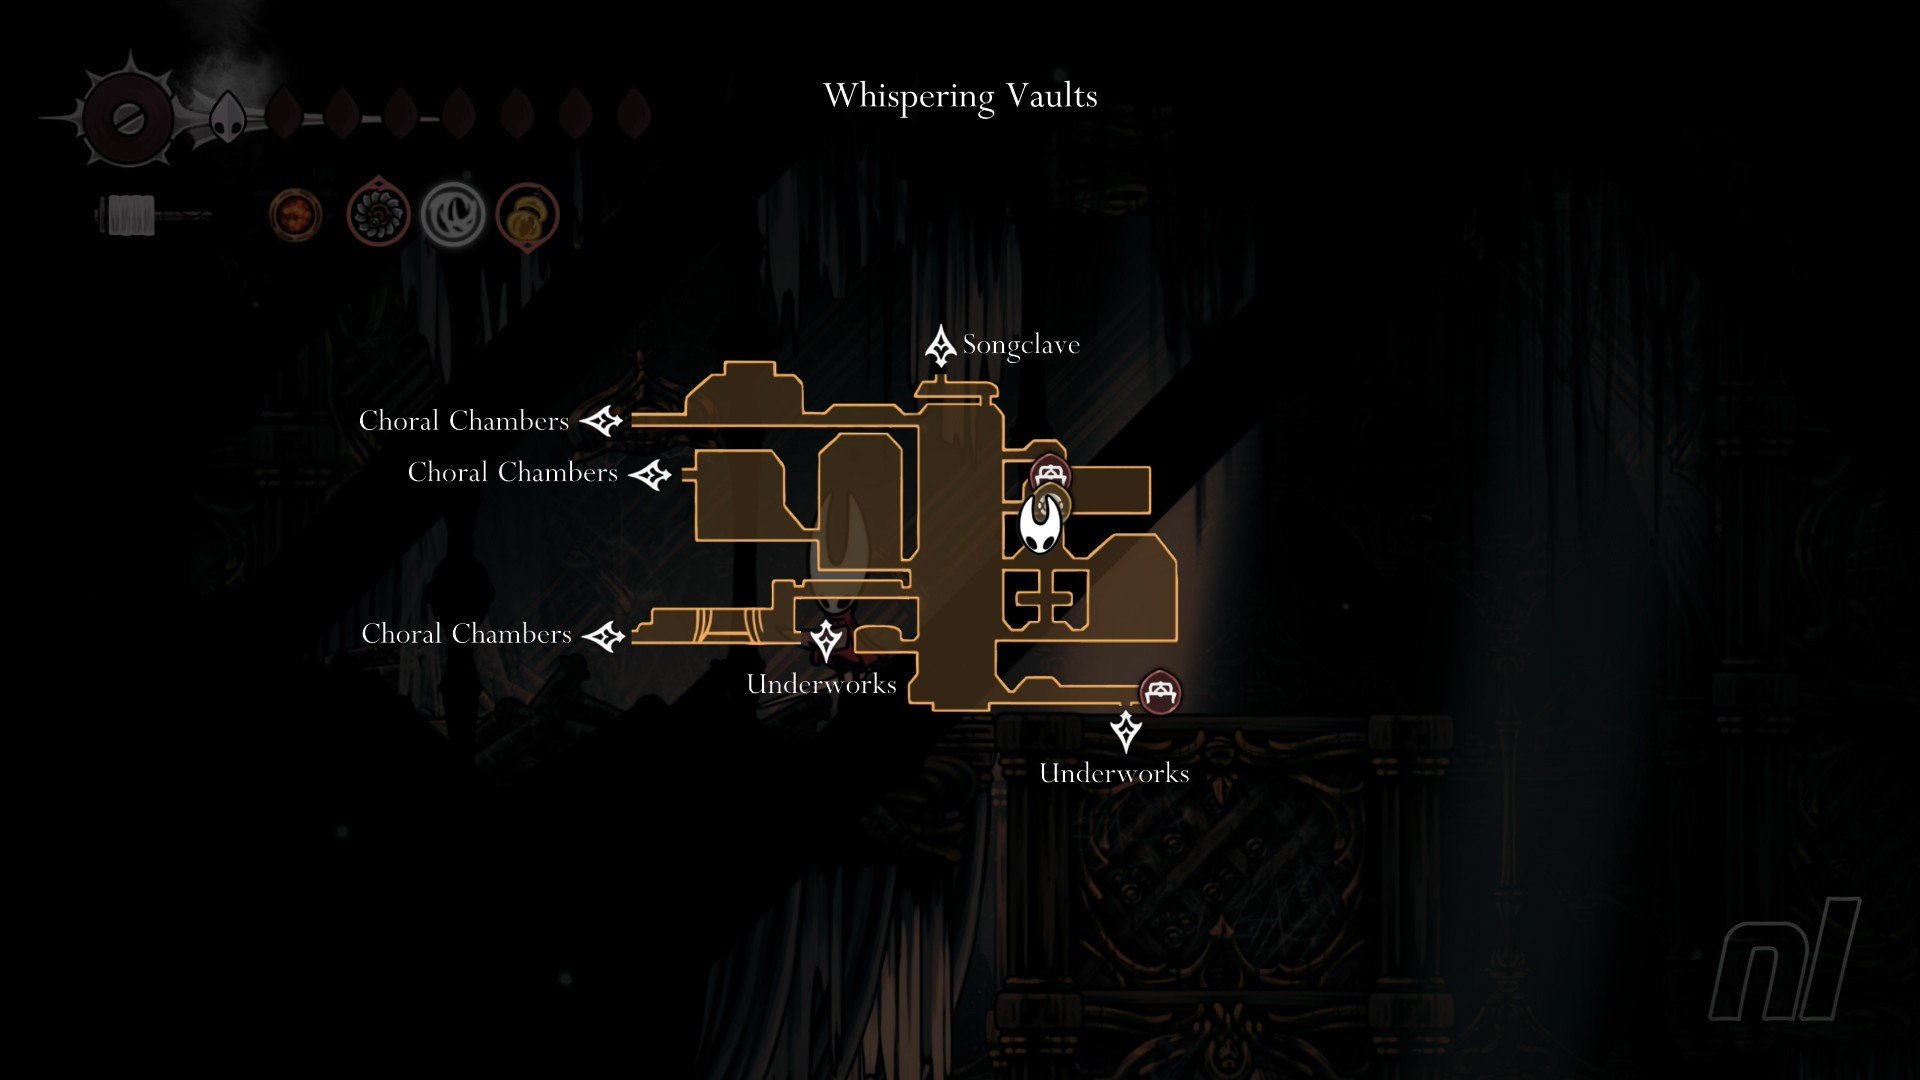
In the Vaults, you'll come to a short corridor (third door down on the right, below the Bench room) that seems empty. However, follow the path into the next room and drop all the way down, then head left into another corridor.
About halfway, jump and slash you needle upwards and you'll push a hidden block upwards. Climb the new shaft and the block and you'll reach the Mask Shard.
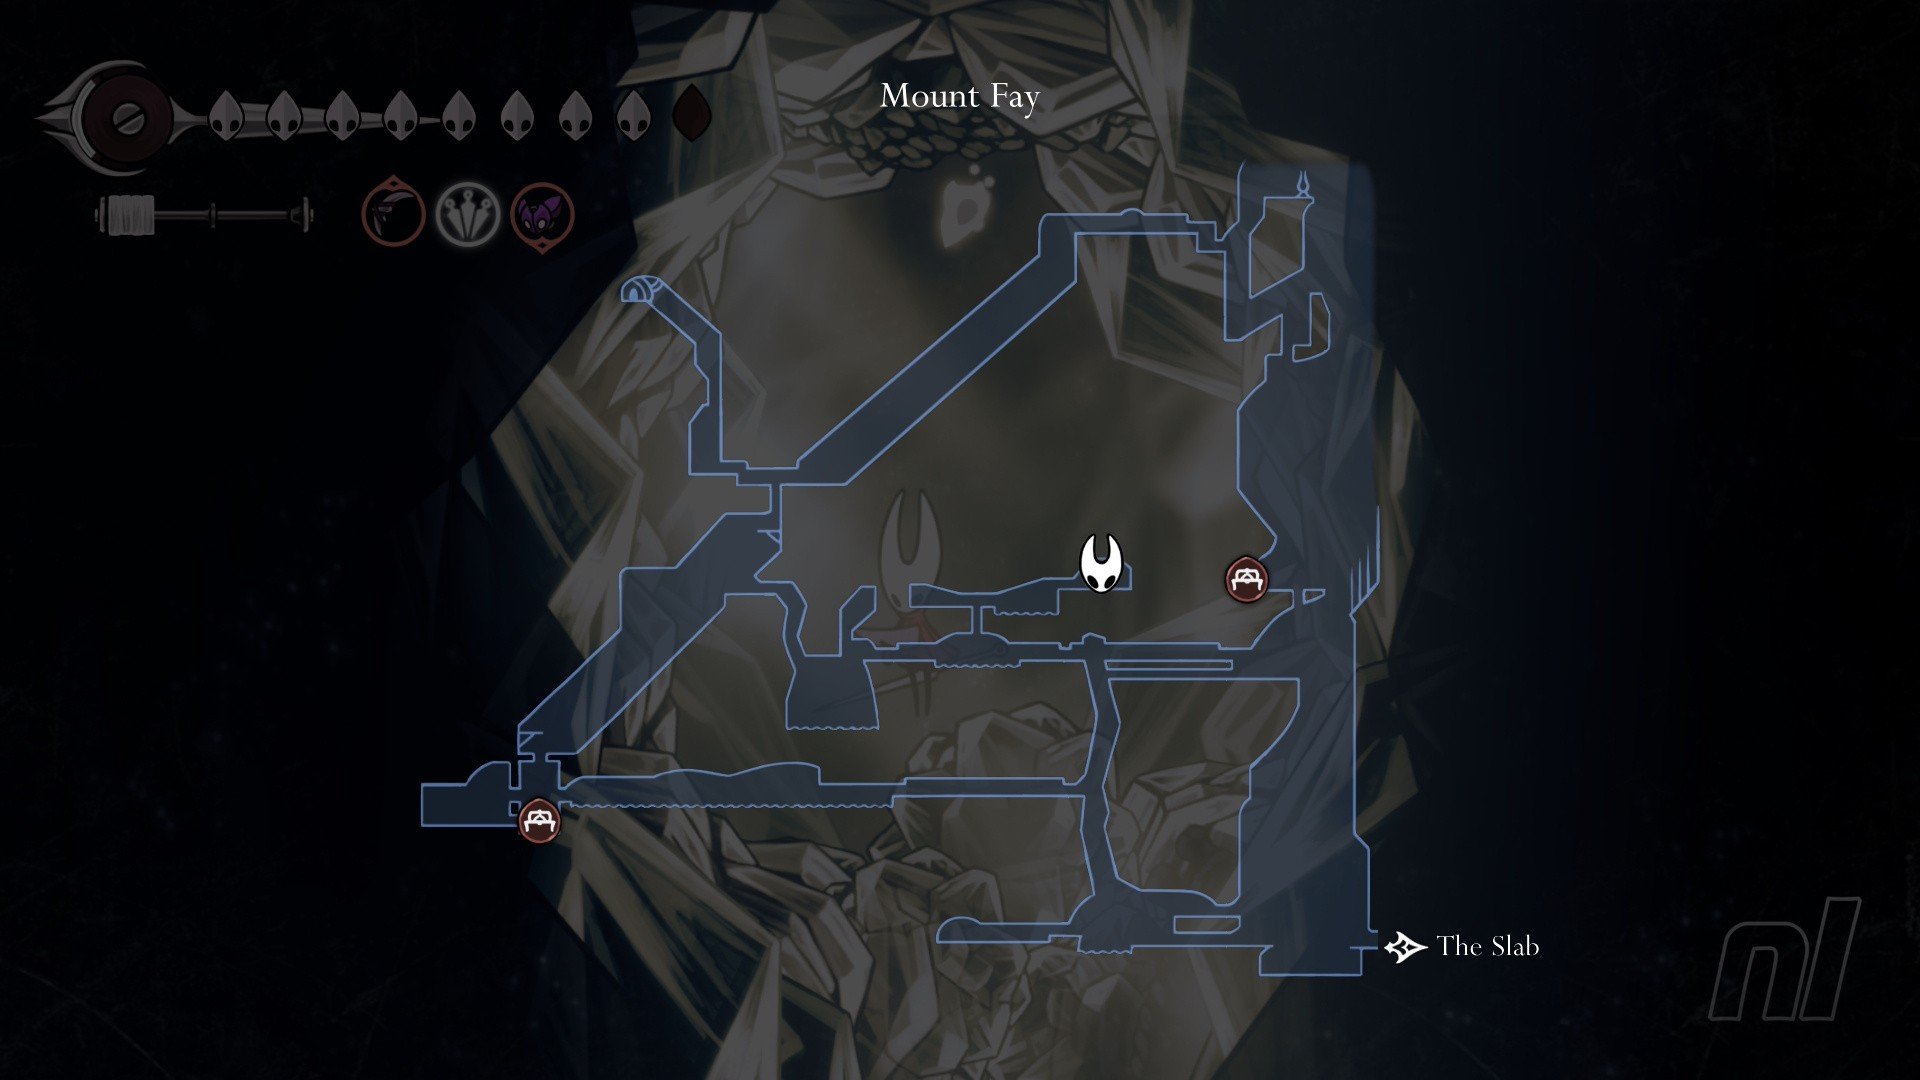
Shard 10 - Mount Fay, Faydown Cloak
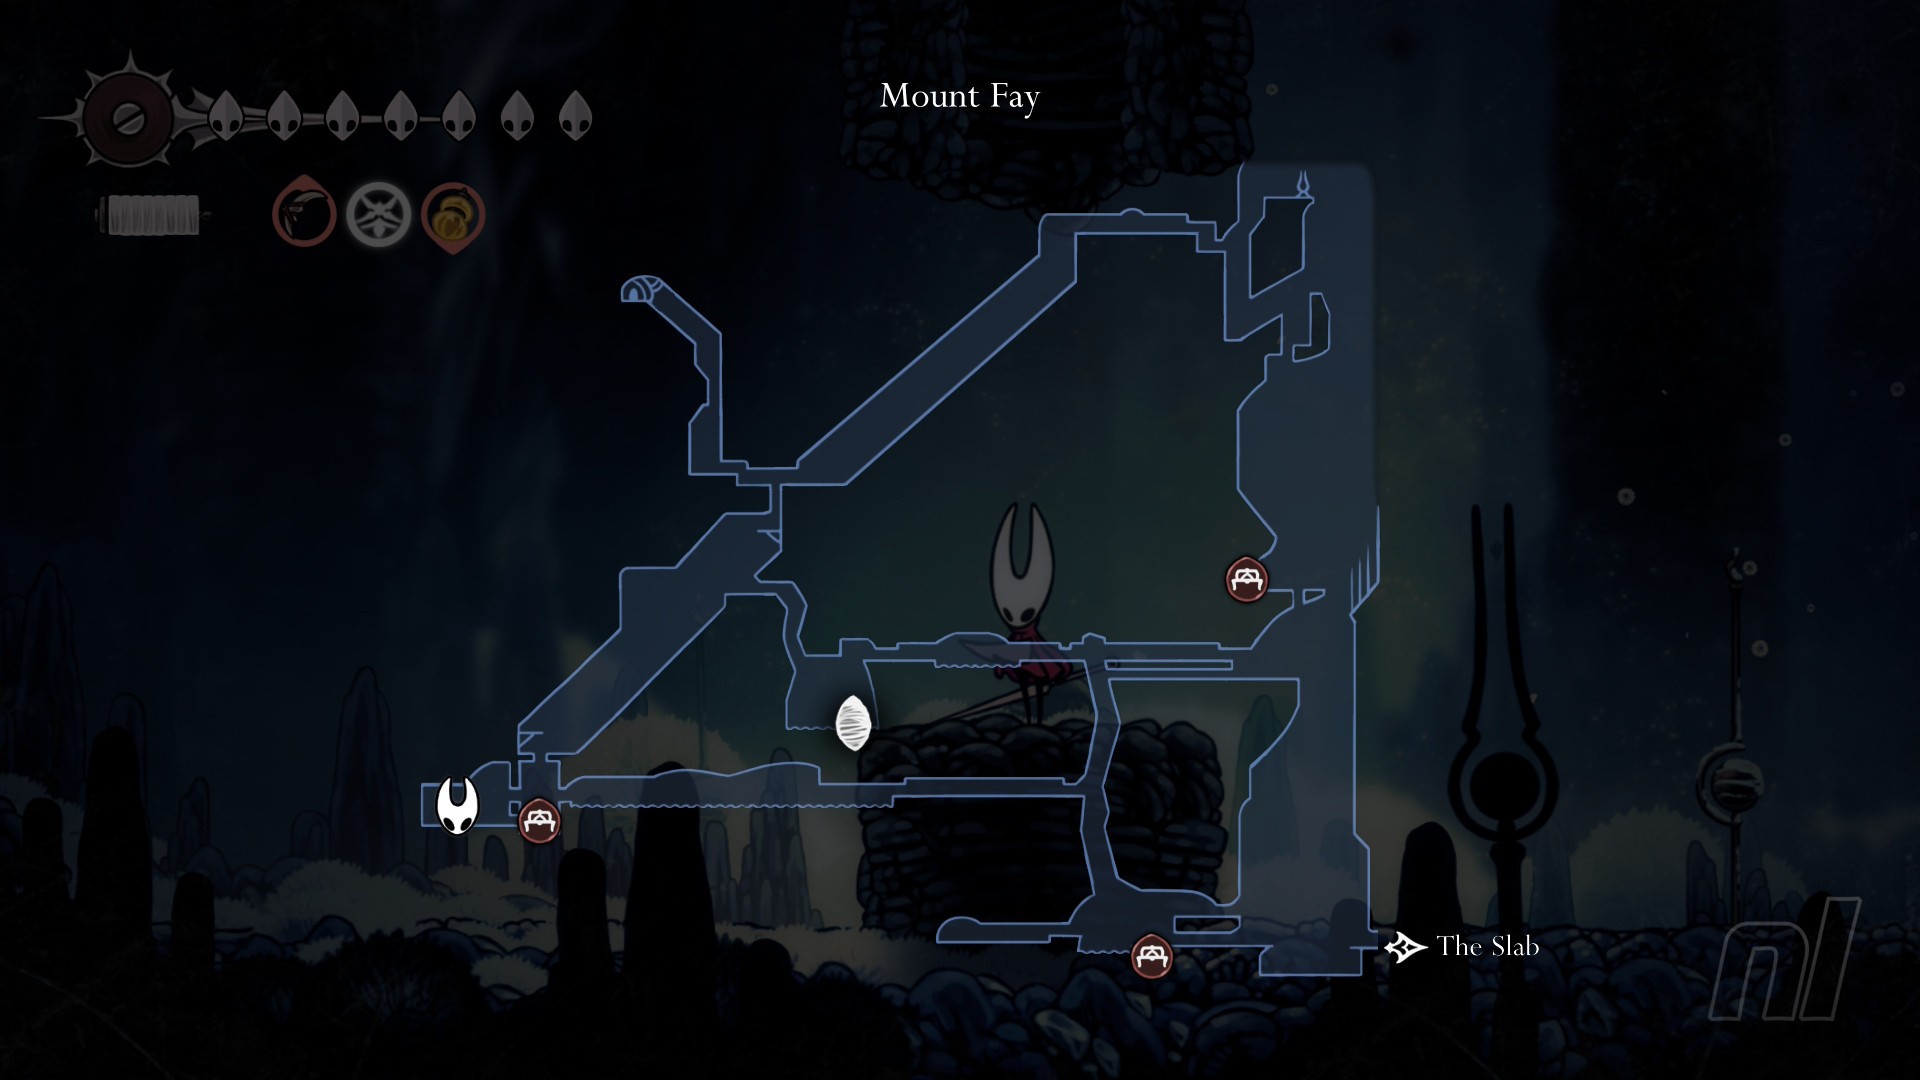
Once you've unlocked the Faydown Cloak and can use Double Jump, head back down the left side of the mountain, towards the 90 Rosary Bench.
Head one room left and you'll see what looks like a broken upside-down pillar hanging from the cliff. Double jump up and use Cling Grip to wall jump to the top and grab the shard.
Shard 11 - Bellhart, Savage Beastfly Grand Hunt
Complete the Savage Beastfly Grand Hunt Wish, which is on Bellhart's Wishwall.
The beast is in Far Fields, close to where you fought the Fourth Chorus. It's just down and right from the Bellway/Bench. Make sure you equip the Magma Bell as there's a lot of fire and lava in this fight. It's a tough one!
Deliver the claw to the Wishwall to get the shard.
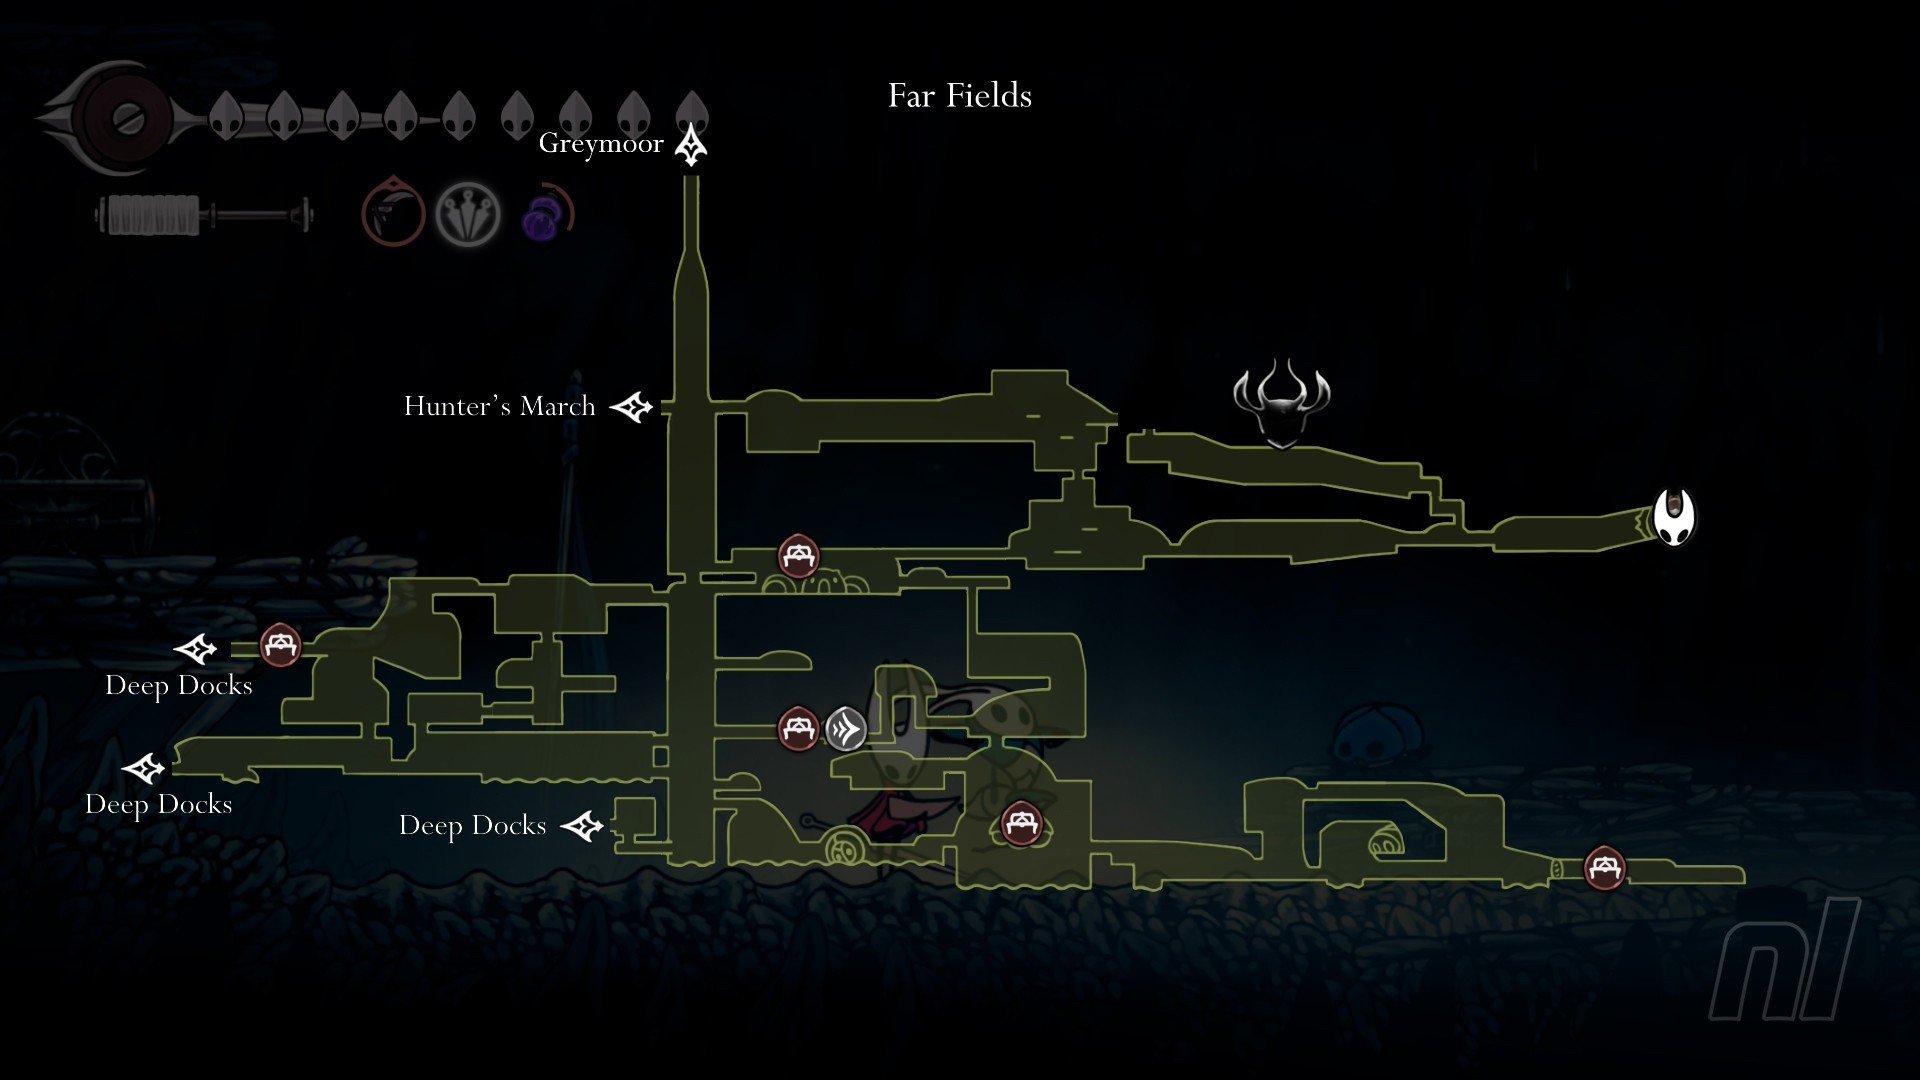
Shard 12 - Far Fields, Skull house lava room

Another Mask Shard you need Double Jump and the Magma Bell for.
Head to the room three screens right from the Seamstress' tent and using Clawline, make your way over to a house that looks like a skull.
Inside, the entrance will be blocked off. Carefully glide your way down the hole, avoiding the spikes, and eventually you'll land on some magma with an explosive floor. Blow it up and you'll have to fight four waves of enemies.
After that, the lava will start bubbling and it's a race to the top. Keep to the left side of the climb and you should make it out okay! You won't start at the beginning if you're caught, but make sure you're as healed as possible before the climb.
Once you reach the top, an airflow will form out of the lava. Ride it up for your Mask Shard.
Shard 13 - Blasted Steps, double jump puzzle
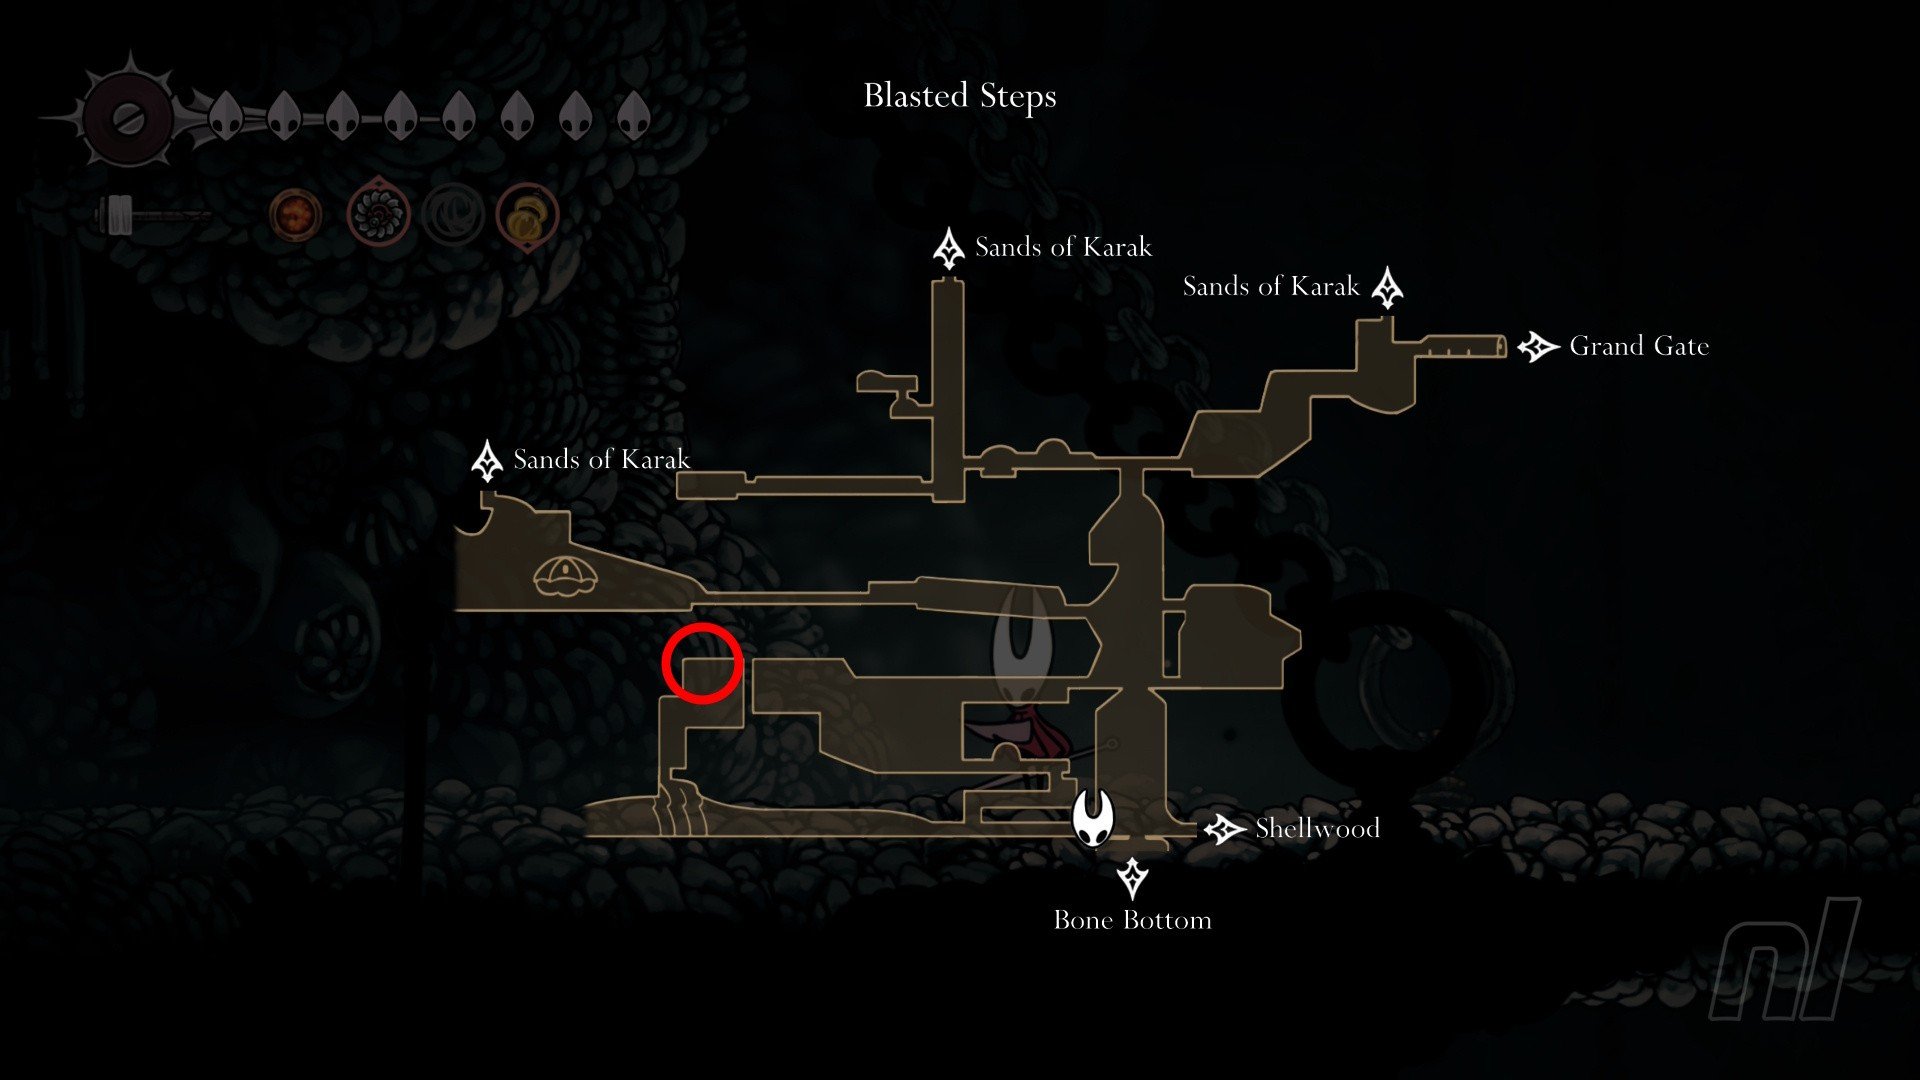
You'll need Double Jump for this one. The quickest way to reach the Shard is from the Shellwood Bench and Bellway. Head west from there and keep going towards the exit of the Blasted Steps (Hornet will tell you as you can't go any further).
Along the way, you'll see some floating platforms high up. You need to get onto these, and they're tricky! Use Swift Step, jump at the end of the nearest stone platform, use Clawline, then Double Jump, and you should grab on to the first one.
Grab the wall on the right, climb up, avoid the boulder, then Clawline across to the next platform, and jump up to the next screen.
Here you'll need to avoid spider enemies, boulders, and spikes in order to reach the Mask Shard. It might take a few tries, but don't give up!
Shard 14 - Wisp Thicket, past the fire mages
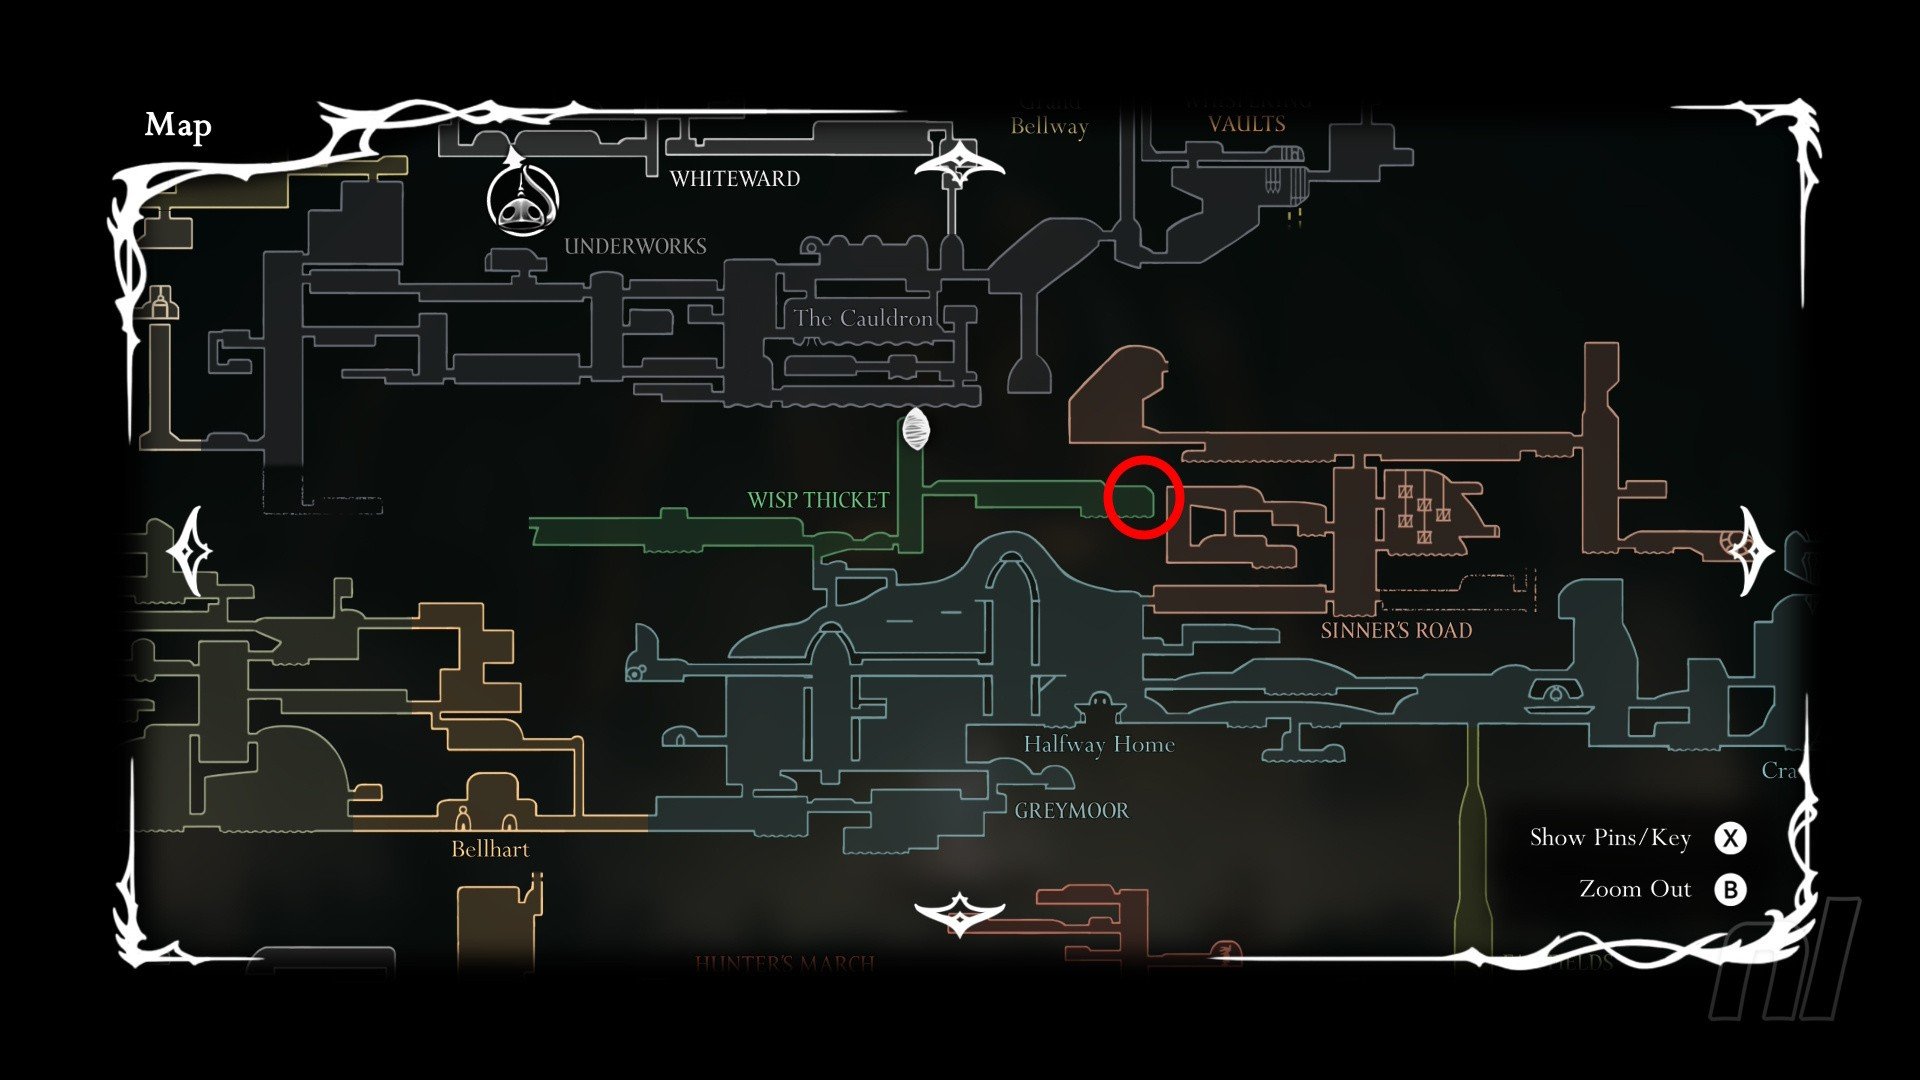
The Wisp Thicket is only accessible once you have Double Jump. We also highly recommend equipping the Magma Bell Tool to deal with the fire enemies here.
Get here by going to the top of the western tower (where the Lost Flea is/was) and go up. Once you reach a corner, double jump and wall climb to reach the area.
You want to head east from the entrance, and you'll need to be careful as there are spikes and fire enemies that do a lot of damage. Our advice? Destroy the torches as those fireflies are extremely annoying. You can run past the mages.
Keep heading to the far right and eventually you'll reach the Shard.
Shard 15 - Bilewater, fish room
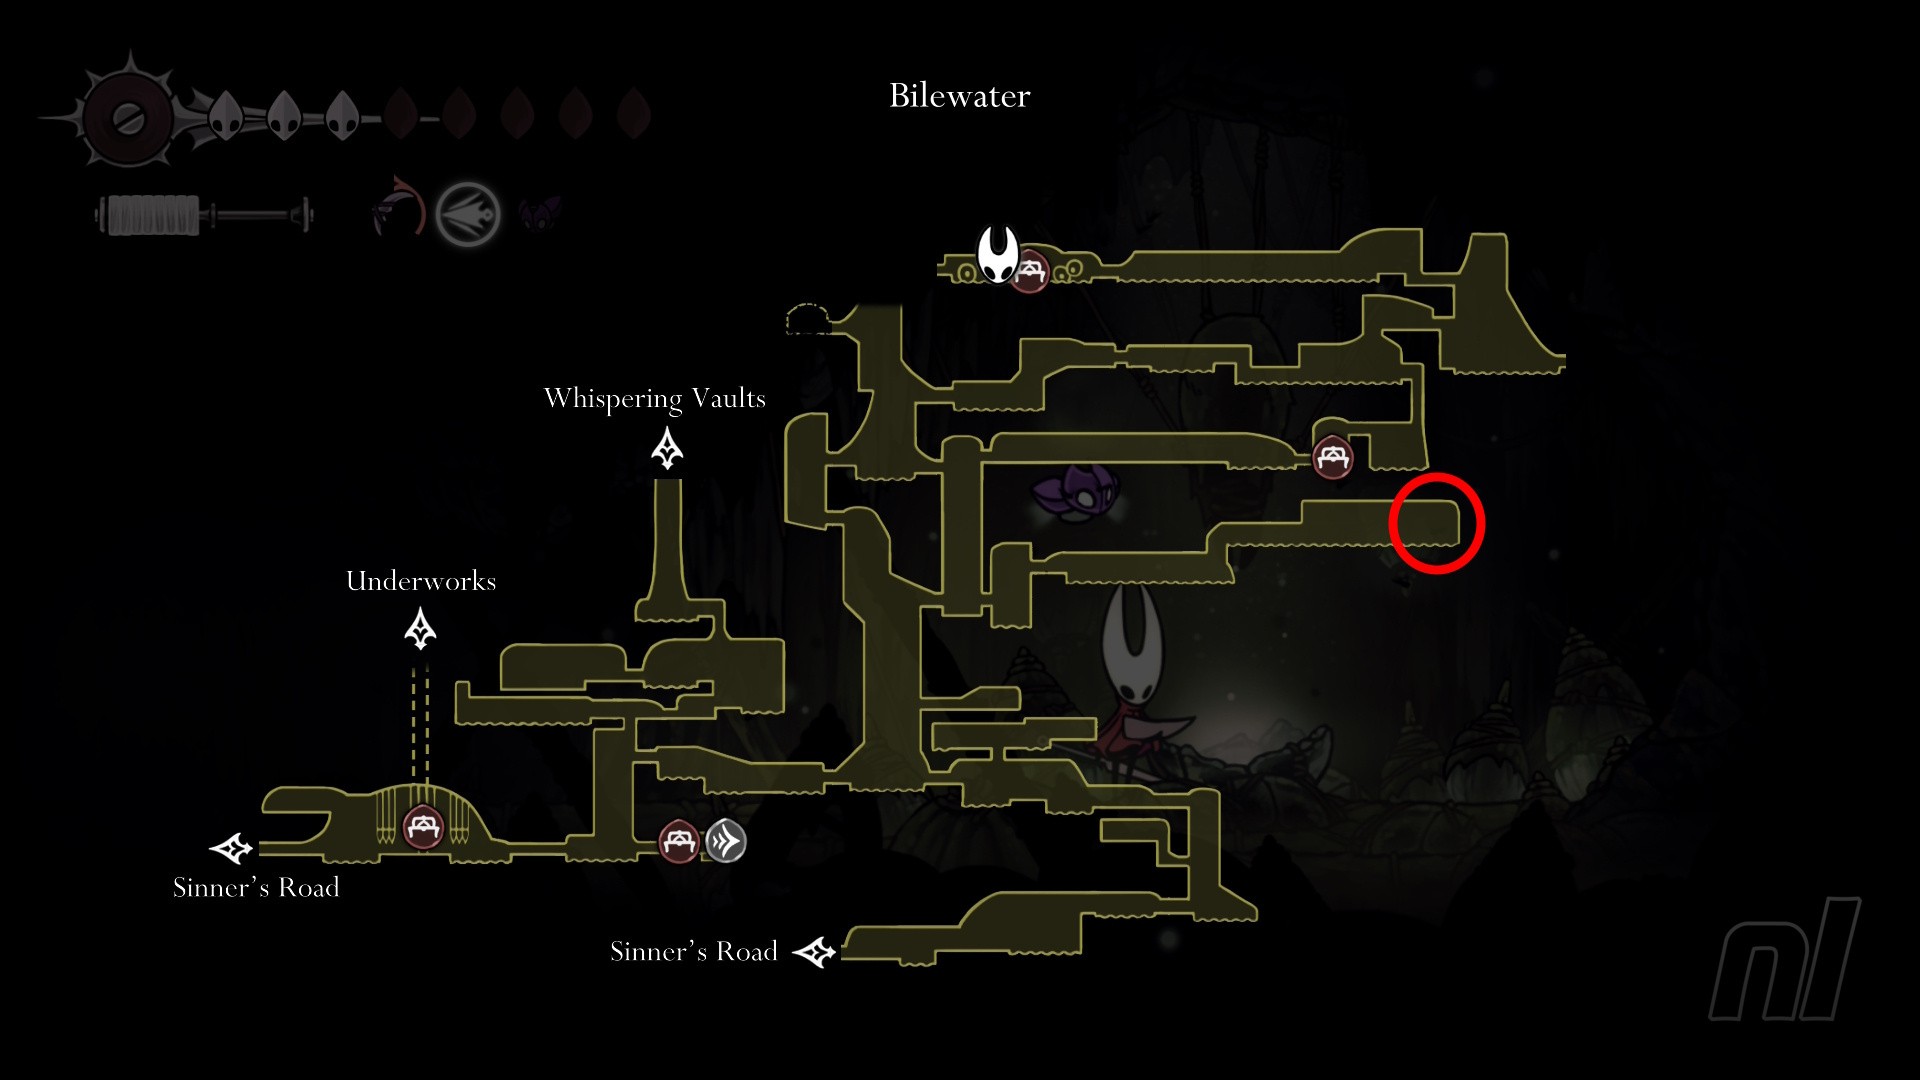
Yes, it's about as pleasant as it sounds. As you make your way through Bilewater and start climbing up, head through the second right-hand door (above Shakra's location). Just keep going right and eventually you'll reach a long room full of maggot water and fish.
These fish jump out of the water and drag Hornet into the silk-eating-infested waters. Oh, and they do two masks of damage. Of course.
Basically, you need to run. Try your best not to fall into the water and avoid the fish — it's much easier said than done, though.
Once you reach a dead end, jump left and wall jump to reach the Mask Shard. Worth it? Yes.
Shard 16 - The Slab, Key of Apostate room
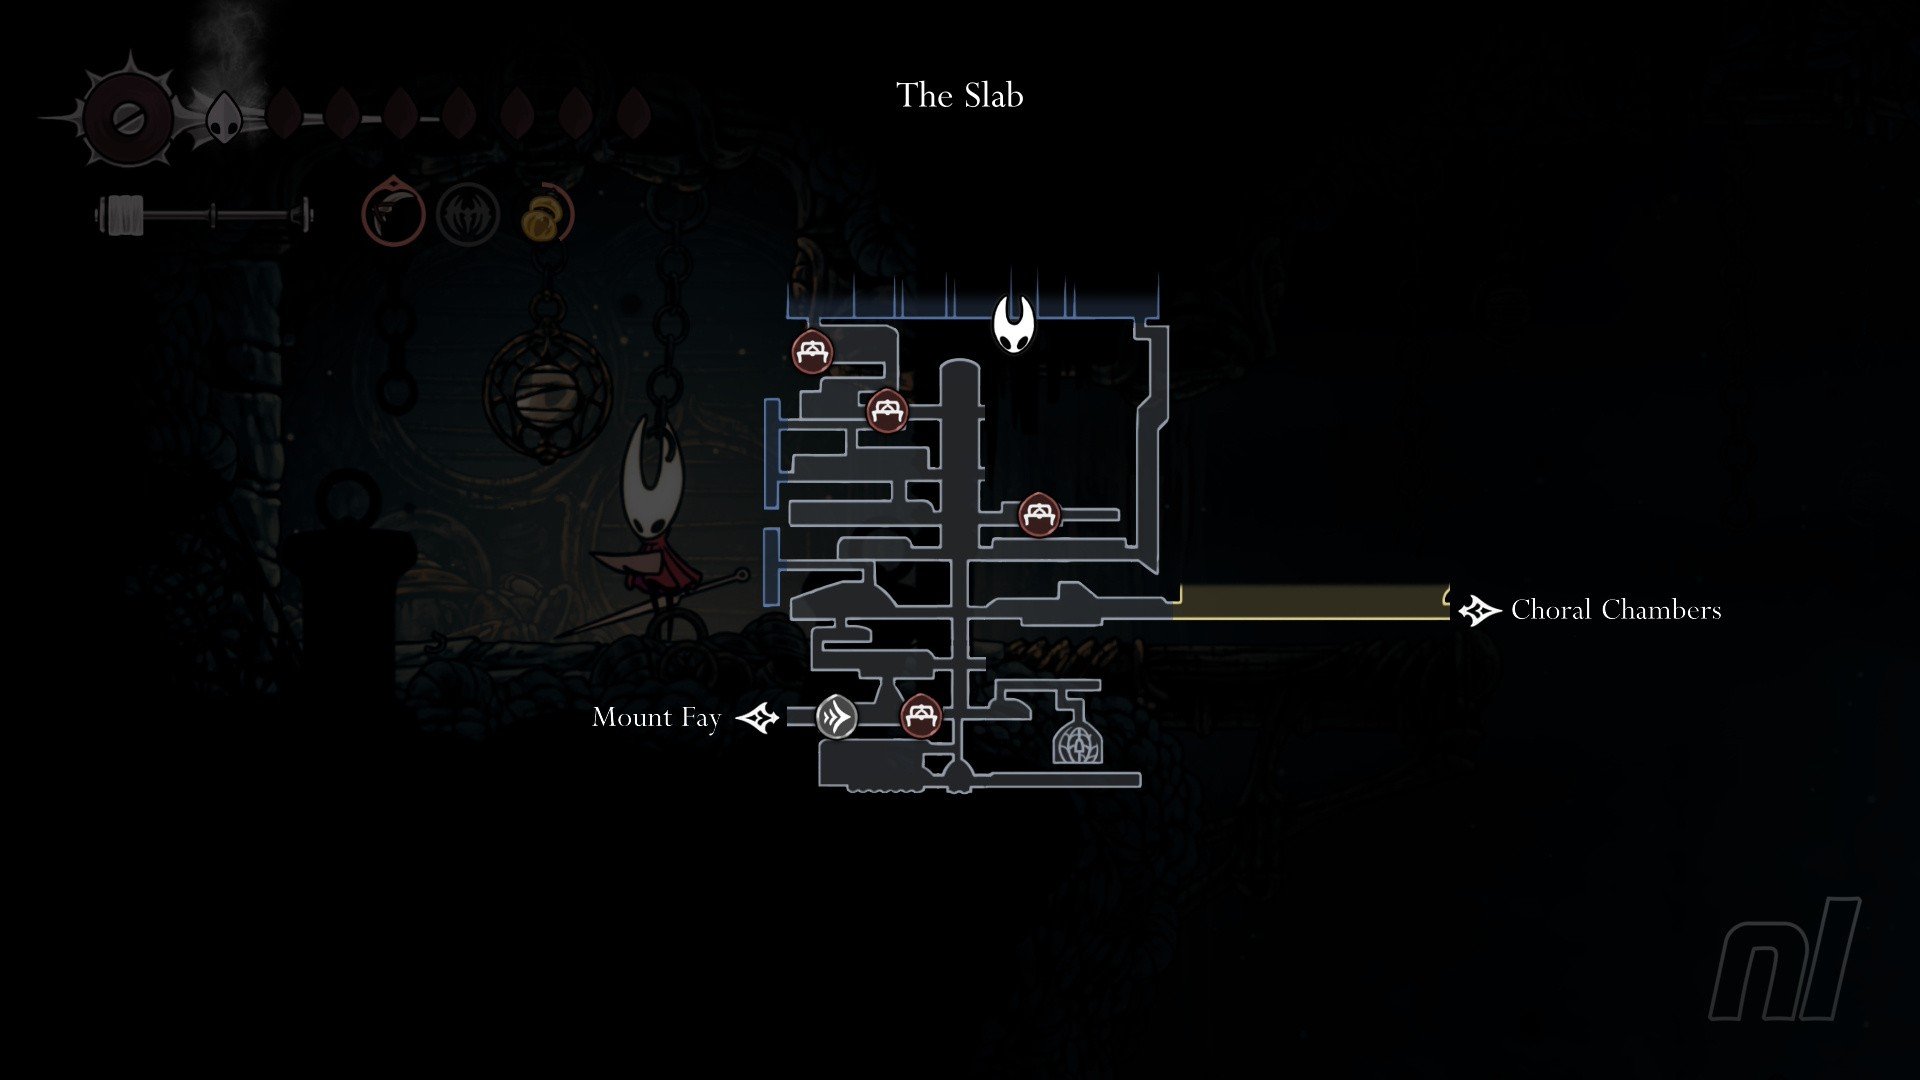
You need the Key of Apostate for this Mask Shard, which you get in the Putrefied Ducts section that's accessible after defeating Groal, the boss of Bilewater.
Once you're back in The Slab, head to the tall room and go to the second open gap on your map. Use the key there and you'll enter a room with some rails and seemingly nothing else. Step on the button on the centre platform to reveal a jumping puzzle involving saw blades.
Pogo on the saw blade to reach the platform above you. Wait until it comes around above you to pogo onto the wall on the left. Hop onto the cages and grab the wall on the right. Then, finally, wait for the saw blade and use Clawline and Double Jump to launch yourself into the corner of the room with the Mask Shard.
Shard 17 - Mount Fay, Silk Soar (Act 3 Only)
Once you have Silk Soar, return to Mount Fay and climb about halfway up the mountain. Then head inside and go left until you reach a room with icy water and a icy platform in the centre.
Stand on this and use Silk Soar to reach a new, hidden area. Go right, then head through the doorway here to find yourself in a tricky platforming challenge.
At the top awaits you Mask Shard.
Shard 18 - Bellhart / Far Fields, Fastest in Pharloom Wish (Act 3 Only)
You can either pick this wish up from the Bellhart wishwall in Act 3 or head to a new part of Far Fields.
You have to access this by using Silk Soar in the Hunter's March, where the statue of a beautiful bug stands. Then just follow the path east until you open up a new path to a new area in Far Fields.
Eventually, you'll be able to go up and right, or down and right. Go the downards way and eventually you'll reach a bug who wants to race you (see where Hornet is on the Map? That's where you're aiming for). You have to beat him in three different courses to get the Mask Shard and complete the Wish.
Shard 19 - Bellhart, Dark Hearts Wish (Act 3 Only)
In Act 3, after you've been to The Abyss, new Wishes open up in Bellhat, which include the Dark Hearts Wish. You'll get your Mask Shard when you complete this.
For this, you'll need to defeat 12 Void Masses spread across Pharloom. There are way more than 12 of these, but here are a few maps where you'll find multiple:
- Shellwood
- Hunter's March
- Deep Docks
- Far Fields
- The Marrow
- Choral Chambers
Shard 20 - Bellhart, The Hidden Hunter Wish (Act 3 Only)
Complete The Hidden Hunter Wish, which should appear in Bellhart either after you find Gilly in the new part of Far Fields (on the way to the Sprintmaster's Quest) or after you've gained one of the three Old Hearts.
After defeating Gurr the Outcast, head left and then up, be careful of the traps, but attack the last string in the room for the Grass Doll. Bring it back to Bellhart for your reward.
Phew! That took a long time, but 10 Masks is worth it. For more collectibles, equipment, and tips, head to our Hollow Knight: Silksong walkthrough hub for more handy guides.