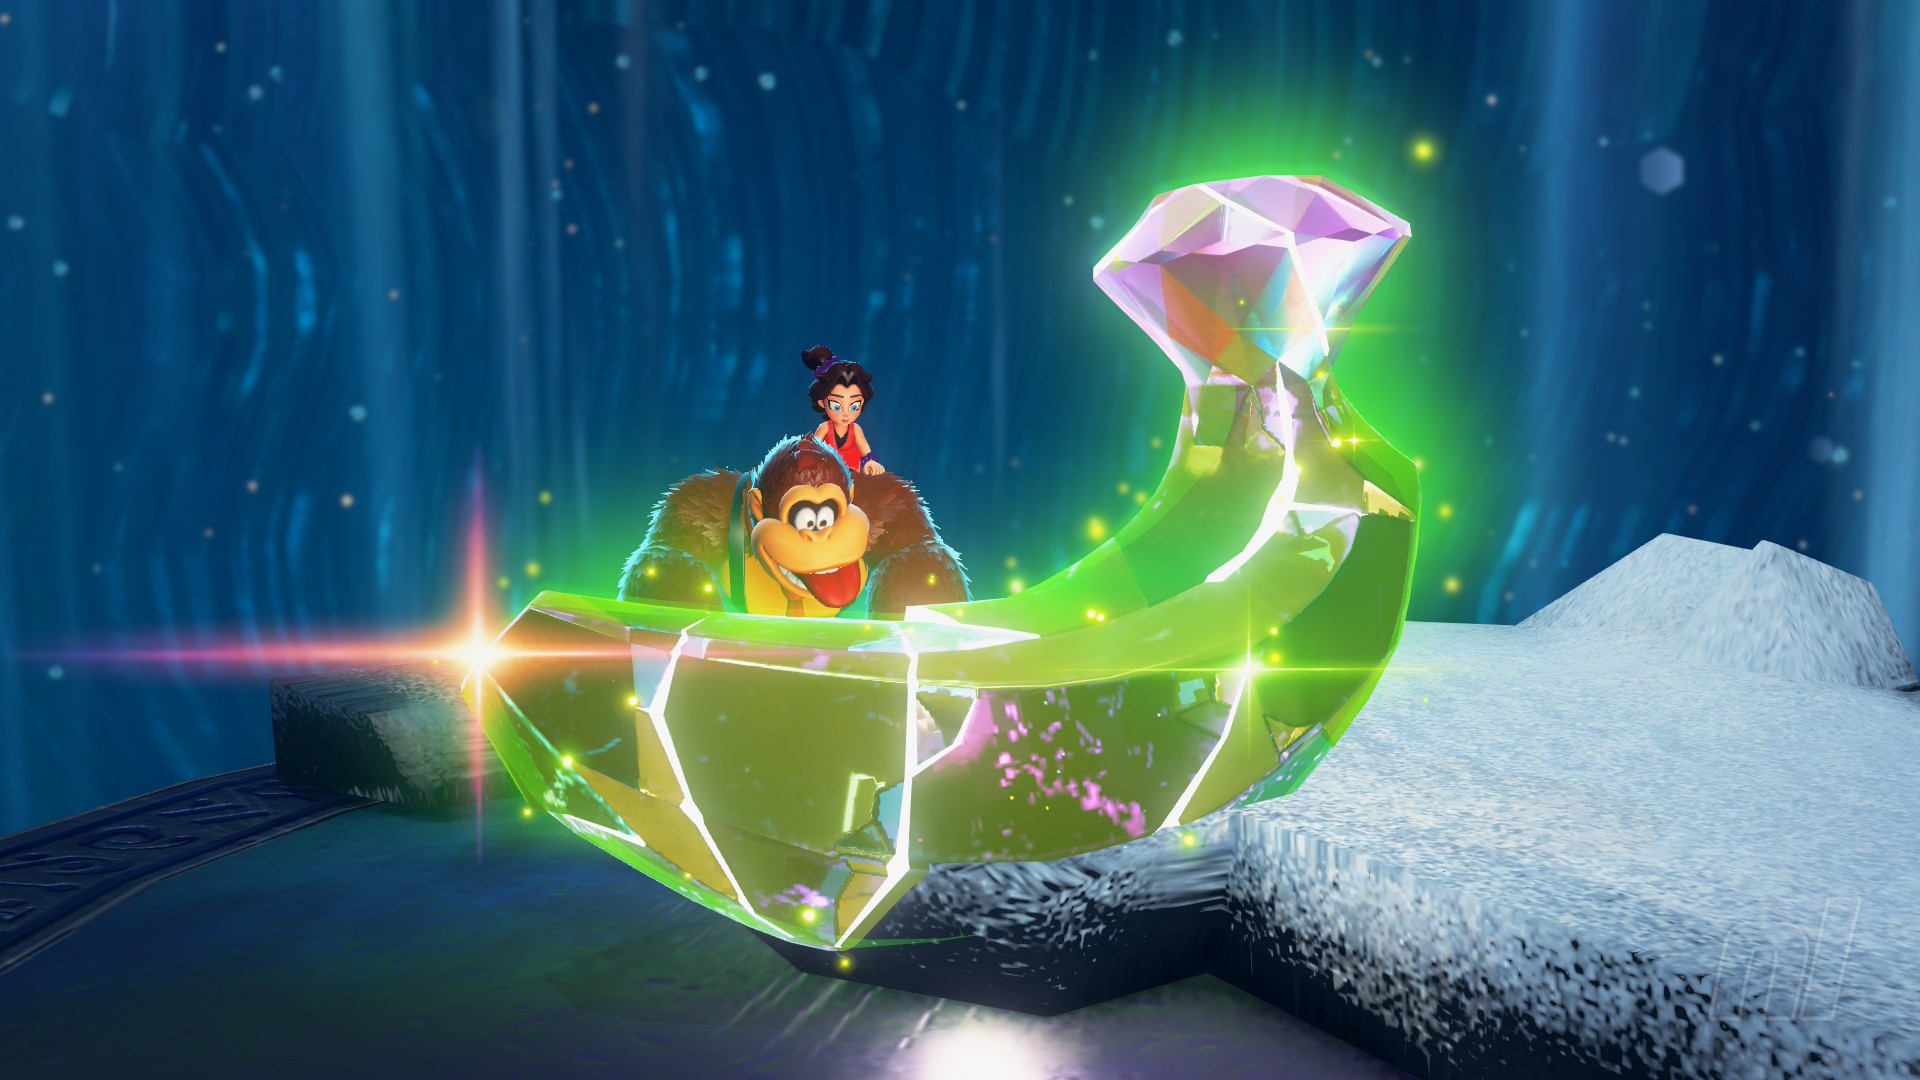
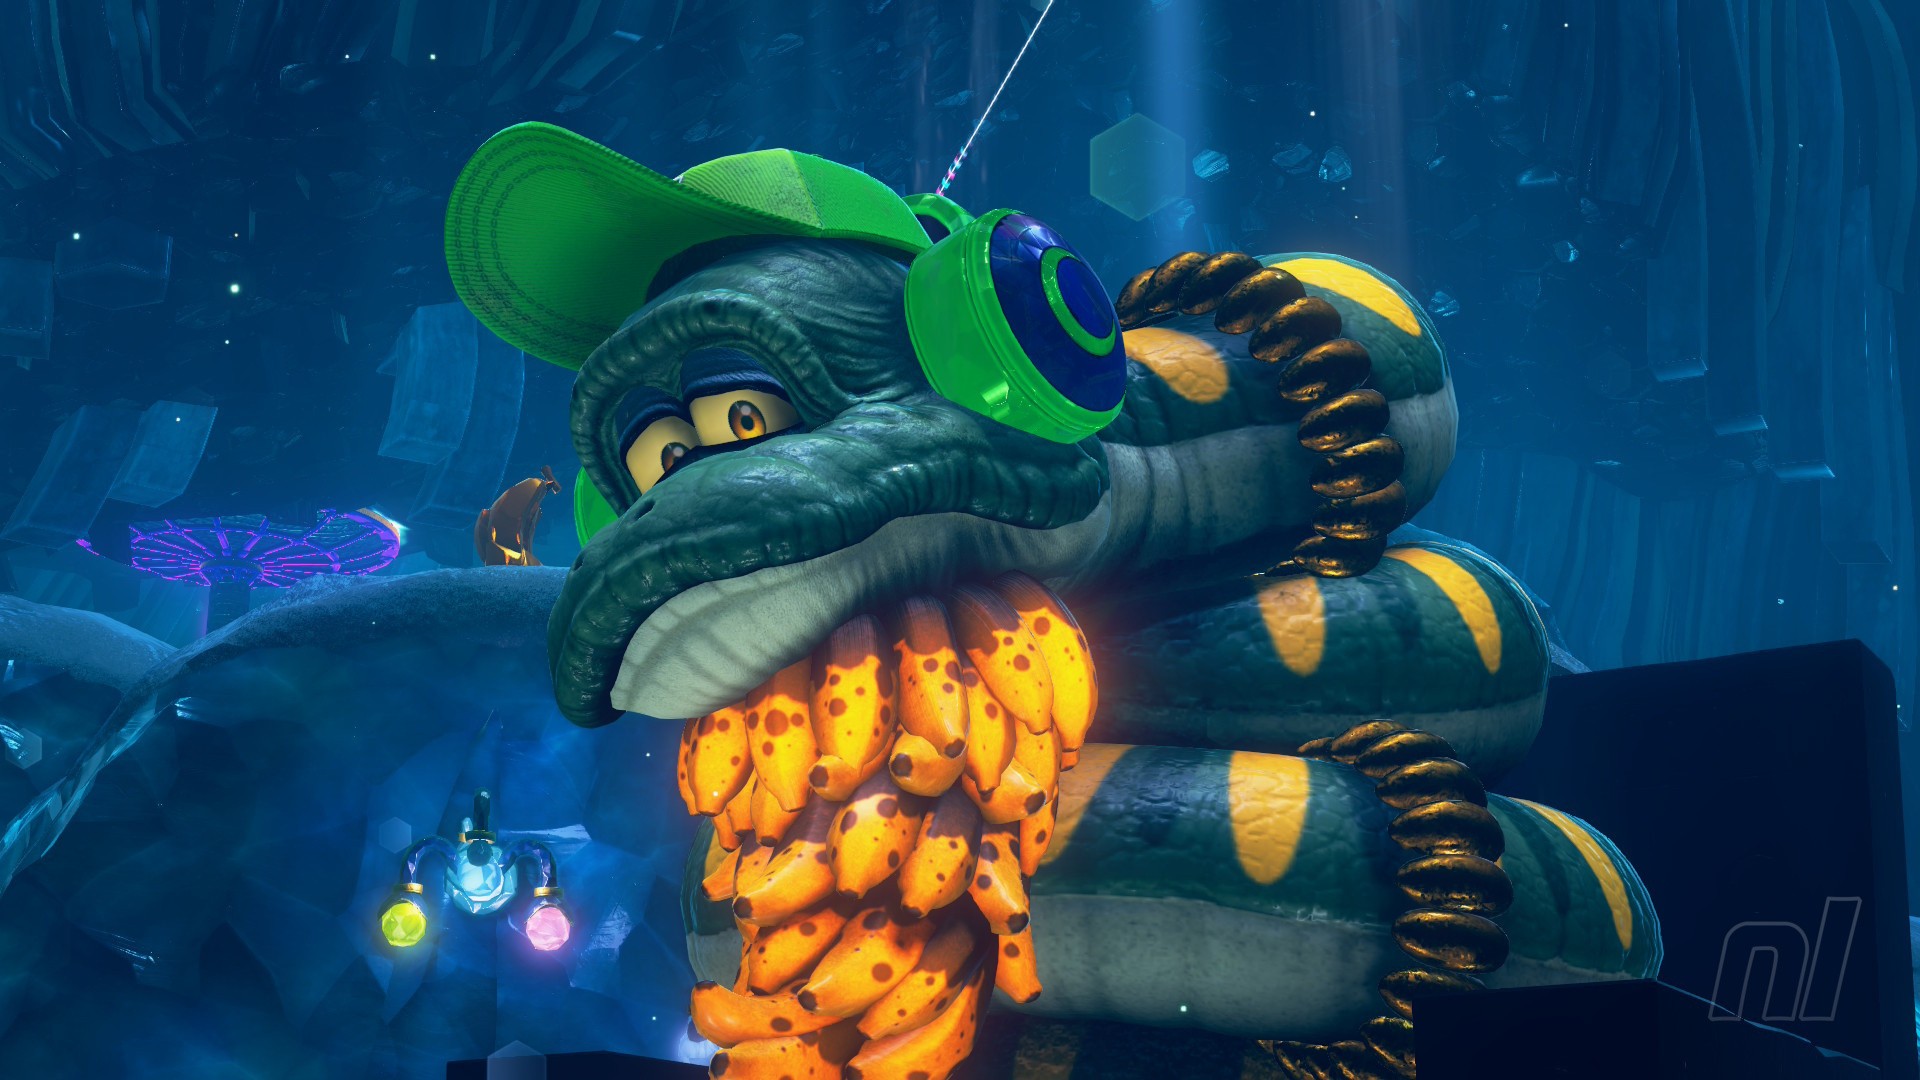
It's time to dive into the snake-filled Radiance Layer, and ssssee how many ssshiny Banandium Gemsss we can find.
There are 76 Banandium Gems to track down on this layer, and we've assembled the following maps and lists to help you do it.
If you're looking for help with a different layer, you can slither over to our full Banandium Gem Locations guide hub for a similar rundown of Donkey Kong Bananza's other regions.
Subscribe to Nintendo Life on YouTube834k
Radiance Layer Banandium Gem Locations
We've divided the following list into the Radiance Layer's five sub-levels, but do bear in mind that you may be required to wrap up the area's main story before you can nab some of the 'nanas. Similarly, there's one subset of Banandium Gems that is only available once you've rolled credits, and we've included them in their own section of the guide below.
SL1200
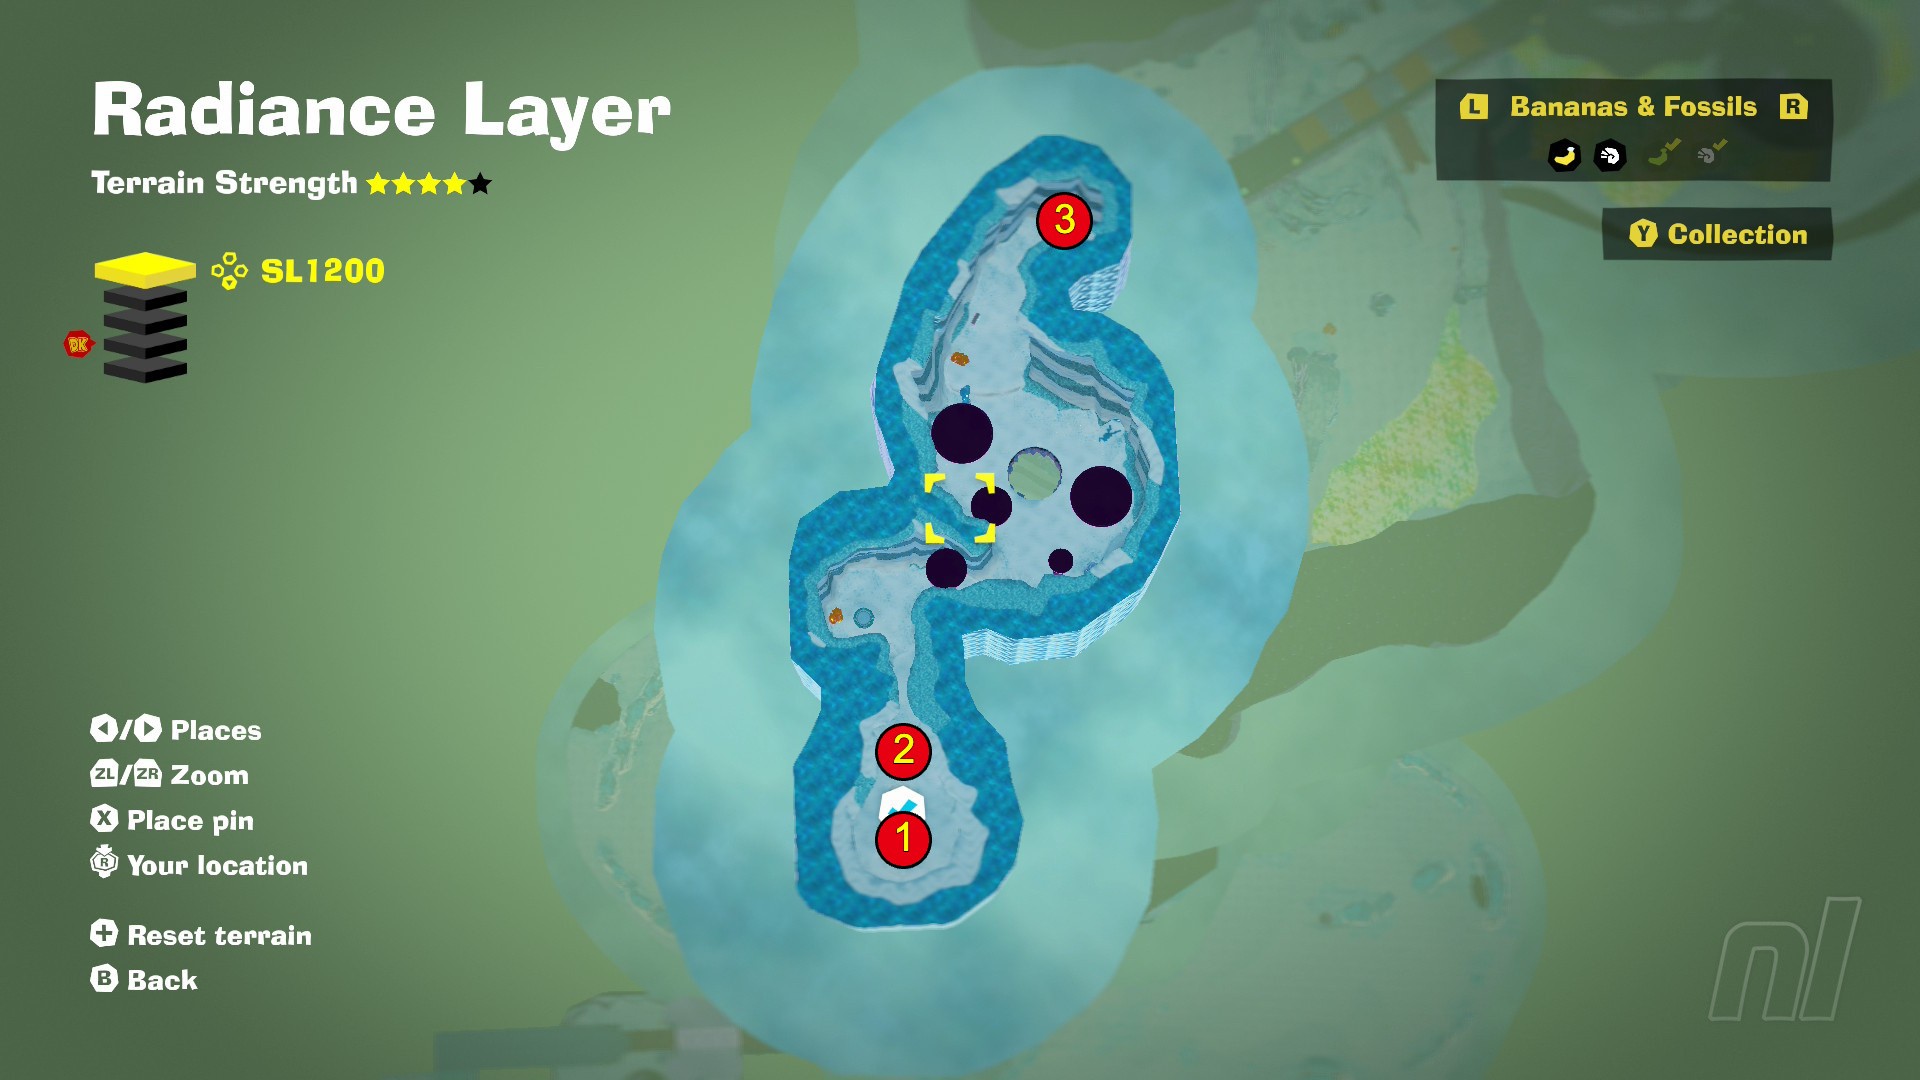
1. Beneath the White-Sand Landing
Dig straight down from the Shedlight Cave checkpoint.
2. Alighted in the Radiance Layer
Right in front of you as you arrive in the Radiance Layer.
3. Deep Down in Shedlight Cave
Head straight down the path, past the Void Co. lock and destroy the pillar at the end. The banana is buried below the pillar, under the concrete.
SL1201
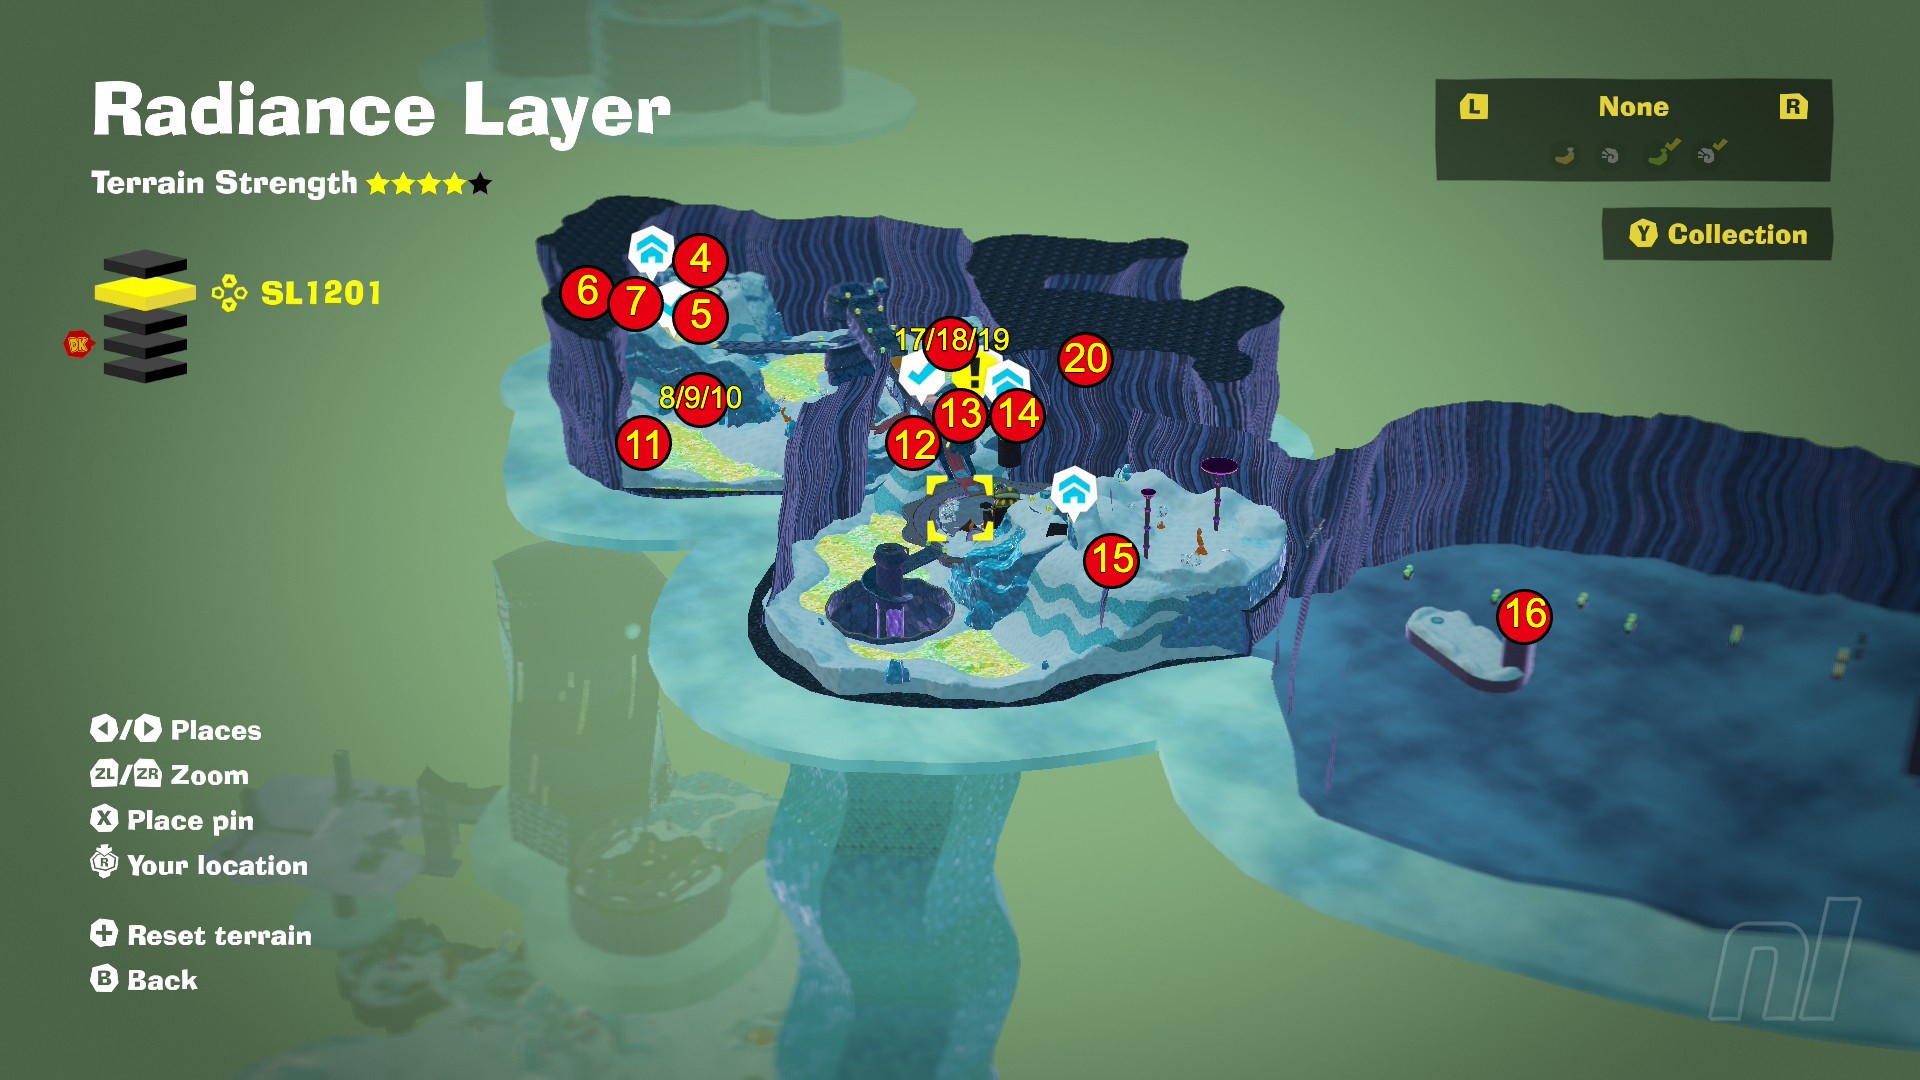
4. Ssslithered Past Shedlight Cave!
Follow the main path into SL1201.
5. Shifty Smash: A Thorny Situation
Beat the Shifty Smash Challenge in the room below the Glowboa Grotto checkpoint.
6. A Light Snack
Once you've restored sunlight in the layer, head through the Glowboa Getaway and down a Light Door in the adjoining alleyway. The Gem is at the bottom of the pit.
7. Revealed by the Light
Grab a chunk of Glow Stone and use it on the stand next to the door, behind the Glow Stone Vein checkpoint.
8. Glowing Fruit in the Darkness
Under the bridge that runs from the Gloomboa's head, you'll find the Dim Lights in the Darkness Challenge Ruins. The first banana is up the first two platforms, straight ahead.
9. Sharp Eye for a Banana
In the section with the glowing enemy, look left for a blue light. Throw a Glow Stone at it to raise this hidden banana.
10. Guided by Glowing Fruit
Reach the end of the Challenge Course.
11. Adrift in Glowboa Grotto
In a pile of sand on the other side of the corner Glow Stone 'lake'.
12. Battle: Some Light Smashing
Speak to the Constructone in the rock below the snake path's main body to unlock the Antickoid x6 Battle Ruins.
13. Sitting on a Snake's Head
With Snake Bananza unlocked, Charge Jump onto the Snake Path and nab the banana.
14. Over the Elder's Head
Use Snake Bananza to hop up onto the zip-line platform over the Snake Elder's head.
15. Bathing in the Essence of the Sun
Use Elephant Bananza to clear the lava in the Sssizzling Sunbath room. The banana is hidden under the entrance path.
16. Atop an Unlit Landing
On a right pillar in the Ssslithery Zip-Line section. Your scorpion chunk will turn to dust in the light, so only make your way to the right rail after clearing the Glow Stones.
17. Sneaky Room under Sand
Hop over to the Snake Bananza: Charged Climb Challenge Course, roughly halfway along the snake path. At the first patch of sandy ground, punch down to enter a secret room.
18. Springing off Sandy Steps
Make it halfway through the Challenge Course.
19. Swift and Shocking Ascent
Finish the Challenge Course.
20. The View Beyond Glowboa Grotto
With the sunlight restored to the layer, use Snake Bananza to jump into the high doorway on the far wall of Glowboa Grotto. The banana is just past the Light Door.
21-29.
Post-credits challenges (scroll down).
30. Radiance Chip Exchange
Cash in your banana chips at any of the layer's Chip Exchange locations.
SL1202
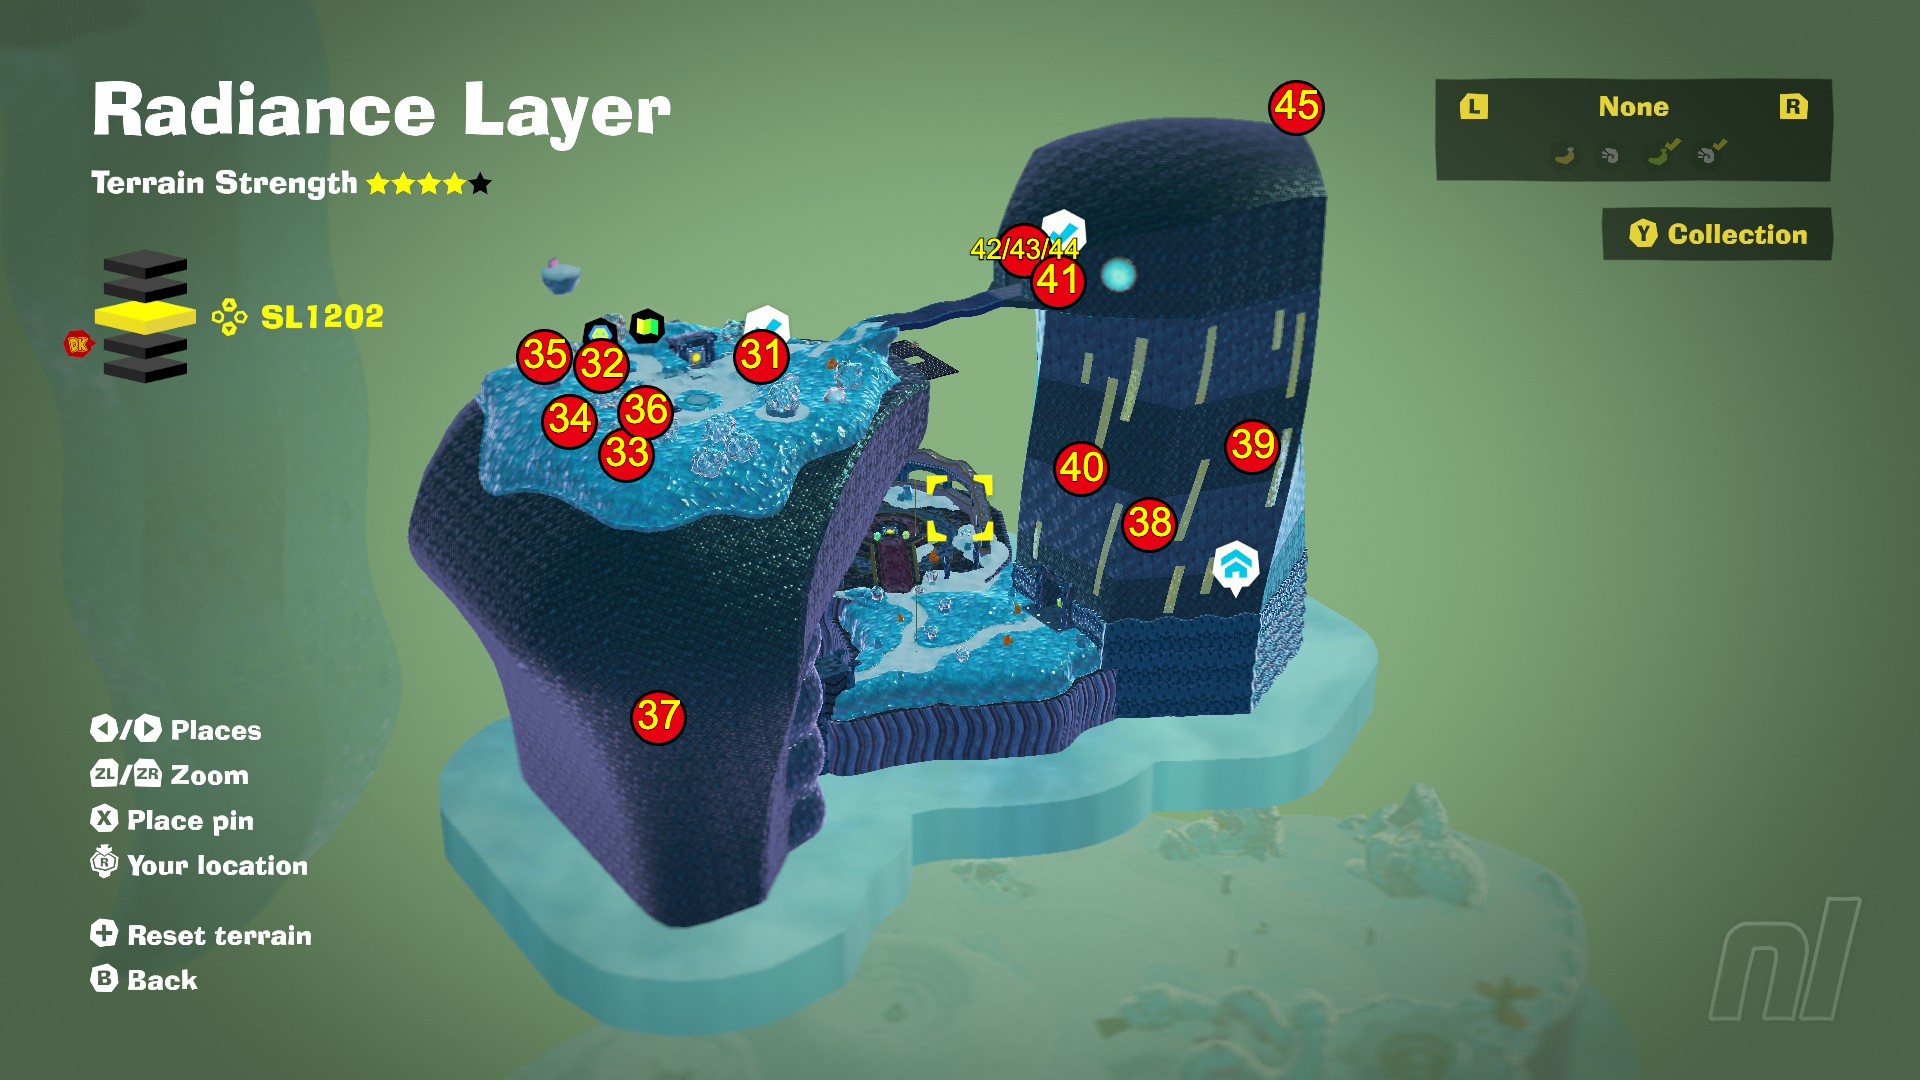
31. Unveiled in the Sculptor's Studio!
Dive down into SL1202.
32. Battle: Shining Through
Punch through the light source, next to the SL1202 landing point and follow the path to the Gloominoid x3 Battle Ruins.
33. Ceiling Swingin' Snack
Smash through the crystal on top of the broken pipe, right of the landing point, and head in. Use Snake Bananze to reach the railings on the ceiling and swing over to the banana.
34. Staying Fresh in the Storeroom
With the sun back on, head back to the Sculptor's Studio and punch through the solar door at the back.
35. Battle: Dive-Bombing Run
Use Snake Bananza to get to the floating Trapantuloid x3 Battle Course on a platform over the Sculptor's Studio.
36. Perfectly Preserved in Crystal
In a translucent crystal shard, behind the SL1202 landing point.
37. Shifty Smash: A Dark Climb
Complete the Shifty Smash Challenge in the solar door at the bottom of the Sculptor's Studio.
38. Soaking in the Essence of the Sun
Use Elephant Bananza to inhale the pool of lava in the left corner of the tower. This banana is inside.
39. Warmed by Flaming Barrels
At the first turn in the tower's ascent, you'll see this banana hanging from the ceiling.
40. Safe in the Barrel-Free Zone
Sneak behind the pillar in the tower section where flaming barrels come out two at a time.
41. Summited the Solar Control Tower
Reach the top of the Solar Control Tower and restore the sun's power.
42. Hidden in the Girders
Head into the Arcade Country Challenge Ruins, near the Solar Control Tower checkpoint. Follow the path until you hit a section with barrels falling from the left and right. Use Snake Bananza to Charge Jump up to a secret platform.
43. Jumpin' like Jumpman
Roughly halfway through the course.
44. Climbing to a High Score
Finish the Challenge Ruins.
45. Wishing on a Synthetic Sun
On top of the Solar Control Station.
SL1203

46. Settled upon Serpent Sands!
Defeat Poppy Kong and dive down to SL1203.
47. Balloons under the Dunes
Pop all the balloons in the cave under the starting dune.
48. Obssscured in a Dune Cave Nook
Speak to the snake sitting behind the clothes shop and follow the map marker to this banana.
49. Deep in a Dune Cave Hallway
In the cave below the starting dune, head into the hallway with thorns on the ceiling. After defeating the enemy, punch down through the Glow Stone floor tile to find this banana below.
50. Bloomed in the Radiance Layer
Bring light to the Bloomintone, in the concrete cylinder to the right of the layer's starting point.
51. Battle: Shadow and Sunlight
Break the teeth of the Void Kong ice head to enter the Gloominoid & Illuminoid x5 Battle Ruins below.
52. Shifty Smash: Timing Is Everything
Complete the Shifty Smash Challenge behind the ice Void Kong head.
53. Radiance Fragmentone Recovery
Punch through the snowy tongue of the ice snake near Tail-End Getaway to enter an underground cavern. Return one of Fragmentone's fragments to get this first banana.
54. Radiance Fragmentone Restoration
Return all three of Fragmentone's fragments.
55. Battle: Vaulting Virtuoso
Punch inside the Grumpy Kong ice head to access the Molevoloid x2 Battle Ruins.
56. Radiance Smashin' Stats
Drop down the well near the SL1203 Style Shop and find Smashintone in the storeroom beneath. Smash 70,000m of Crystal in the layer, and they will give you a Banandium Gem.
57. Lit-Path Switchback
Speak to the Constructone in the roof of the building next to the Style Shop to remove the rubble from the Surfing in Shadow Challenge Ruins. Change creatures at the rest stop and make your way back up the thorns, surfing in the light this time. Take the lit path on the right to reach this banana.
58. Shadow-Path Rest Stop
This banana is at the first rest stop.
59. Shadow-Path Finish Line
Complete the Challenge Ruins.
60. Tip 'o the Stone Snake's Tongue
Remove the Void lock inside the head of the snake-shaped bridge near the oasis to free this banana on its tongue.
61. Hanging Out beneath the Oasis
Go under the Oasis and use Elephant Bananza to clear the lava. Switch to Snake Bananza and Charge Jump into the banana on the ceiling.
62. The Radiance Growtone
Feed the Growtone 400 Gold.
63. The Hungry Radiance Growtone
Feed the Growtone 2,000 Gold.
64. The Sated Radiance Growtone
Feed the Growtone 4,000 Gold.
65. Grown beneath the Growtone
In an icy overhang that sticks out under the Growtone. Use Snake Bananza to hop up and smash it.
66. Cranky's Radiance Rant
Talk to Cranky Kong on the snake-shaped arches on the Oasis Observation Deck.
67. Under the Viper's Chinny-Chin-Chin
On the back of the wall, below the Window Viper checkpoint.
68. Battle: Open the Window
Through a cracked wall, near the first Window Viper Void lock, you'll find the Crockoid x5 Battle Ruins.
69. Head in the Shade Clouds
Take the path right in the Shade Clouds, and use Snake Bananza to jump onto the slippery pillar.
70. Pillaged from a Shade-Cloud Pillar
Use Snake Bananza to climb the second oily pillar on the Shade Cloud with the Molevoloid. Punch through the top to find this banana beneath.
71. Walkin' on Shade Clouds
Before following the Fractone through the clouds, grab a chunk of the ground and trigger the sun switch. Follow the shaded path away from the final pillar to this hanging banana.
SL1204
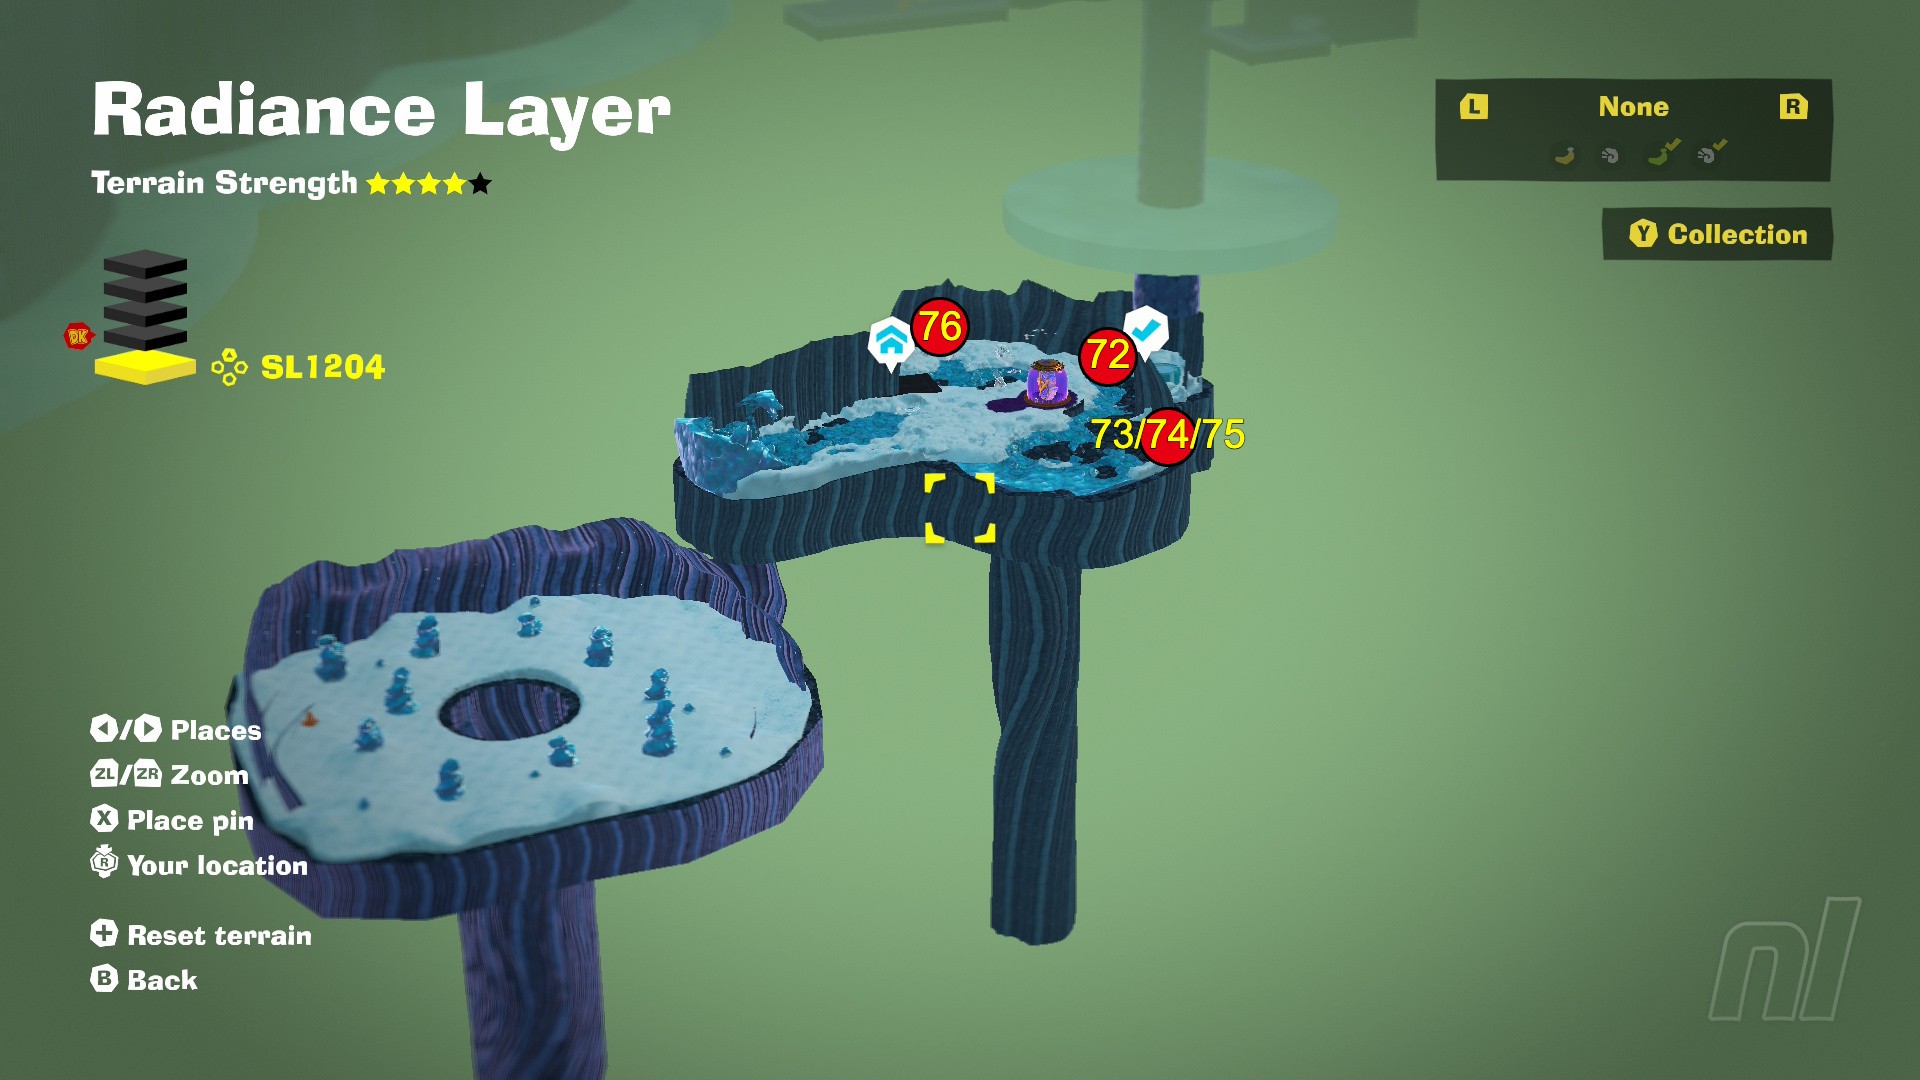
72. Crashed in the Crystal-Cobra Den!
Follow the Shade Cloud path to the end and drop into SL1204.
73. Hidden in the Moving Wall
Head into the Strong, Shady Clouds Challenge Ruins on the left side of the starting cavern. The first banana is behind the thorns, inside the first moving wall.
74. Sticking to the Shadows
Through the first moving wall section.
75. Through Shadows and Thorns
Finish the Challenge Course.
76. Swallowed by the Snake
Inside the crystal snake on the right side of the starting cavern.
Post-Credit Banandium Gems
The following Banandium Gems are only unlocked once you've finished the main story and made a start on the post-credits content. If you're yet to make it this far, we'd recommend going and wrapping up Bananza, and only scrolling past this picture when you're ready to see the endgame stuff.
To get these final bananas, make sure you have at least 600 Banandium Gems in your collection, then head to the Snake Elder to start the Bananza Rehearsal. There's no map for this section, but here's the list of all the bananas you'll encounter:
21. Ran the First Scale!
Make it up the First Scale wall.
22. Summited the Snaking Path
Take the path left from the first banana and Charge Jump through the snaking wall to find this banana hanging at the top.
23. Ran the Second Scale!
Spring up the spiky Second Scale wall.
24. Floated Aloft with Laser Precision
Use Liftoff Ore and avoid the lasers at the optional challenge next to the Second Scale banana.
25. Ran the Third Scale!
Make it up the fiery Third Scale wall.
26. Snaked without Going Boom
Use Glare to slow the bombs left of the Third Scale banana, and climb the concrete tower.
27. Ran the Fourth Scale!
Dodge the shocks and make it to the top of the Fourth Scale.
28. Sink like a Crock
Break the ground to sink the enemies, left of the Fourth Scale banana.
29. Ran the Final Scale!
Scale the final wall.
That'sss all for the Radiance Layer, but you can find the Gems in every other area by heading over to our full Banandium Gem Locations guide hub. There's also the Donkey Kong Bananza Walkthrough guide hub, for all your other DKB needs.


Comments 1
SL1201 #15 - please explain better. What you show on the map versus what you’re describing doesn’t match up.
(Edit) Found it. Your placement of the 15 on the map seems way off. You had me tearing apart the wrong area until I branched off and found it. Maybe fix that.
Show Comments
Leave A Comment
Hold on there, you need to login to post a comment...