
The Lagoon Layer is where Donkey Kong Bananza's Banandium Gem hunt really begins, and in this guide, we'll be showing you how to find each and every one of them.
Below, we have provided a map and list of the Lagoon Layer's three sub-layers, which you can use in combination to track down all 56 Banandium Gems in the region.
If you're after this collectible in other layers, be sure to check out our main Banandium Gem Locations guide hub.
Subscribe to Nintendo Life on YouTube834k
Lagoon Layer Banandium Gem Locations
Some of these are only available once you have cleared the layer's main objective and returned to it at a later point, while others are only available after rolling credits. We've added all the post-credit 'nanas to their own section at the bottom of this guide, but on the whole, we'd recommend clearing up the layer's main adventure first, before returning to mop up the majority of the pick-ups.
SL100
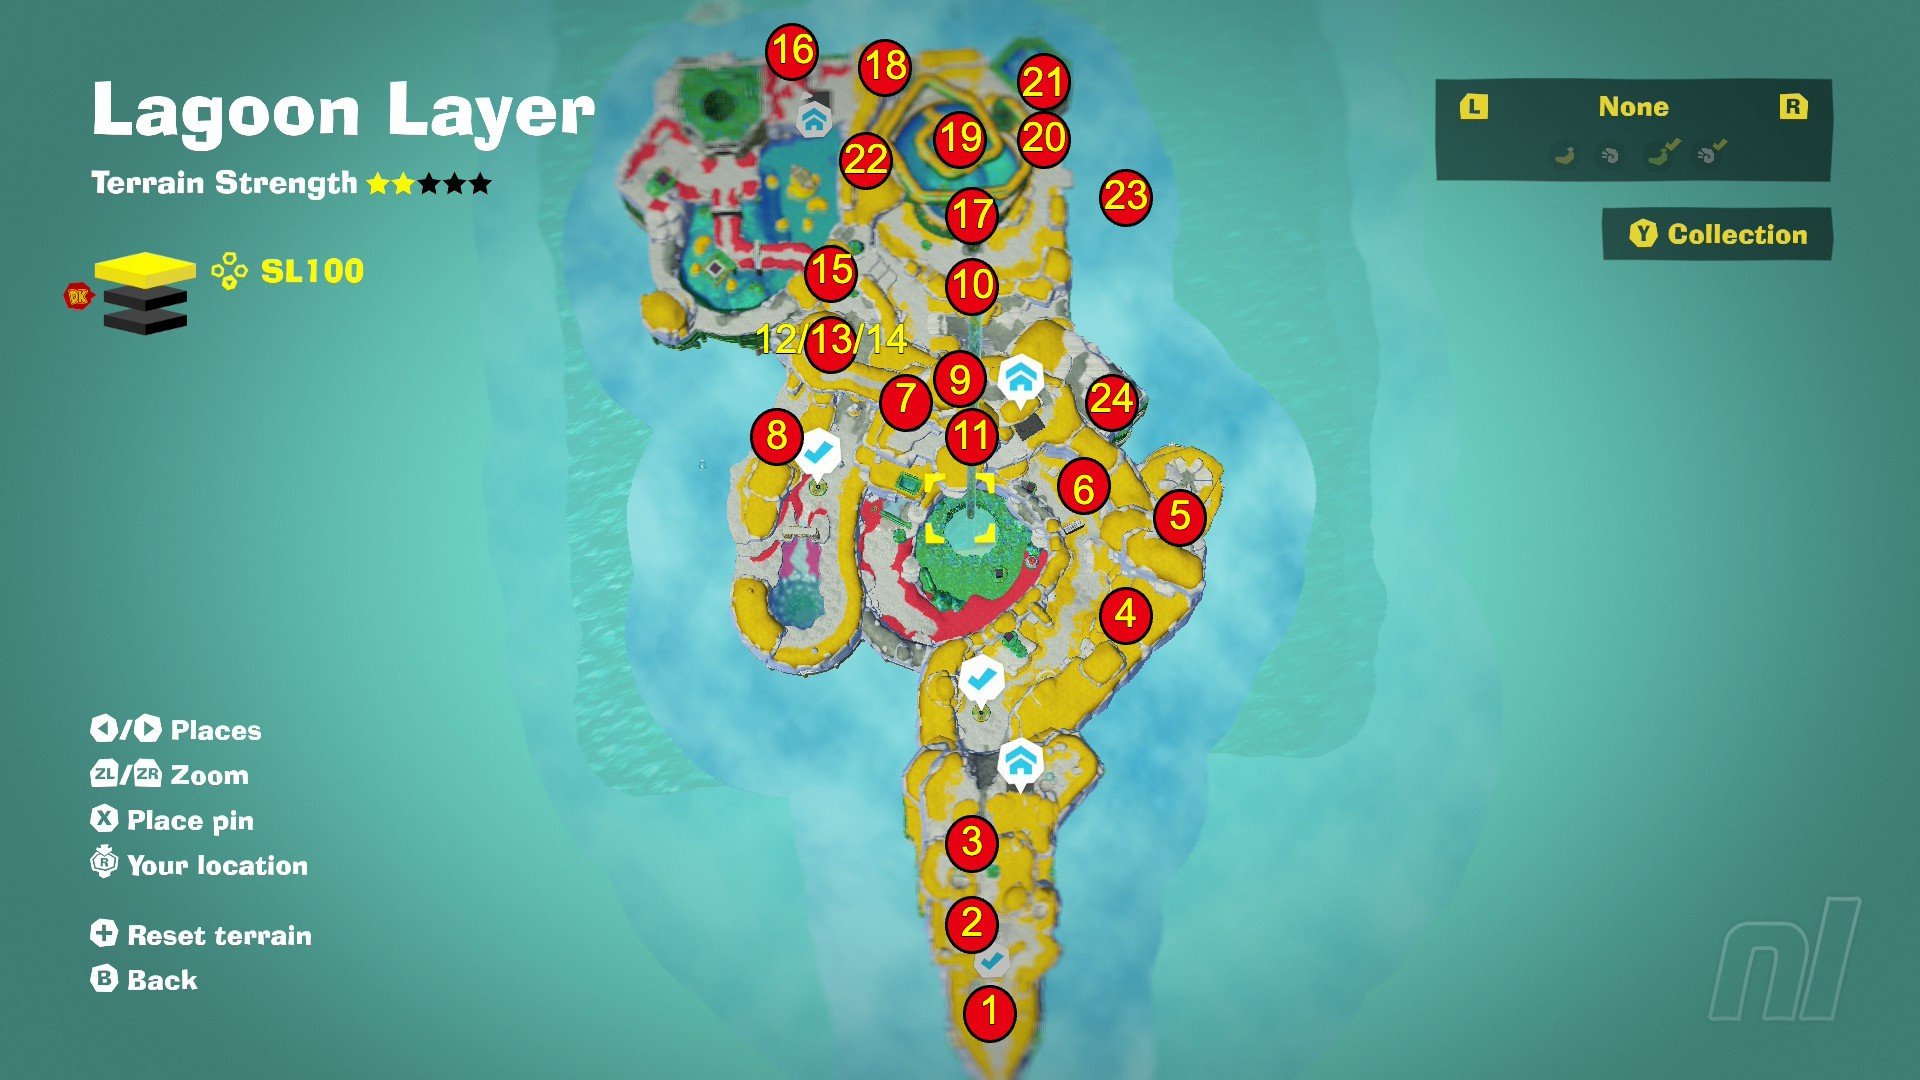
1. First Crockoid Cracked!
Directly in front of your first landing place.
2. Cave by the Cape
Head into the tunnel carved below DK, just ahead of the Ape Cape Teeleport. Punch through a rock doorway behind you to find this banana.
3. Lagoon Smashin' Stats
Smash through 5,000m of water in this layer, then speak to Smashintone, north of the Ape Cape checkpoint.
4. Bathing Banana
Punch through a sand wall, right of the Boom Bomb introduction, and drop into the water below.
5. Shifty Smash: Beyond the Wall
Head over the cliff, northeast of the Reservoir Bank checkpoint, towards an area of splayed rocks. Hit the pyramid next to the Blast Rock to trigger the challenge.
6. Battle: Stoney, Grassy Goons
Follow the path ahead from the Reservoir Bank checkpoint and enter the Challenge Ruins on the right.
7. A Nook behind Concrete
Blast Rock your way through the turning concrete near the above Challenge Ruins and use Hand Slap to locate this banana to the right of the turnstile.
8. Battle: Both Sides of the Bridge
Enter the Antickoid x6 Battle Ruins, left of the Reservoir Hills checkpoint.
9. Smash through the Floor
Under a slab of concrete in a cave next to the Reservoir Getaway.
10. Cranky's Lagoon Rant
Find Cranky Kong on a floating platform, behind the right monkey head on the bridge over the Reservoir Hills checkpoint. Listen to his rant and get the reward.
11. A Real Mouthful
Head one level up the cliff face, right of the Reservoir Hills checkpoint and punch through the dark sand wall.
12. Rest Stop on Roof Road
Enter the Hangin' on Roof Road Challenge Ruins in the left monkey face on the bridge over the Reservoir Hills checkpoint. This first banana is right after the first hanging section.
13. Hidden on Roof Road
Head left on the hanging section after the above banana, towards the moving rocks. Use the gaps in the rocks or punch through to access a secret path to the banana.
14. At the End of Roof Road
Complete the Challenge Ruins to get this banana.
15. Lakeside Low Road
Head under the rock bridge north of the Reservoir Hills checkpoint and turn left to drop onto a small platform with two barrels guarding a doorway. Punch through to find this 'nana.
16. Battle: Swarms among the Pillars
Beat the Peekaboopoid x50 Battle Ruins on SL100's northernmost green metal platform.
17. Follow the Voided Terrain
Covered in Void metal, in the cave under the twisted pipe's water pipe.
18. Fishin' for Bananas
In a cave under the small green water basin, near the twisted green pipe.
19. Rise and Rinse
Punch the blue punching bag inside the water system with the twisted green pipe, then hop to the rising platform in the middle to nab the 'nana.
20. Placed in a Pipe
Use the water spout opening to get into the twisted water tank pipe and follow it to the right.
21. Shifty Smash: Atop the Pipes
Complete the Blast Barrel challenge on the spiral pipe over the water tank to get this gem.
22. Battle: Wings and the Wobbly Disc
Beat the Buzzoid x3 Battle Ruins next to the large water system with the twisted green pipe over it.
23. Beyond the Cloudy Platforms
On a floating platform east of the water tank. Throw two stones at the shiny material to build a bridge across.
24. Blasting for the Banana
Follow the path from the Reservoir Hills checkpoint and speak to the monkey next to the Boom Rock. Follow the map marker and hit the machine it points you towards.
25. Lagoon Chip Exchange
Cash in your chips at the Lagoon Chip Exchange (found on SL101).
SL101
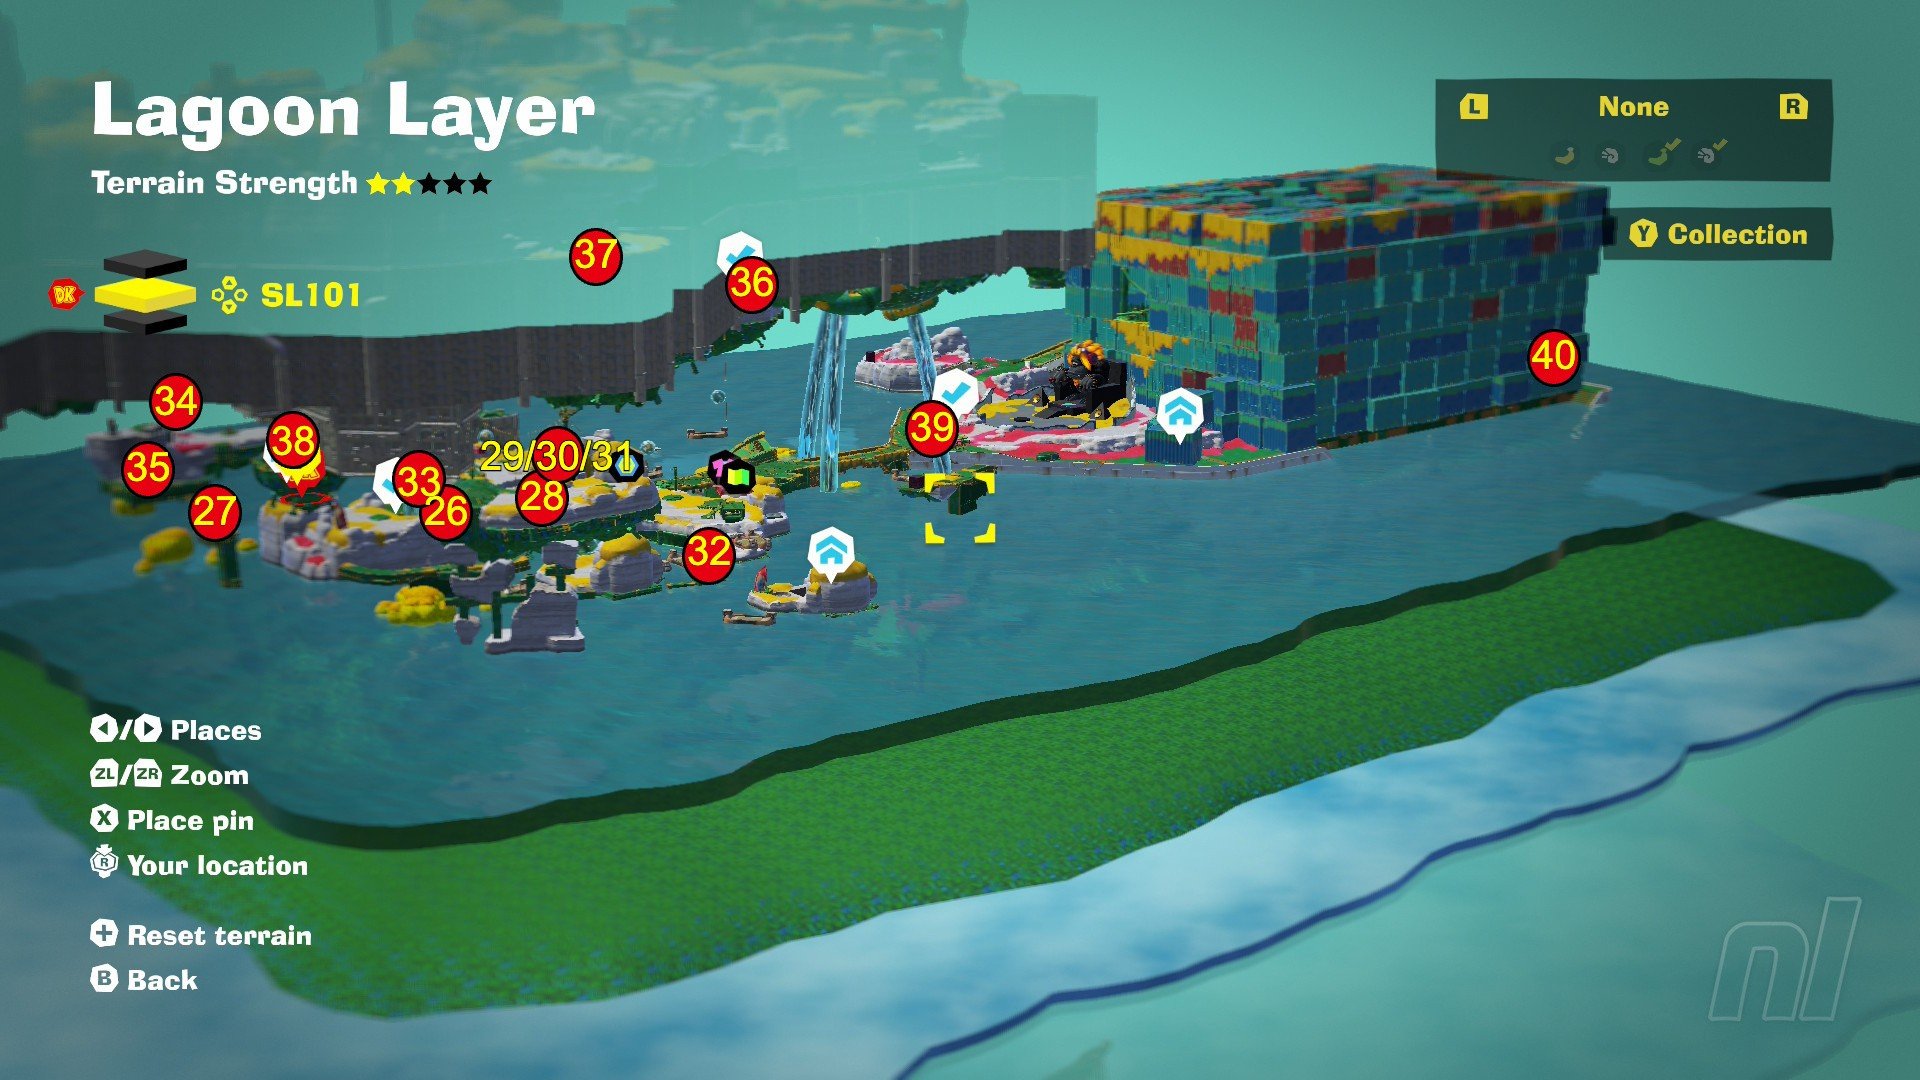
26. Landed in Salvager's Landing!
Defeat the Concrete Crockoid to unlock the Void Co. plug and follow the jump downwards.
27. Shifty Smash: A Wall Hanging in Air
Turn around at the entrance to SL101 and jump onto the metal structure with the Boom Rock. Punch the shining pyramid to start the challenge.
28. On the Ceiling of the Floor
Get the water to its maximum level after talking to the Kong Elder. You'll then be able to swim to this banana under the fishing village.
29. Over the Thorny Path
In the Thorn-Choked Conveyor Challenge Ruins in the Salvager's Landing fishing village. This first banana is straight ahead from the first conveyor.
30. Into the Thorny Nook
Follow the conveyor from the above banana and use a Boom Rock to blast the thorny opening on the left.
31. Through the Thorny Walls
Ride the challenge conveyor from the previous two bananas to the end.
32. The Salvager's Stash
Speak to a monkey on a raised platform, left of the entrance to the Salvager's Landing fishing village. Follow the banana pin on the map to a metal mine shaft, just next to the clothes shop.
33. Battle: Concrete-Wall Clash
Complete the Crockoid x2 Battle Ruins near the Salvager's Landing checkpoint.
34. Up, Over, and Across
Use the rope roof to head towards the second concrete pillar on the critical path. This banana is on the other side, just before you ascend to SL100.
35. Within the Fast-Growing Grass
Beneath the large floating island, left of the Warp Gong.
36. Hangin' on Orangu-Hang Highway!
Break through the northern Void Co. lock into SL101 and find this banana beneath.
37. Concrete Wall on the Moving Floor
Break through the concrete wall above the end of the Orangu-Hang Highway, then break another on the left to find this banana.
38. Outskirts of the Fishing Village
Use the hidden entrance to SL101, found under the 'crater' section north of SL100's Reservoir Bank checkpoint. Complete the hanging course to find this banana at the end.
39. Crossed to the Kong Elder's Court!
Fill the water level back up to maximum and follow the bridge to the court. This banana is at the end of the bridge.
40. The Ship Stern's Snack
Swim around the shipping containers behind the Kong Elder to find this banana.
41-50
Post-credits challenges (scroll down).
SL102
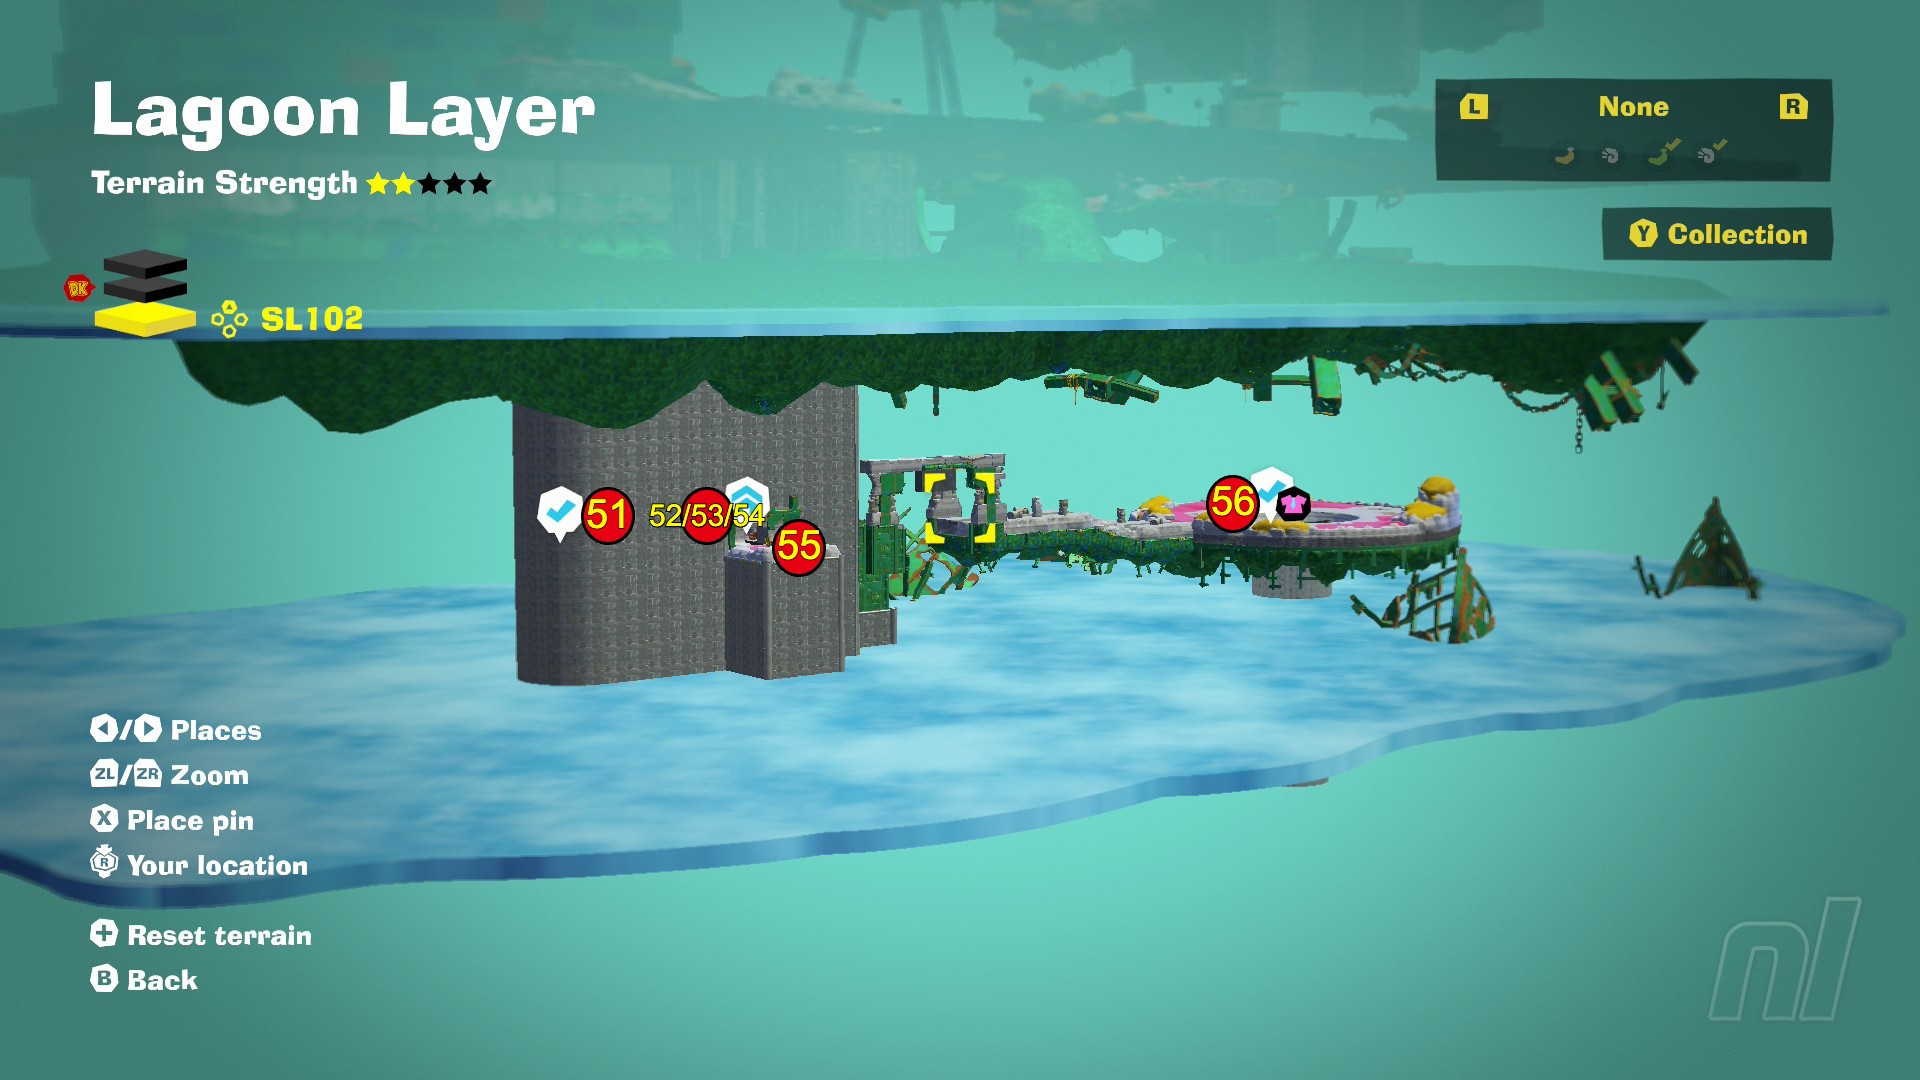
51. Dipped into Chimpy Channel
Learn Kong Bananza from the Kong Elder and follow the critical path through the Void Co. seal. The banana is right at the entrance to SL102.
52. Pop and Destroy
Complete the Kong Bananza: Pop Party Challenge Ruins.
53. Atop the Concrete Roof
Enter the Kong Bananza: Pop Party Challenge Ruins, next to the entrance to SL102 and climb onto the arena's roof to find this one.
54. Hung from the Ceiling
Hanging from the ceiling of the above Challenge Ruins.
55. Shipwrecked Treasure
In the boat behind the Lakebed Getaway.
56. Lagoon Hide-and-Seek
Speak to Seekertone at the former-boss battle site, and find the four hiding Fractones.
Post-Credit Banandium Gems
The remaining Banandium Gems are only available for those who have rolled credits in Donkey Kong Bananza, and have started the post-credits storyline.
If you don't want the contents of these Banandium Gems spoiled, don't scroll past the following image until you've polished off the main game.
To nab the remaining collectibles on this Layer, make sure you have at least 300 Banandium Gems, then head over to the Kong Elder on SL101 and begin the Kong Bananza Rehearsal.
There's no map for this section of the game, but here are all the Banandium Gems you'll find in the challenge room:
41. Smash Through the First Scrappin' Ground
Defeat the enemies, as instructed.
42. Lure and Destroy
Punch through the wall left of the first banana to start a detour.
43. Past the Second Scrappin' Ground
Make it through the bomb room.
44. Lift and Destroy
Head through the wall left of the Second Scrappin' Ground banana and use the lift to defeat the enemies.
45. Past the Third Scrappin' Ground
Complete the shifting block challenge.
46. Wallop and Destroy
Head into the detour after the third room and use the Wallops to do your dirty work.
47. Past the Fourth Scrappin' Ground
Make it through the Burrower rooms.
48. Launch and Destroy
Head into the next detour, stand under the Burrowers and launch the enemies upwards with an Up Punch.
49. Bounce and Destroy
Enter the final detour and use the cannon balls to knock down the enemies.
50. Past the Fifth Scrappin' Ground
Complete the Kong Bananza Rehearsal.
We hope that was helpful! For more assistance tracking down these pesky peelers, be sure to check out our full Banandium Gem Locations guide hub, and head over to the Donkey Kong Bananza Walkthrough for a bunch more hints and tips.


Comments 0
Wow, no comments yet... why not be the first?
Leave A Comment
Hold on there, you need to login to post a comment...