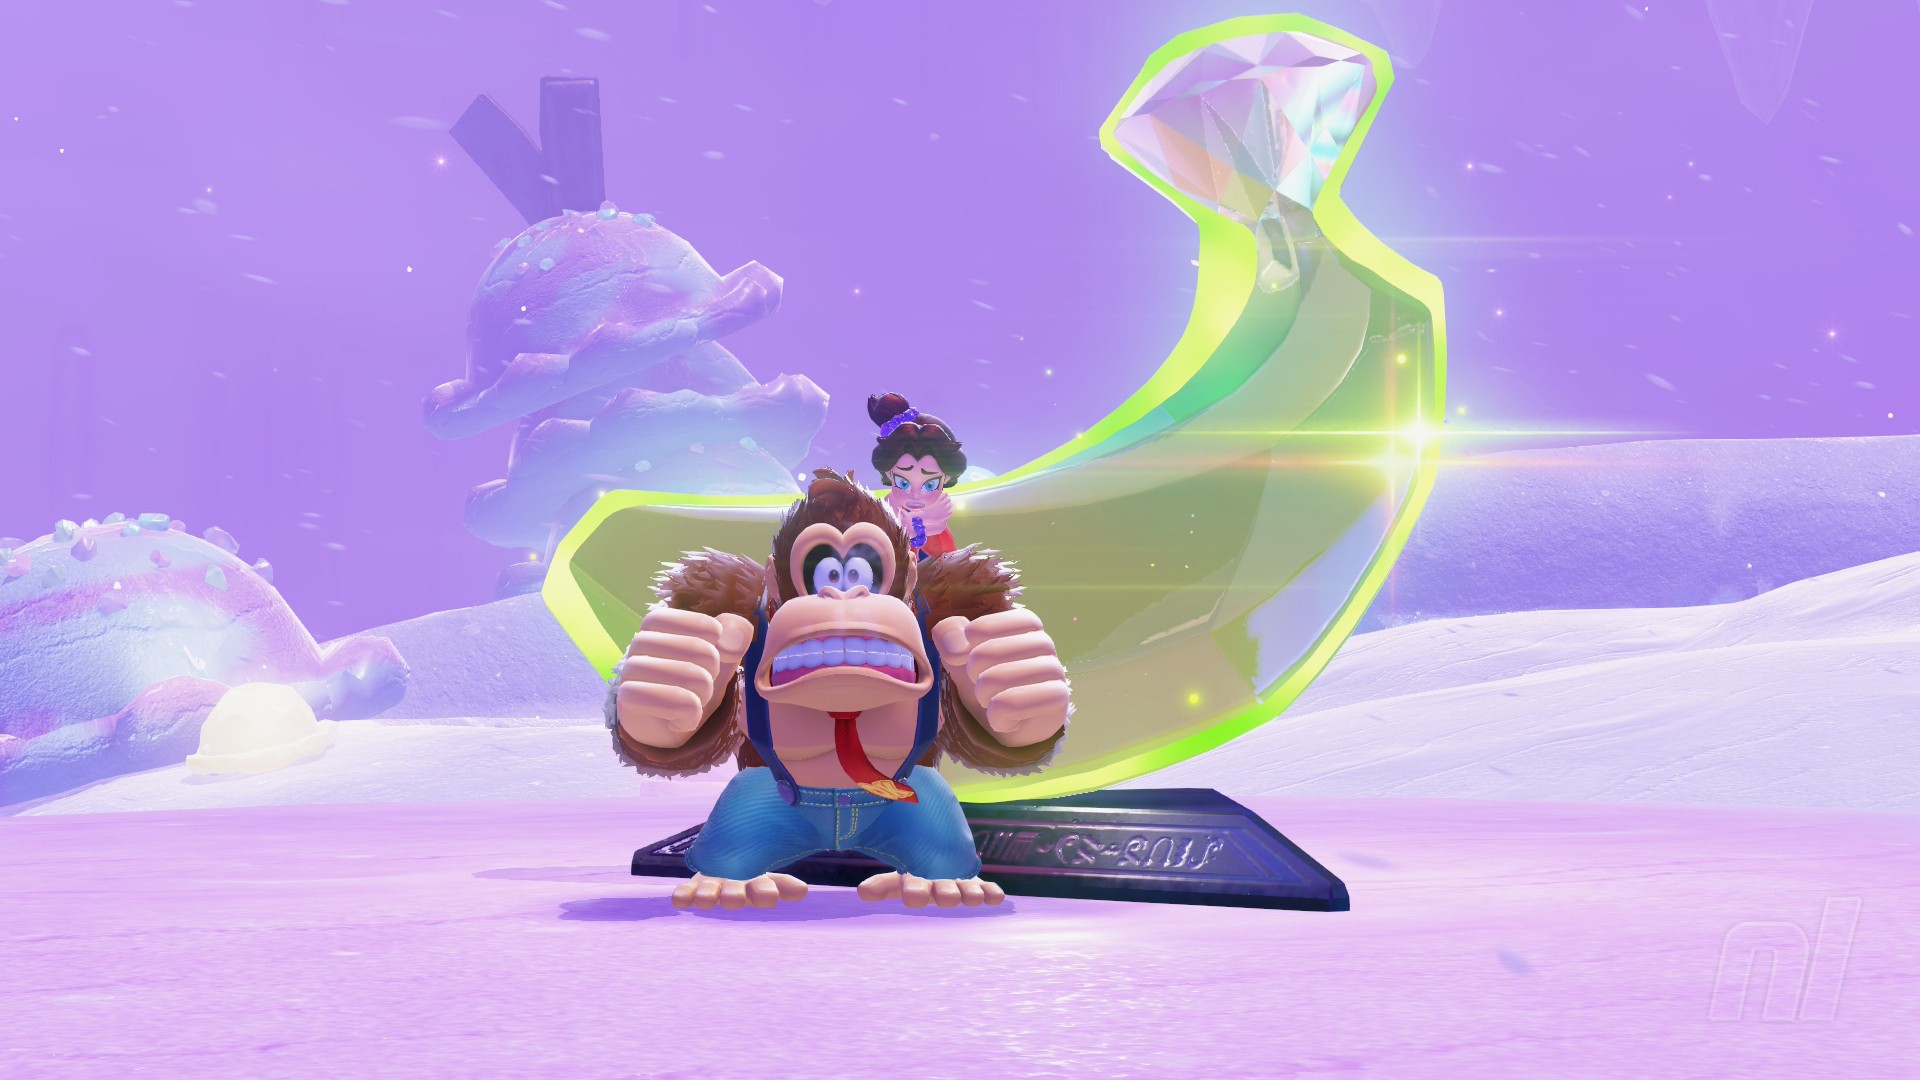
The snow-covered Freezer Layer has the most Banandium Gems in any region in Donkey Kong Bananza, and they're split between a bunch of sub-layers.
There are a whopping 87 Banandium Gems to find across the area's four sub-layers, and we have made a map and list for each of them, which you can use in tandem to track them all down.
And remember, you can find more details on the other regions' collectibles by heading over to our Banandium Gem Locations guide hub.
Subscribe to Nintendo Life on YouTube834k
Freezer Layer Banandium Gem Locations
Some of the following Banandium Gems are only available once you've polished off the layer's main mission and come back later, while you'll have to make it past the game's credits for others. We've added the post-credit Gems to their own section below, but we'd suggest returning to this layer after you've finished its main quest to get the most from the region.
SL500
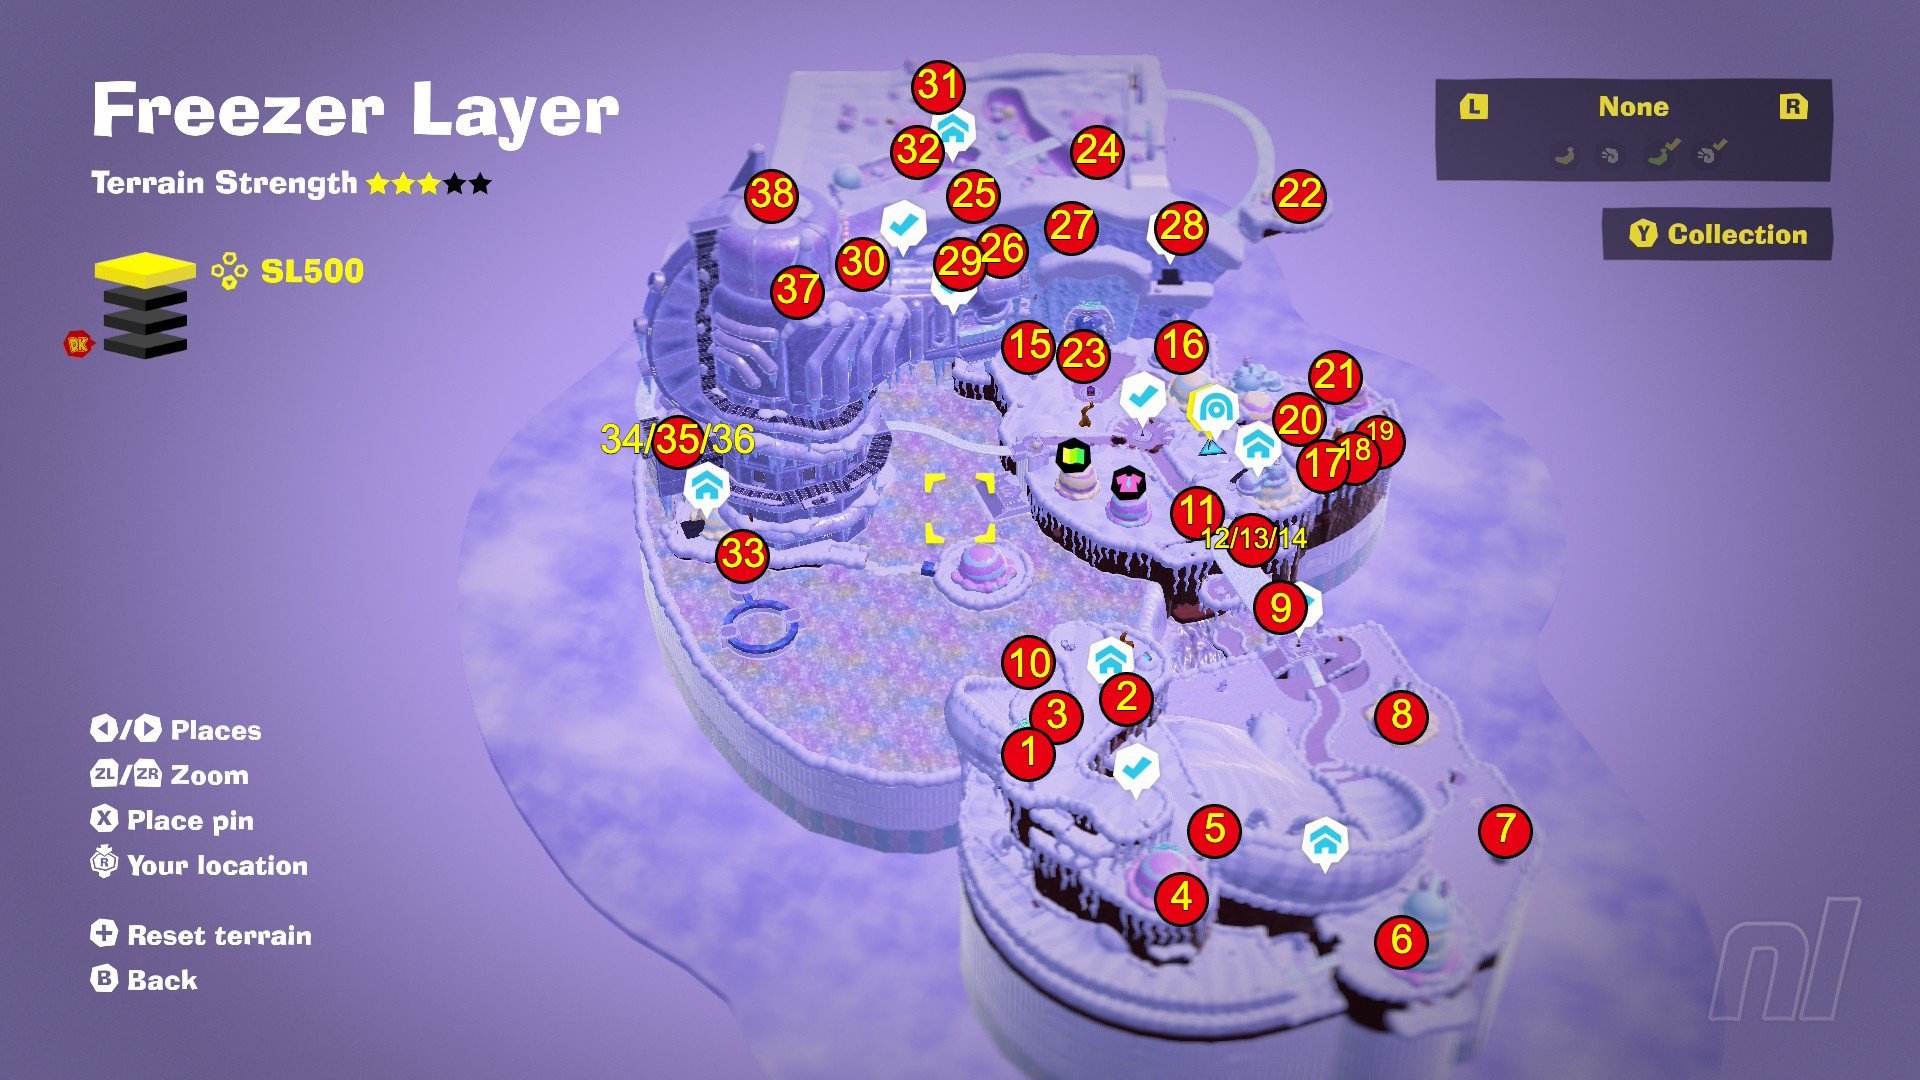
1. Chillin' in the Freezer Layer!
Dive down into the Freezer Layer.
2. A View of Crumbly Bridge
In a cave in the starting mountain, under the end of the first long slope.
3. A Snowy-Cliffside Secret
Snowboard down the first slope in the later and you'll find a ladder-shaped cliff on your right. Punch straight through it and use Hand Slap to find the hidden banana.
4. Turned Up under Turnips
In a cave in the starting mountain, under the turnip patch.
5. Slumbering in the Snow
Follow the long path around the bottom of the starting mountain and enter the cave at the end. This banana is hiding under a pile of snow.
6. Under the Cliff-Edge Scoop Hut
Dig straight down from the three-scoop ice cream building shaped like a zebra.
7. Enshrined atop the Pillar
Snowboard down the second slope in the layer and walk back on yourself to the right, towards a large pillar. Use Hand Slap on the dirt in front to activate a secret lift.
8. Battle: Snowball Rollin'
Complete the Rolluskoid x3 Battle Challenge in the ice cream building at the bottom of the second snowboard ramp in the layer.
9. Over the Freezing River
Follow the non-zebra route below the Crumbly Bridge checkpoint, through the lava room. After climbing up the lava wall, drop off the ledge to find the banana below.
10. Hidden behind the Waterfall
Roll through the waterfall to find a secret path behind. The banana is straight ahead.
11. Across Crumbly Bridge
Follow the non-zebra path across Crumbly Bridge and use the Blast Barrel to find this banana on the other side.
12. Clearing a Red-Hot Path
Enter the Challenge Ruins just below the village side of Crumbly Bridge. This first banana is at the top of the first rotating lava pillar.
13. Behind the Red-Hot Paths
Make a path up the second-to-last lava pillar in the Challenge Ruins and climb up onto the platform. Walk around the perimeter and drop down into a new section, using your pre-existing lava gap to take you further around the rotation into a secret room.
14. Climbing a Red-Hot Path
Complete the Challenge Ruins.
15. Battle: Quick Quake Quarrel
Complete the Crocktoid x6 Battle Ruins, near the Coolstripe Cavern entrance, by repeatedly hitting the switch at the end of the icy track.
16. Un-Voiding the Scoop Hut
Remove the Void Co. infection on route to the Zebra Elder, then punch into the zebra-shaped ice cream house next to the doorway.
17. The Freezer Growtone
Feed the Growtone on the right side of the Crumbly Bridge 500 Gold.
18. The Hungry Freezer Growtone
Feed the Growtone 1,000 Gold.
19. The Sated Freezer Growtone
Feed the Growtone 3,000 Gold.
20. Freezer Hide-and-Seek
Head to the lower section of houses near the Snowy Crossroads Warp Gong and find the four hidden Seekertones. Remember to look high and low.
21. Heavily Protected Produce
Clear the Void Co. infection in the lower area of houses, behind the Snowy Crossroads Warp Gong.
22. Scoop Hut in the Sky
Use Ostrich Bananza off the top of the cooling tower and fly to the nearby floating island. The banana is inside an ice cream scoop.
23. Cracking Open Coolstripe Cavern
Use the quake switch to open the cavern route to the Zebra Elder.
24. Edge of a Cool Pool
Use Hand Slap while on the icicle crossing the river in Coolstripe Cavern to bring up three hidden platforms to the banana.
25. Beware Falling Icicles
In the first open area in Coolstripe Cavern, on a raised platform joined by a sandy bridge. Watch out for the icicle.
26. Battle: Barely Skating By
Beat the Antickoid x5 Battle Ruins in the first large open room in Coolstripe Cavern.
27. Deep in the Cavern
Follow the main path through the cavern. This one's on the way out of the first big open room with falling icicles.
28. Sitting on the Snow
On a platform on the side exit to the caverns. It has a long, crumbling path leading to the roof.
29. Gazing at the Cooling Tower
Keep following the path through the cavern and look for a platform on the left just before the Exit checkpoint.
30. Kept in a Coolstripe Cubby
Just after the Coolstripe Exit checkpoint, before dropping down to the inter-level tunnel, dig into the ground by the metal grate.
31. Shifty Smash: Above the Caverns
Use Zebra Bananza to make it onto the cavern roof, then complete the Shifty Smash challenge once up there.
32. Coolstripe Cavern's Lost Treasure
Speak to the zebra on the cavern roof and follow the map marker to this banana. The simplest path is to get directly above it on the cavern roof, then smash down through a nearby ring of gold.
33. Shifty Smash: Ice-Cold Lakeside
Complete the Shifty Smash Challenge in the ice ring, near the bottom of the cooling tower.
34. U-Turn on a Crumbly Road
Head to the back of the cooling tower and access the Zebra Bananza: Pop Party Challenge Course. Use the crumbly road to run back under the Challenge Course's starting spot and punch the banana on the ceiling. Remember to keep moving while you punch!
35. Crumbly-Road Run
Pop all the balloons in the Challenge Course.
36. A Crusty Trust Fall
Turn back on yourself as soon as you hit the crumbly track and drop through the ground to find this banana.
37. Behind the Cooling Tower's Eyes
Punch through the eyes of the cooling tower to find this banana on a secret path.
38. Cranky's Freezer Rant
Climb up the metal mane at the back of the zebra-shaped cooling tower and you'll find Cranky in a ball of ice cream on the top.
39. Freezer Chip Exchange
Trade Chips at the exchange store in the Freezer Layer.
SL501
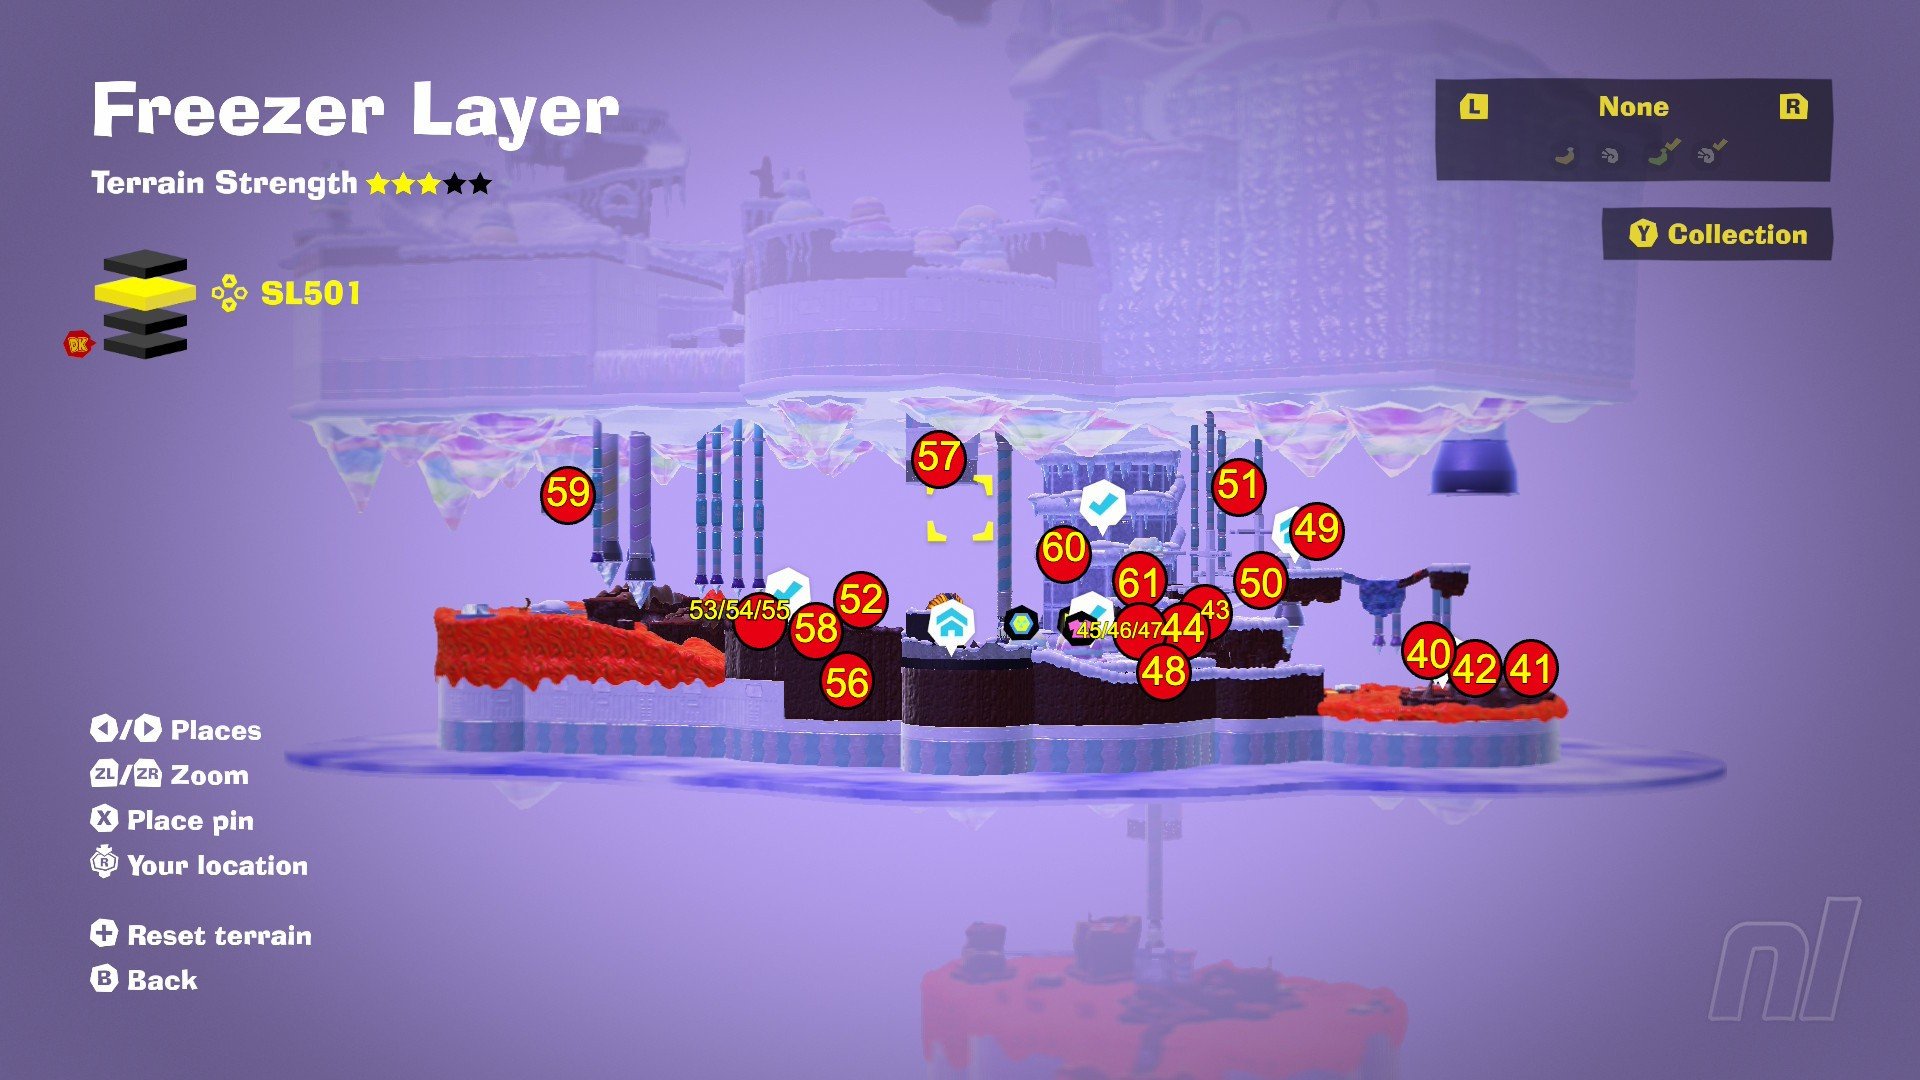
40. Through Coolstripe Cavern
Follow the critical path down to SL501.
41. Molten-Hot Choco Banana
In a mound behind the Chocolava Lake checkpoint. Use a nearby falling icicle to remove the lava.
42. Battle: Broiling Bowling Brawl
Complete the Rolluskoid x4 Battle Challenge near the start of Chocolava Lake.
43. Coolin' Down in Canter Creamery
Make it through Chocolava Lake.
44. Battle: Magma Mayhem
Beat the Antickoid x6 Battle Challenge, left of the Canter Creamery entrance.
45. Traversing the Massive Iceberg
Speak to the Constructone, right of the Canter Creamery entrance, to open the Rising Iceberg Rush Challenge Course. This first banana is next to the second punching bag.
46. Edge of the Massive Iceberg
On a sloped iceberg to the left of the second punching bag.
47. Mastering the Massive Iceberg
At the end of the Rising Iceberg Rush Challenge Course.
48. Smothered in Chocolava
Next to the piece of broken record by the cooling tower. Use the Ice Machine to clear the lava, and break down any walls that get in its way.
49. Shifty Smash: Over Ice and Lava
Head up the crumbly path near the first cooling fan and complete the Shifty Smash challenge at the top.
50. Freezer Smashin' Stats
Smash through 20,000m of Snow in the Freezer layer, then speak to Smashintone under the Creamery's fans.
51. Found above the Fan
Climb up the second fan in the Creamery. This banana is on the top level.
52. Kept Warm in the Field
In the lava field, right of the Zebra Elder. Punch a nearby frosty enemy into a large pile of lava to reveal the banana beneath.
53. Trembling Steps through Powder
Use an icy enemy to clear a lava wall in the lava fields, right of the Zebra Elder, to enter the Precarious, Powdery Path Challenge Course. This first banana is at the end of the first section of the path.
54. Treacherous Steps through Powder
Reach the Blast Barrel at the end of the Challenge Course.
55. Extra Steps through Powder
Keep going straight, past the Blast Barrel at the end of the course, and complete an extra section to find the final banana.
56. Through a Too-Hot Tunnel
Pull up the big central turnip in the lava field, right of the Zebra Elder and drop into the area below. Use a cube of ice to surf through the lava tunnel.
57. A View of Canter Creamery
Use the entrance to SL501 in the cave at the bottom of Crumbly Bridge (SL500).
58. Beneath the Zig-Zag Bridges
Grab the record piece in the lava, near the Zig Zag Bridges checkpoint, and use it to surf over the lava, straight downhill to this 'nana.
59. Stake-Hidden Snack
Use the entrance to SL501 found at the bottom of Cold-Colt Crest (SL500).
60. Buried in the Cooling Tower
In the first cooling tower ice machine puzzle, direct the ice to the bottom left corner of the dirt stack to remove the lava on this hidden banana.
61. Behind the Cooling Tower
On the metal path, running around the outside of the cooling tower.
62-75.
Post-credits challenges (scroll down).
SL502
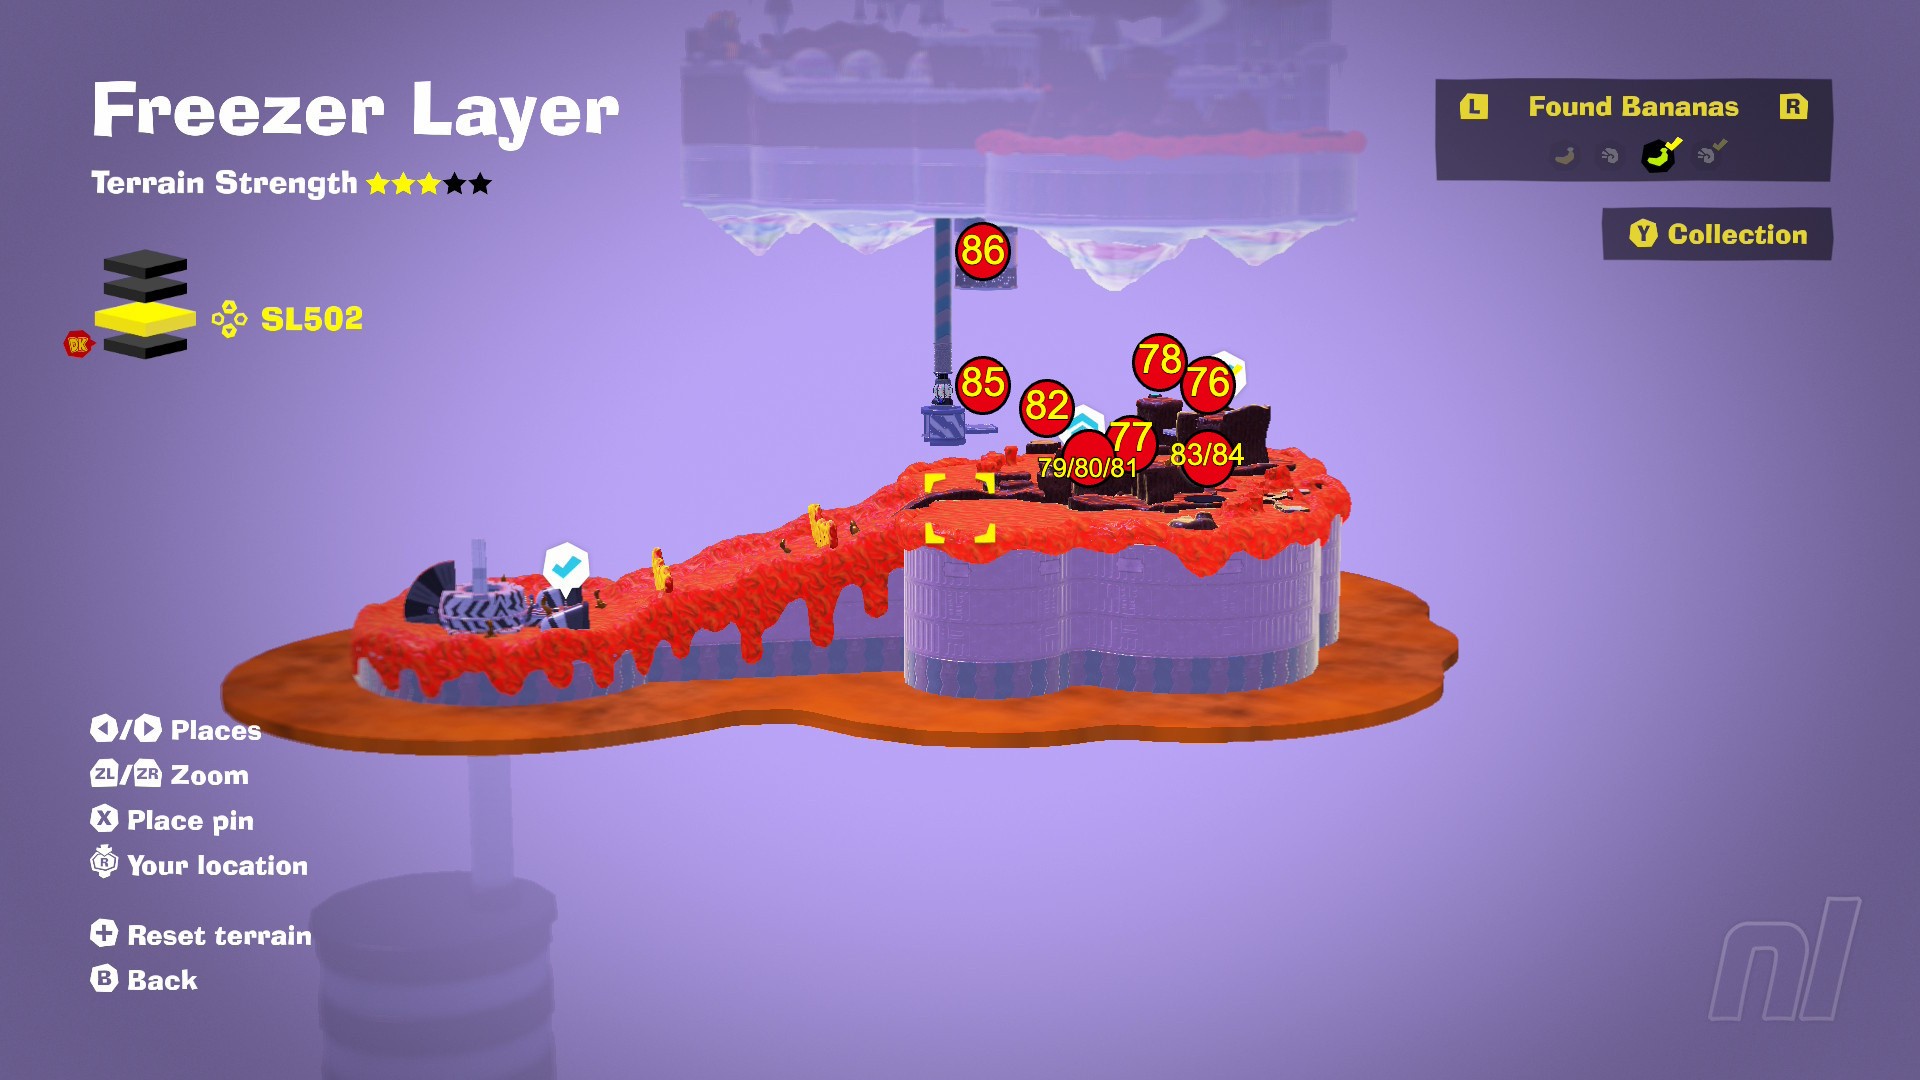
76. Hoofin' it to Hot-Hoof Heater!
Dive down to SL502 from the cooling tower.
77. Hidden in Chocolava Cave
From the above Challenge Course, drop down below the bridge, into a gap in the lava. Follow the rotating path to this hidden banana.
78. Battle: Fighting on the Run
Speak to the Constructone behind the entrance to SL502 to open the Squeeloid x8 Battle Challenge.
79. Scraping the Slope
Head across the first bridge in SL502 and drop down on the other side to enter the Ice-Serve Slope Challenge Ruins. Make a path from the ice machine to the bowl at the bottom of the ramp.
80. A Sneaky Second Serving
Unearth a hidden bowl in the middle of the ice ramp, and build an ice path to there first.
81. Over the Slope
Head straight towards the ice machine and use a secret path on the left to climb up the structure to this banana.
82. Treat on a Tiny Island
Follow the first bridge from the Hot-Hoof Heater checkpoint, then follow the materialising bridge on the right past the lava pillars to a floating island with the banana.
83. Freezer Fragmentone Recovery
Find Fragmentone on a chocolate outcrop, southwest of the Heater's main island and return one of their fragments.
84. Freezer Fragmentone Restoration
Return Fragmentone's other two fragments.
85. Tricky Trot to the Ice Maker
Use Zebra Bananza on the materialising bridge, next to the Heater's main island Getaway.
86. Looking over Chocolava
Follow the tunnels through the cave in the mountain under the fans on SL501 and use the hidden entrance to SL502 to reach this banana.
SL503
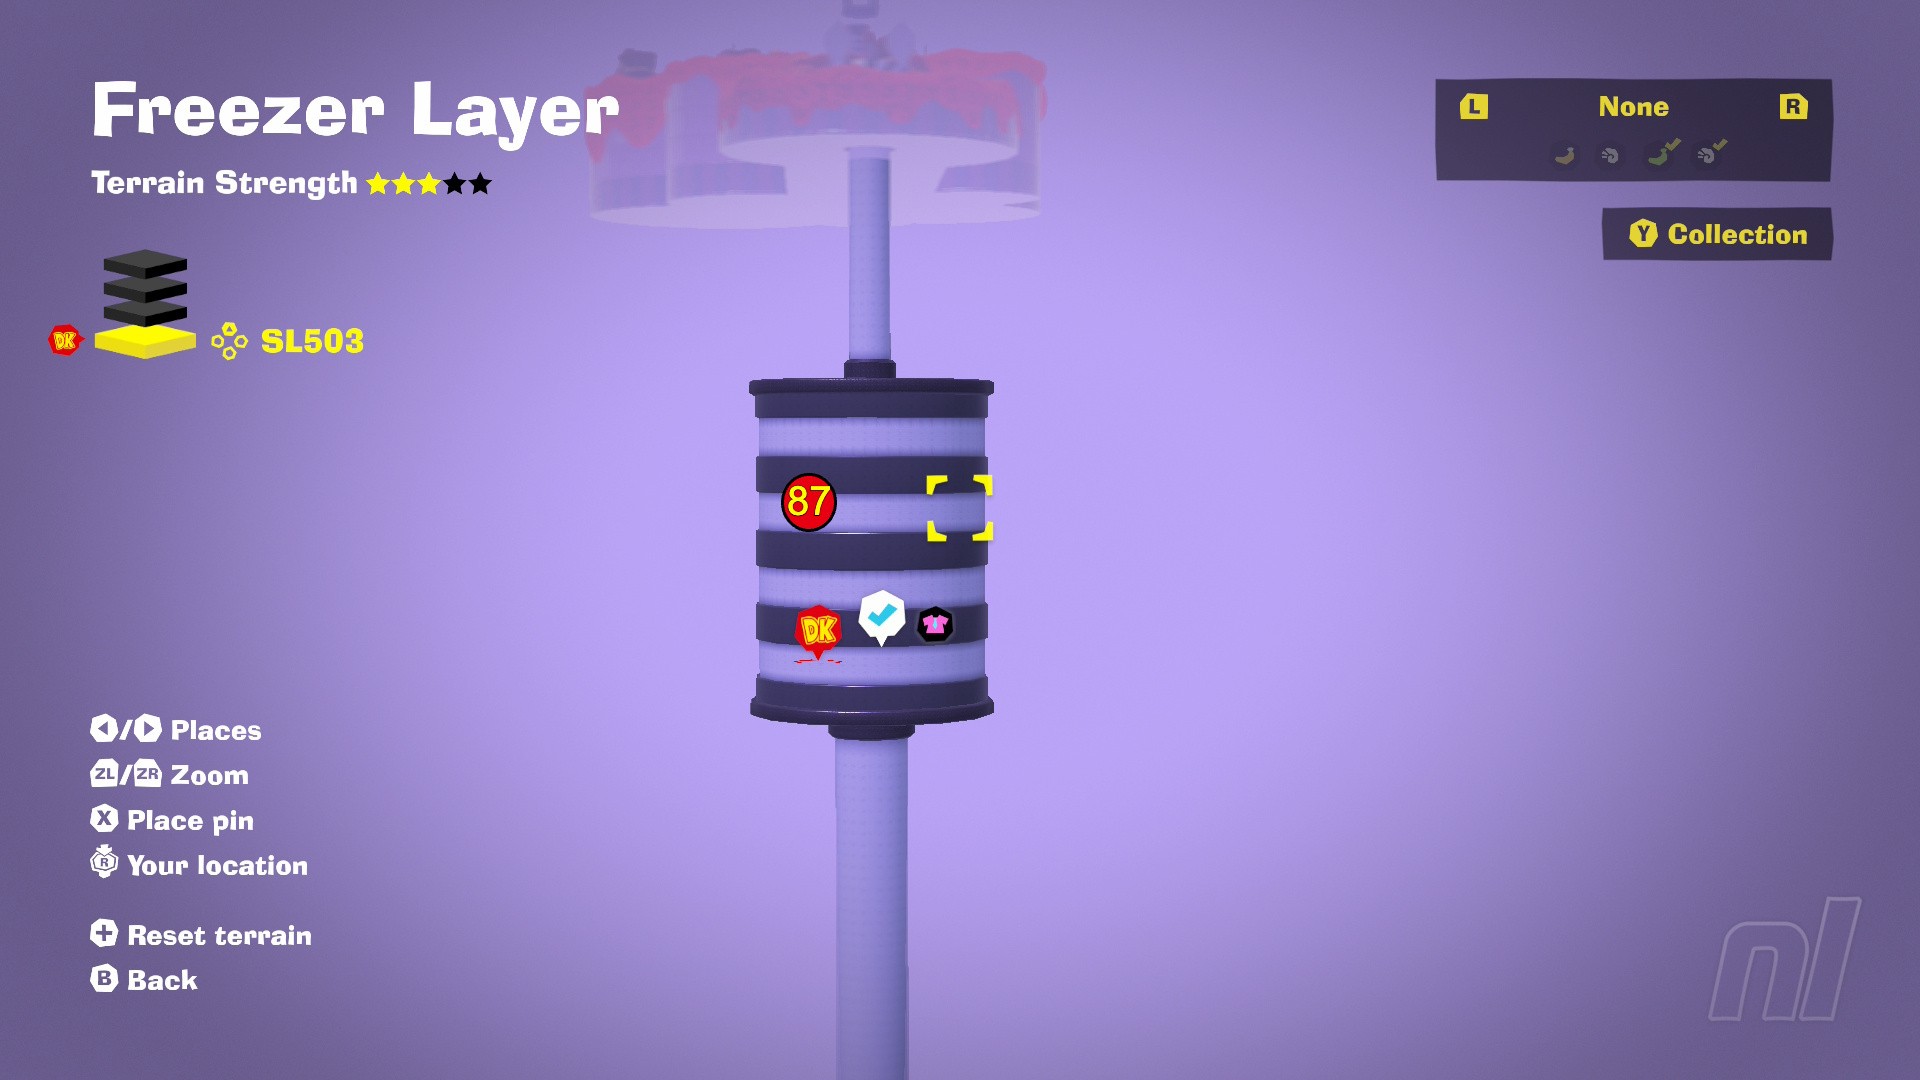
87. Stuck among the Pipes
Use Ostrich Bananza as you dive into the compressor to SL503, and float to a pipe on the wall with the banana attached to it.
Post-Credit Banandium Gems
You'll need to have cleared the credits if you want to pick up the remaining Banandium Gems on this layer. So, if you don't want these bonus collectibles spoiling, we'd recommend coming back to this section once you've wrapped up the main story.

To get the post-credits Banandium Gems on the Freezer Layer, make sure you have at least 350 Banandium Gems, then head to the Zebra Elder to start the Bananza Rehearsal.
There's no map for these rehearsal bananas, but you can find a list of them all below:
62. Amuse-Boost Finish Line
Complete the Amuse-Boost within the time limit.
63. Amuse-Boost Fast Finish
Finish the Amuse-Boost with at least 20 seconds still on the clock.
64. Shifty Smash: Trot Up the Tower
Complete the Shifty Smash challenge, next to the Amuse-Boost bananas.
65. Hurl d'Oeuvres Finish Line
Complete Hurl d'Oeuvres within the time limit.
66. Hurl d'Oeuvres Fast Finish
Complete Hurl d'Oeuvres with at least 20 seconds on the clock.
67. Shifty Smash: Damp Dodge 'n' Dash
Complete the Shifty Smash challenge next to the Hurl d'Oeuvres bananas.
68. Shocking Cioppino Finish Line
Finish the Shocking Cioppino challenge within the time limit.
69. Shocking Cioppino Fast Finish
Finish the course with at least 20 seconds left.
70. Shifty Smash: Splashy Ascent
Complete the Shifty Smash challenge next to the Shocking Cioppino bananas.
71. Switcheroo Entrée Finish Line
Polish off the Switcheroo Entrée course within the time limit.
72. Switcheroo Entrée Fast Finish
Speed through Switcheroo Entrée with at least 20 seconds to spare.
73. Shifty Smash: Swift Switcheroo
Complete the Shifty Smash challenge next to the Switcheroo Entrée bananas.
74. Dangerous Dessert Finish Line
Polish off the Dangerous Dessert course in the time limit.
75. Dangerous Dessert Fast Finish
Sprint through the Dangerous Dessert finale with at least 20 seconds left on the clock.
That's yer lot for the Freezer Layer, but you can find a rundown of all the other layers in our Banandium Gem Locations guide hub. For even more hints and tips, be sure to check out our Donkey Kong Bananza Walkthrough.


Comments 0
Wow, no comments yet... why not be the first?
Leave A Comment
Hold on there, you need to login to post a comment...