If you're looking to pick up every outfit in Donkey Kong Bananza, then you're going to want to be on the lookout for Fossils.
These stone bones can be found all over the place in the underground world, with some layers even boasting three different rarities to their name. Fossils are unique to each layer, and we've put together the following guide to help you track them all down.
We've also included a Fossil FAQ section at the bottom of this guide, just in case you unearth any other queries in your search.
Subscribe to Nintendo Life on YouTube834k
Donkey Kong Bananza: All Fossil Locations
Below, we have laid out a map for every sublayer in the game where you'll find Fossils, accompanied by a rundown of how many there are to find and a quick explanation on how to nab the Extra-Rare variants on all layers where that's applicable.
Simply head to the pinpointed locations on the maps, then use Hand Slap to track down any nearby collectibles — remember, they could be above or below you.
Lagoon Layer Fossils
There are 72 Fossils to find in the Lagoon Layer, broken into the following categories:
- Ammonite (Normal) - 61
- Anomalocaris (Rare) - 10
- Whale (Extra-Rare) - 1
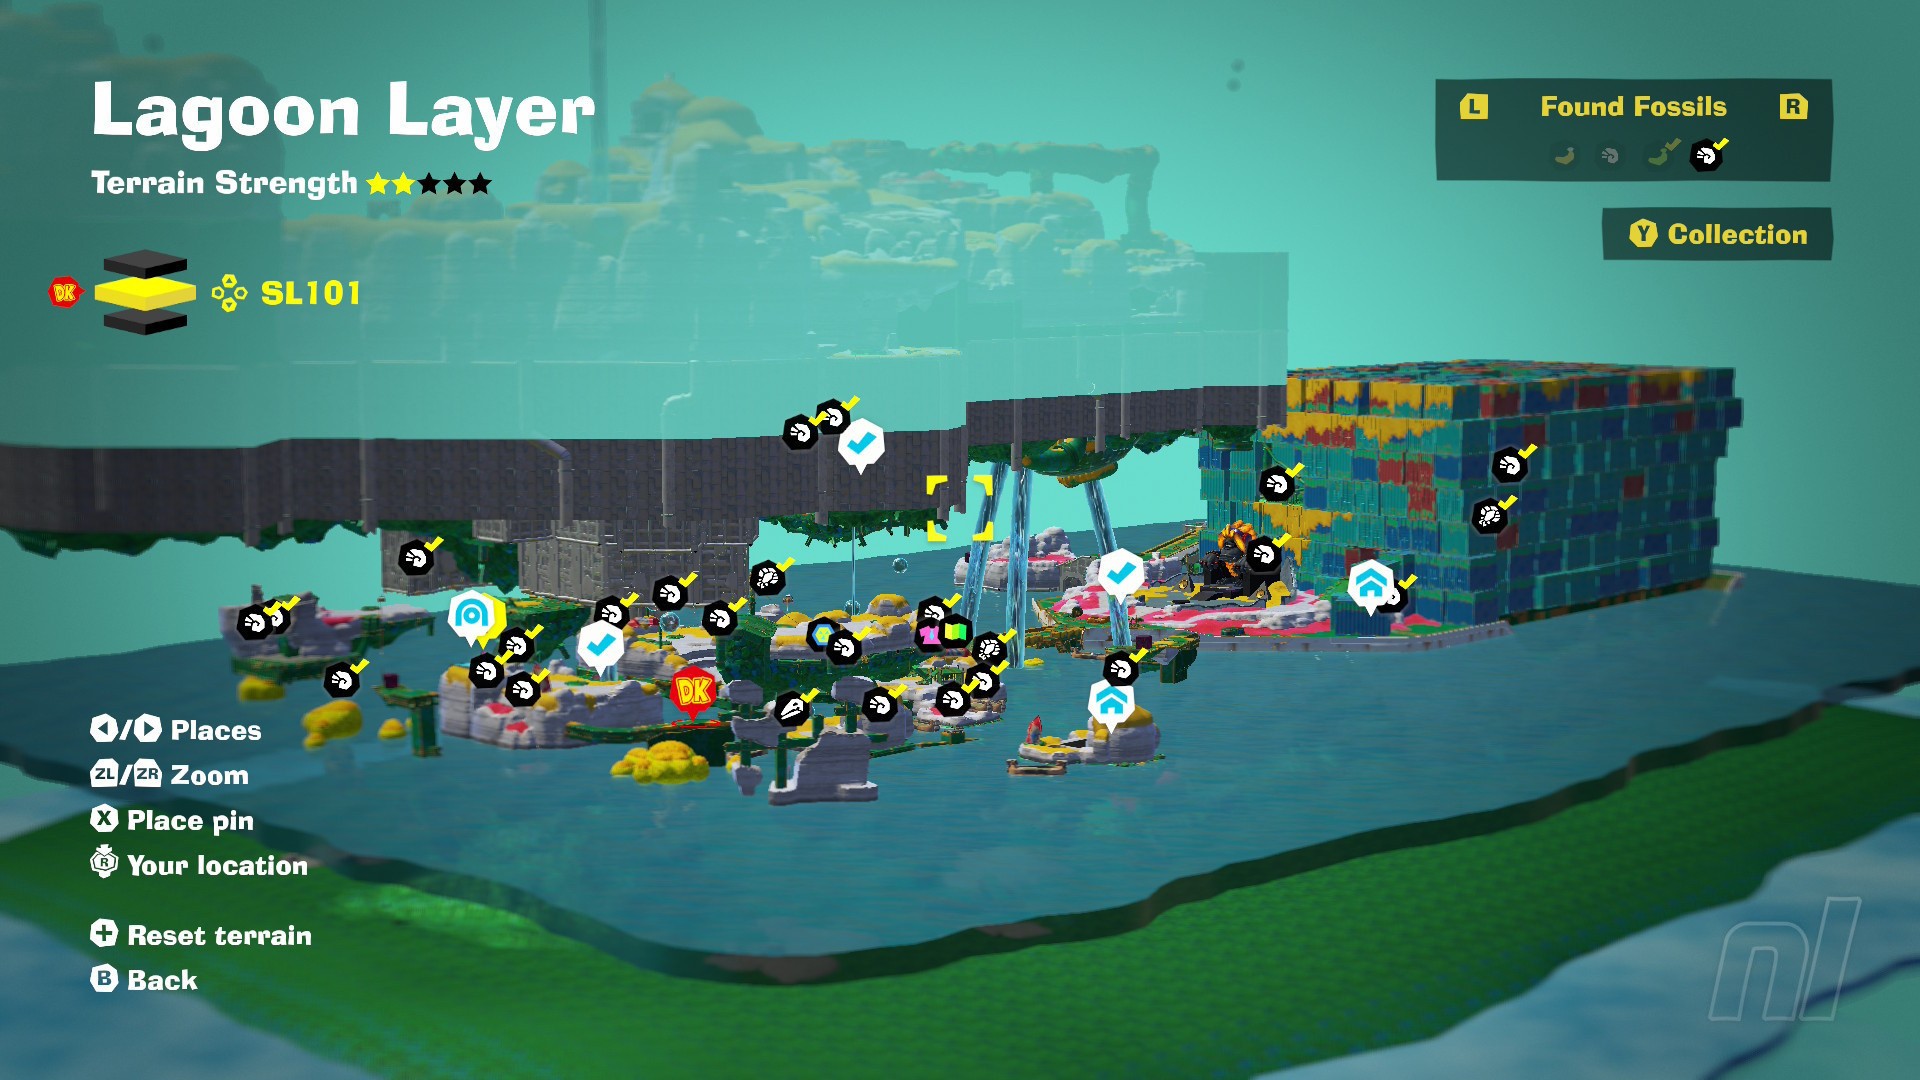
To get the Lagoon Layer Extra-Rare Fossil, restore the water level to its maximum height, then swim across to the raised platform near the Salvagers Landing checkpoint on SL101. Climb the rock face and repeatedly punch the Whale Fossil.
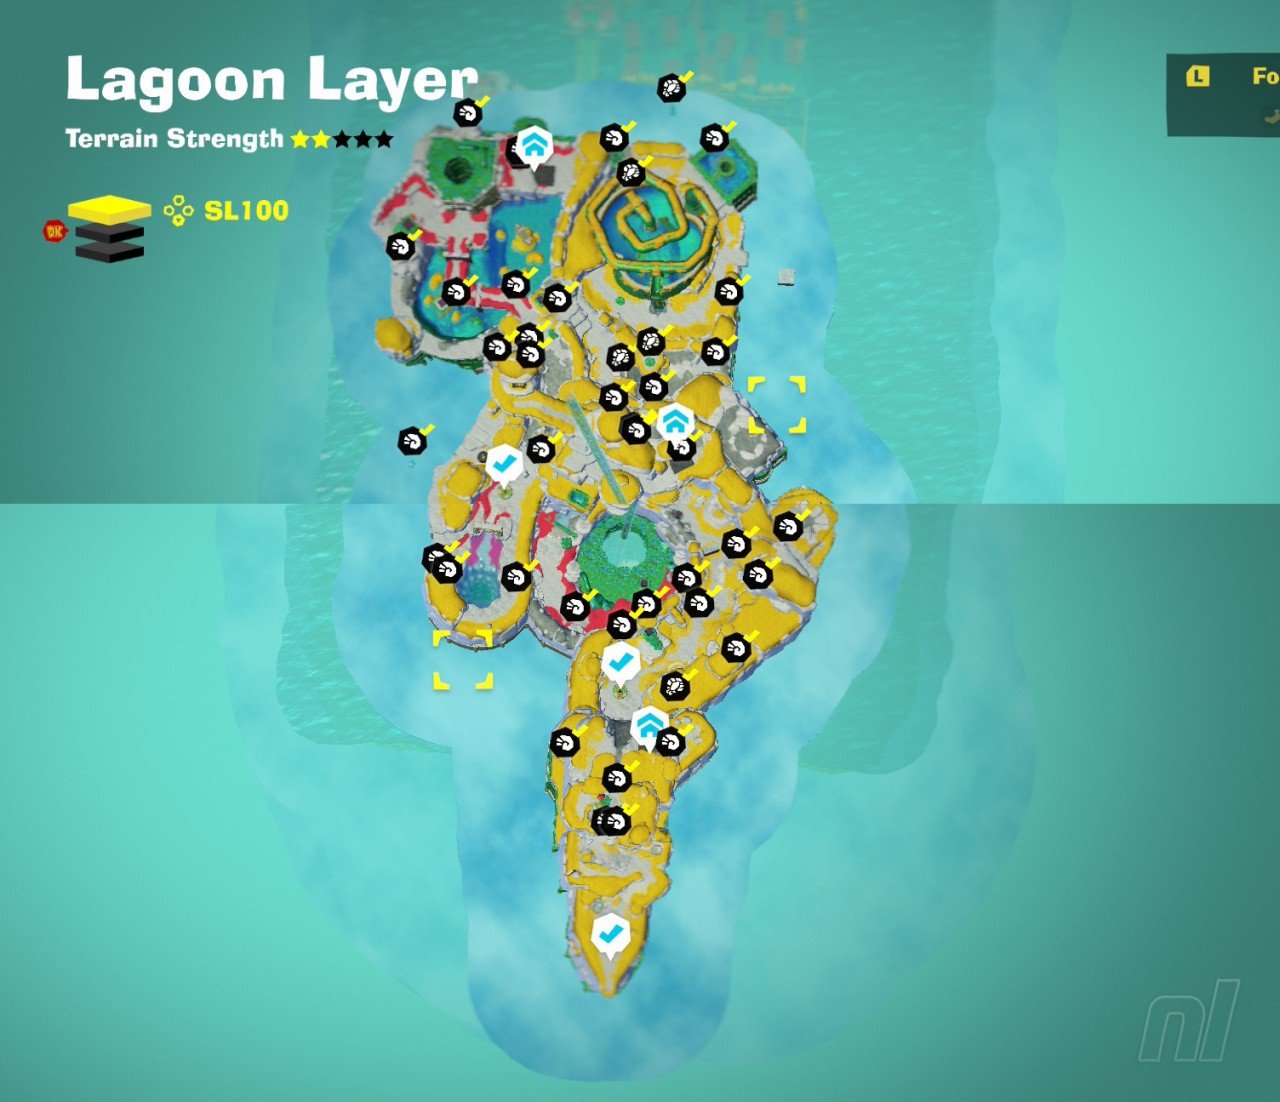
SL100 Fossil Map
SL101 Fossil Map
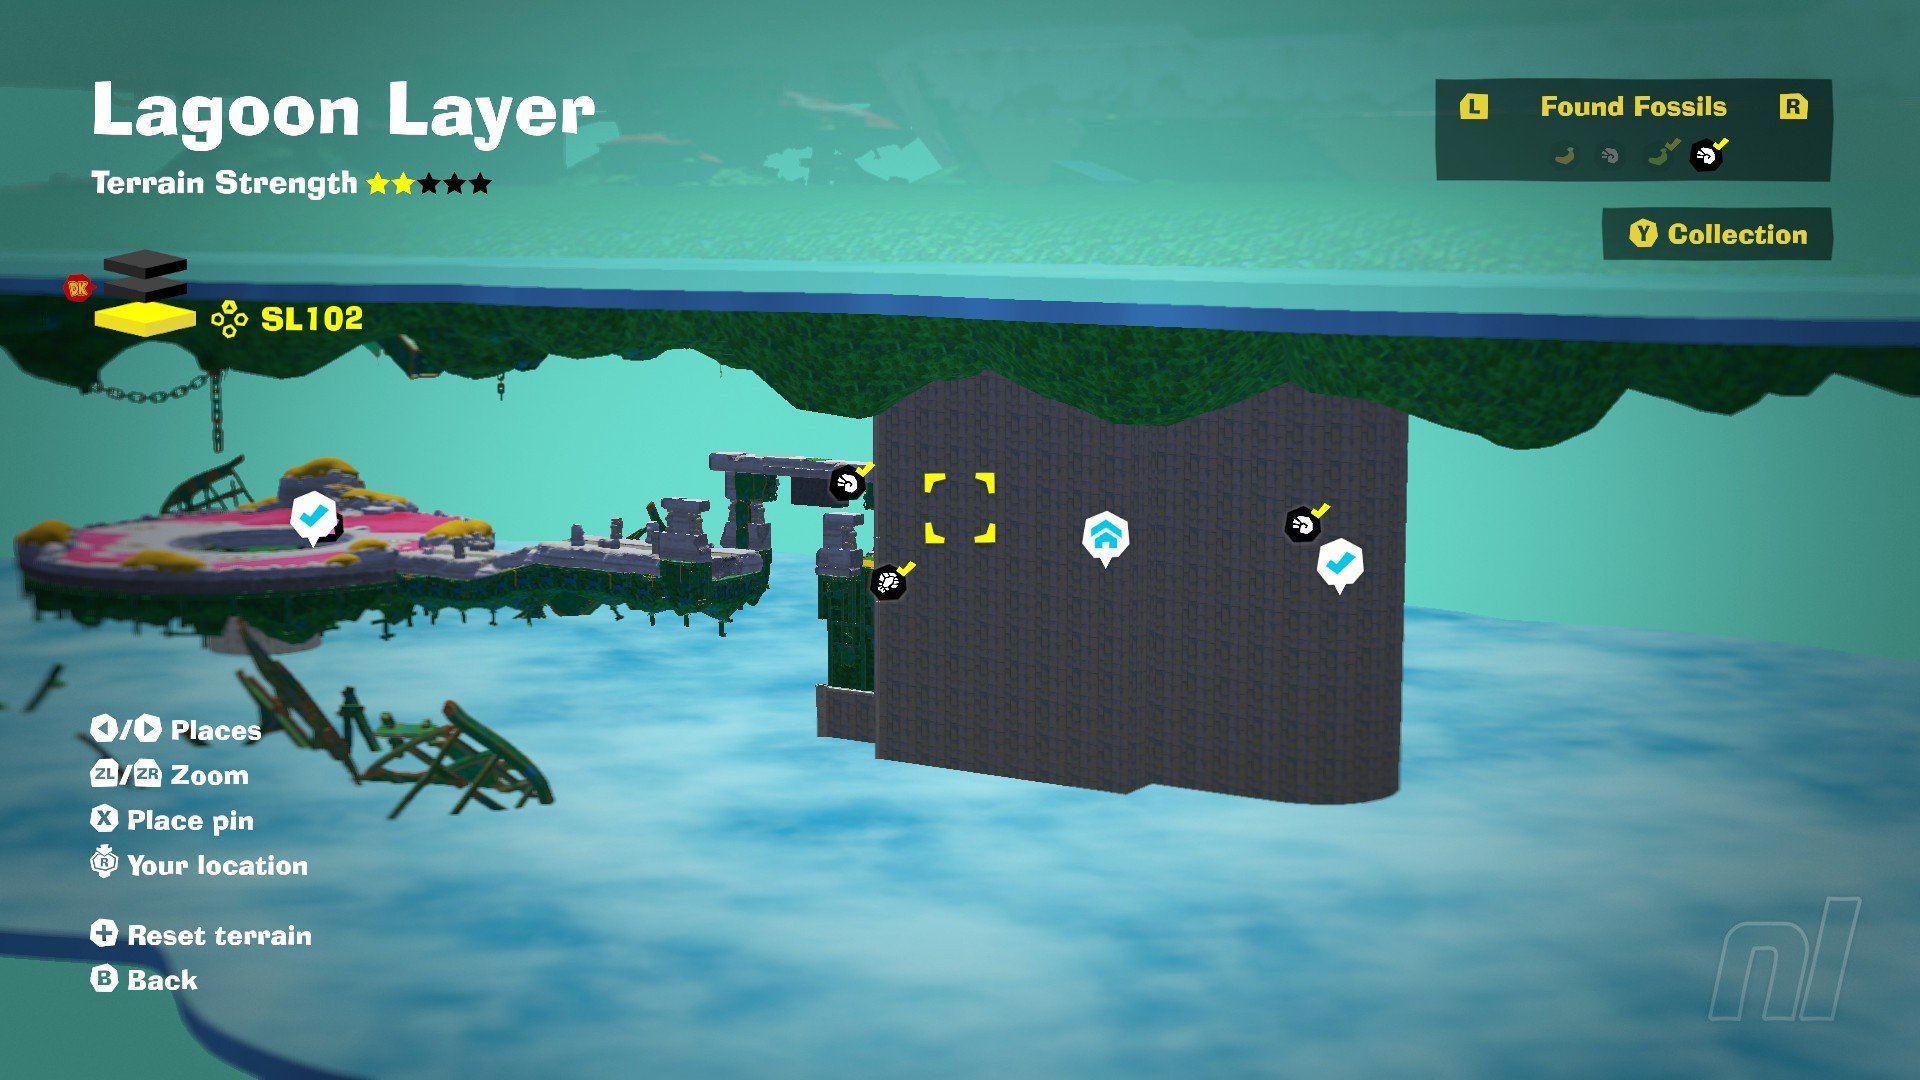
SL102 Fossil Map
Hilltop Layer Fossils
You'll find 30 Fossils in the Hilltop Layer, all of which fall into the Normal Ammonite (alt colour) category. There's no Extra-Rare Fossil to be found here, so let's get straight into the map.
SL200 Fossil Map

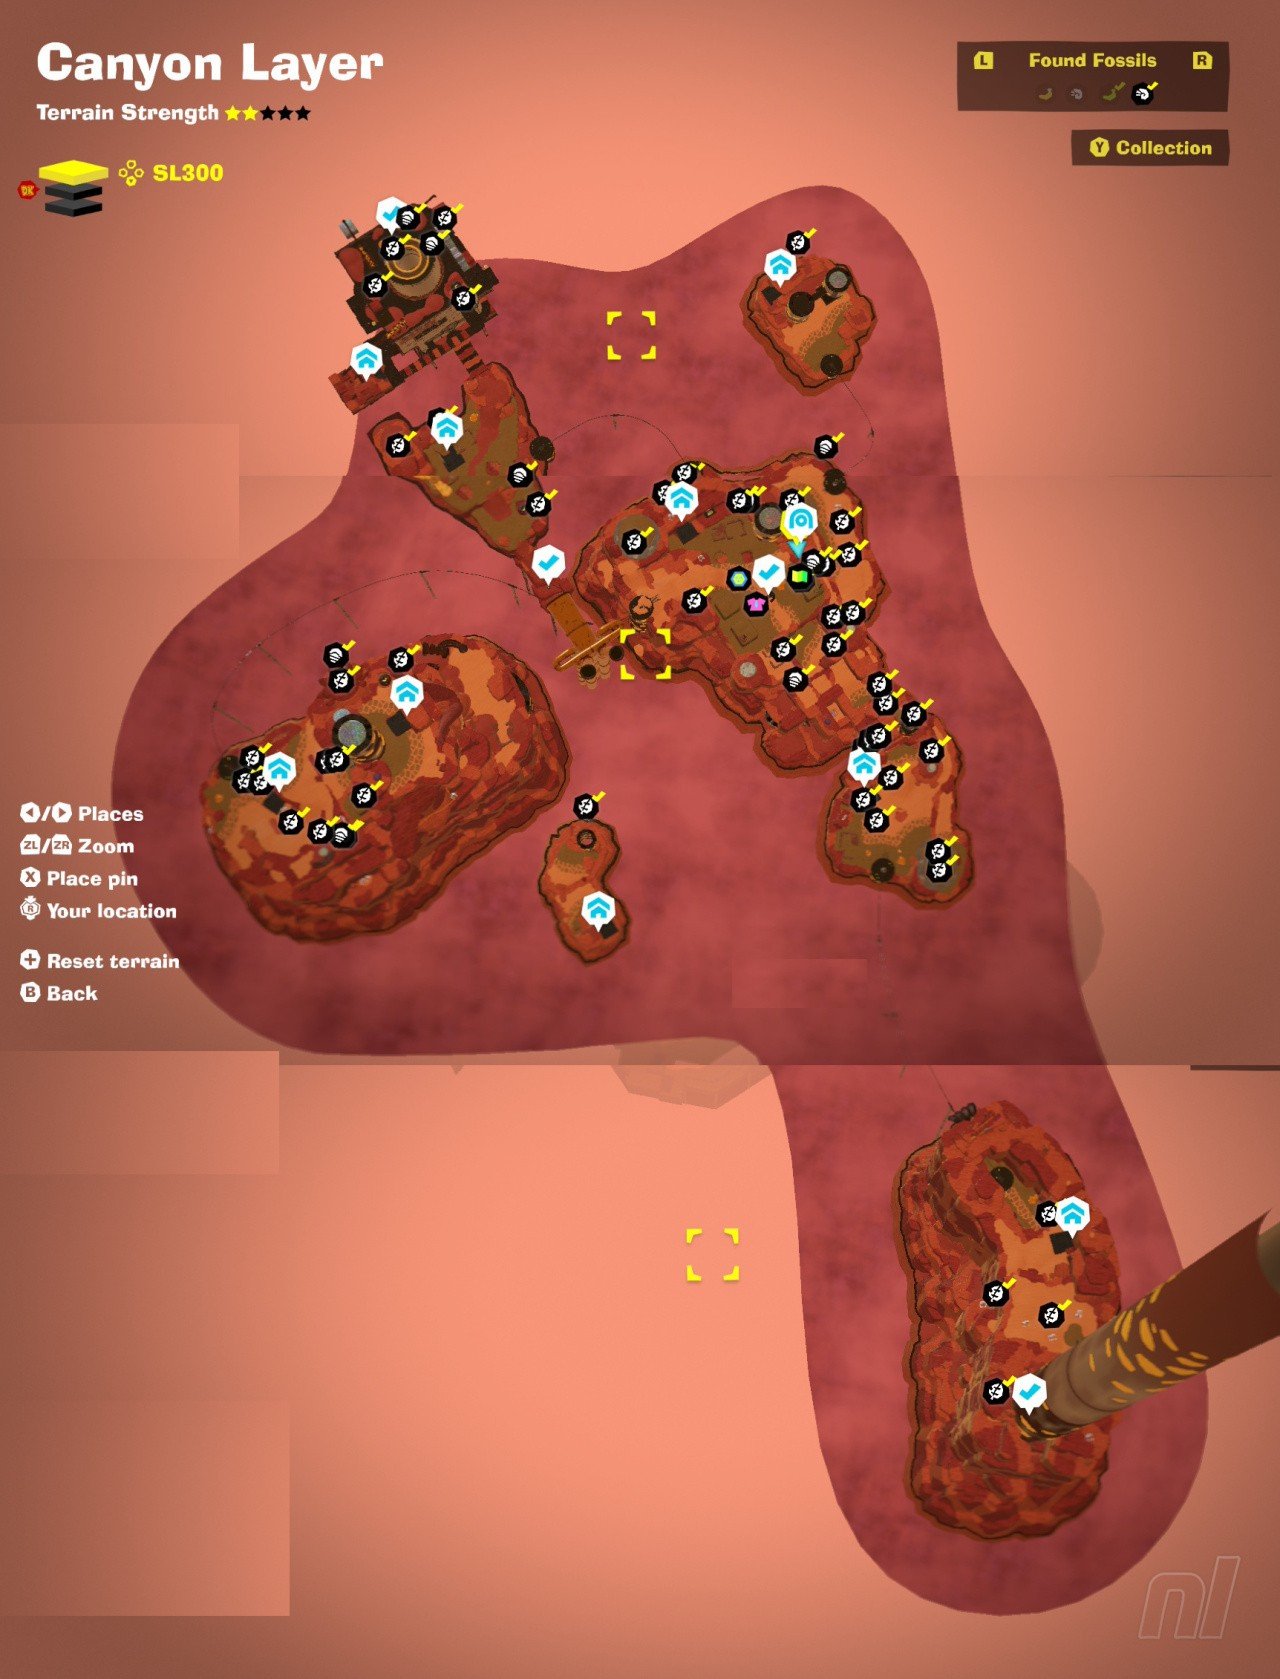
Canyon Layer Fossils
The Canyon Layer is home to 72 different Fossils in the following rarity categories:
- Leaf (Normal) - 61
- Tribolite (Rare) - 10
- Triceratops (Extra-Rare) - 1
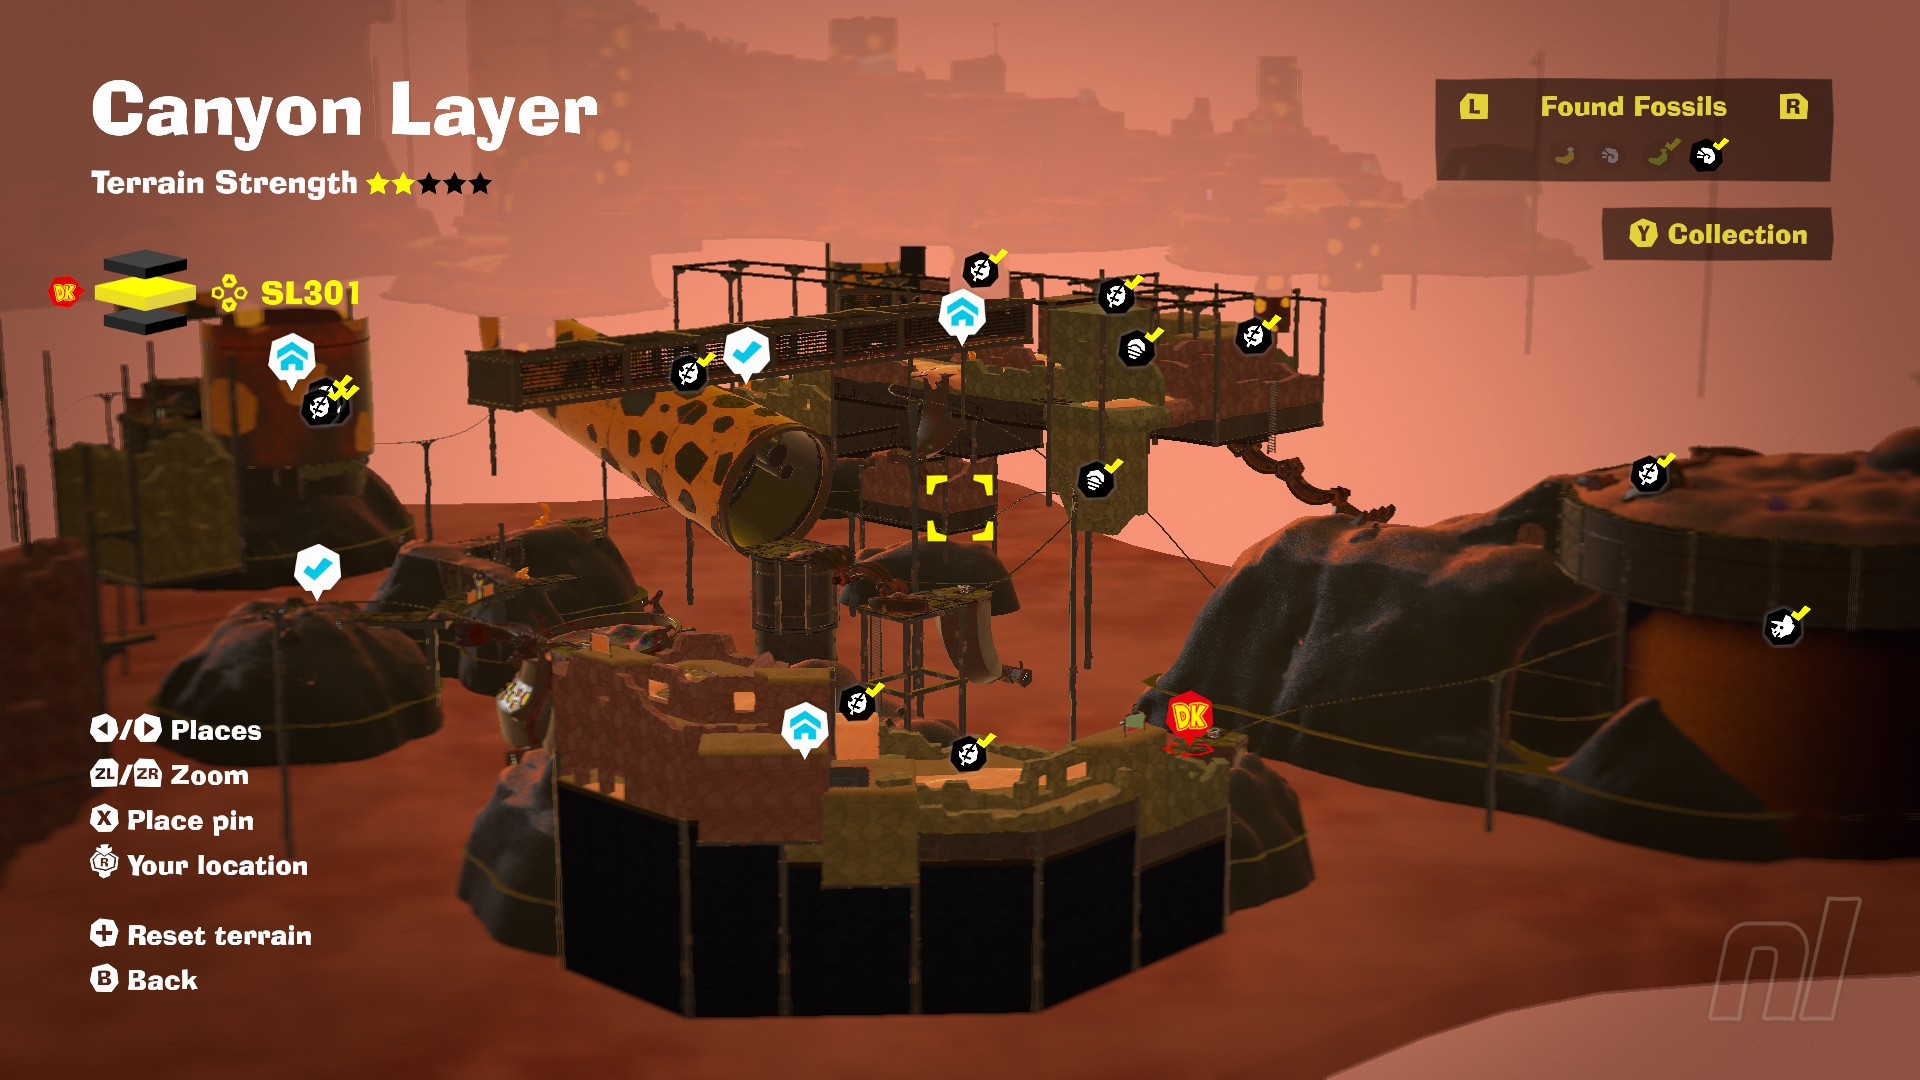
To find the Canyon Layer Extra-Rare Fossil, take the mine cart from the Banandium Refinery Gravel Storage checkpoint on SL301 and make sure you're stocked up on Boom Bombs as you enter the tunnel. You'll find this Fossil in a sandy wall on the left side of the tracks.
SL300 Fossil Map
SL301 Fossil Map
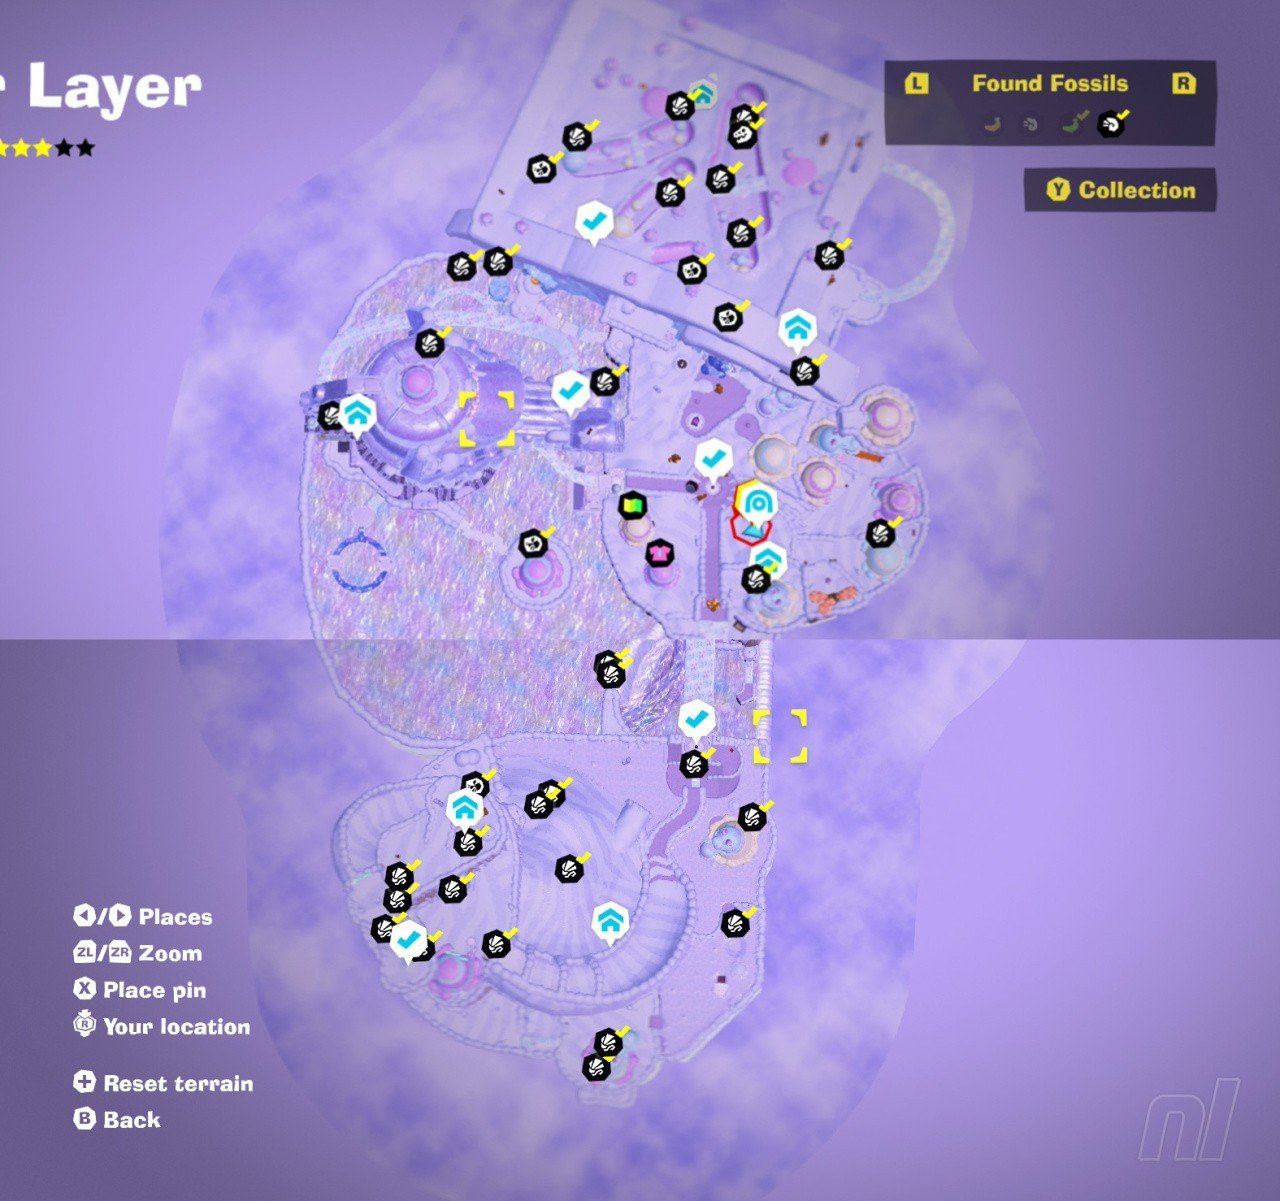
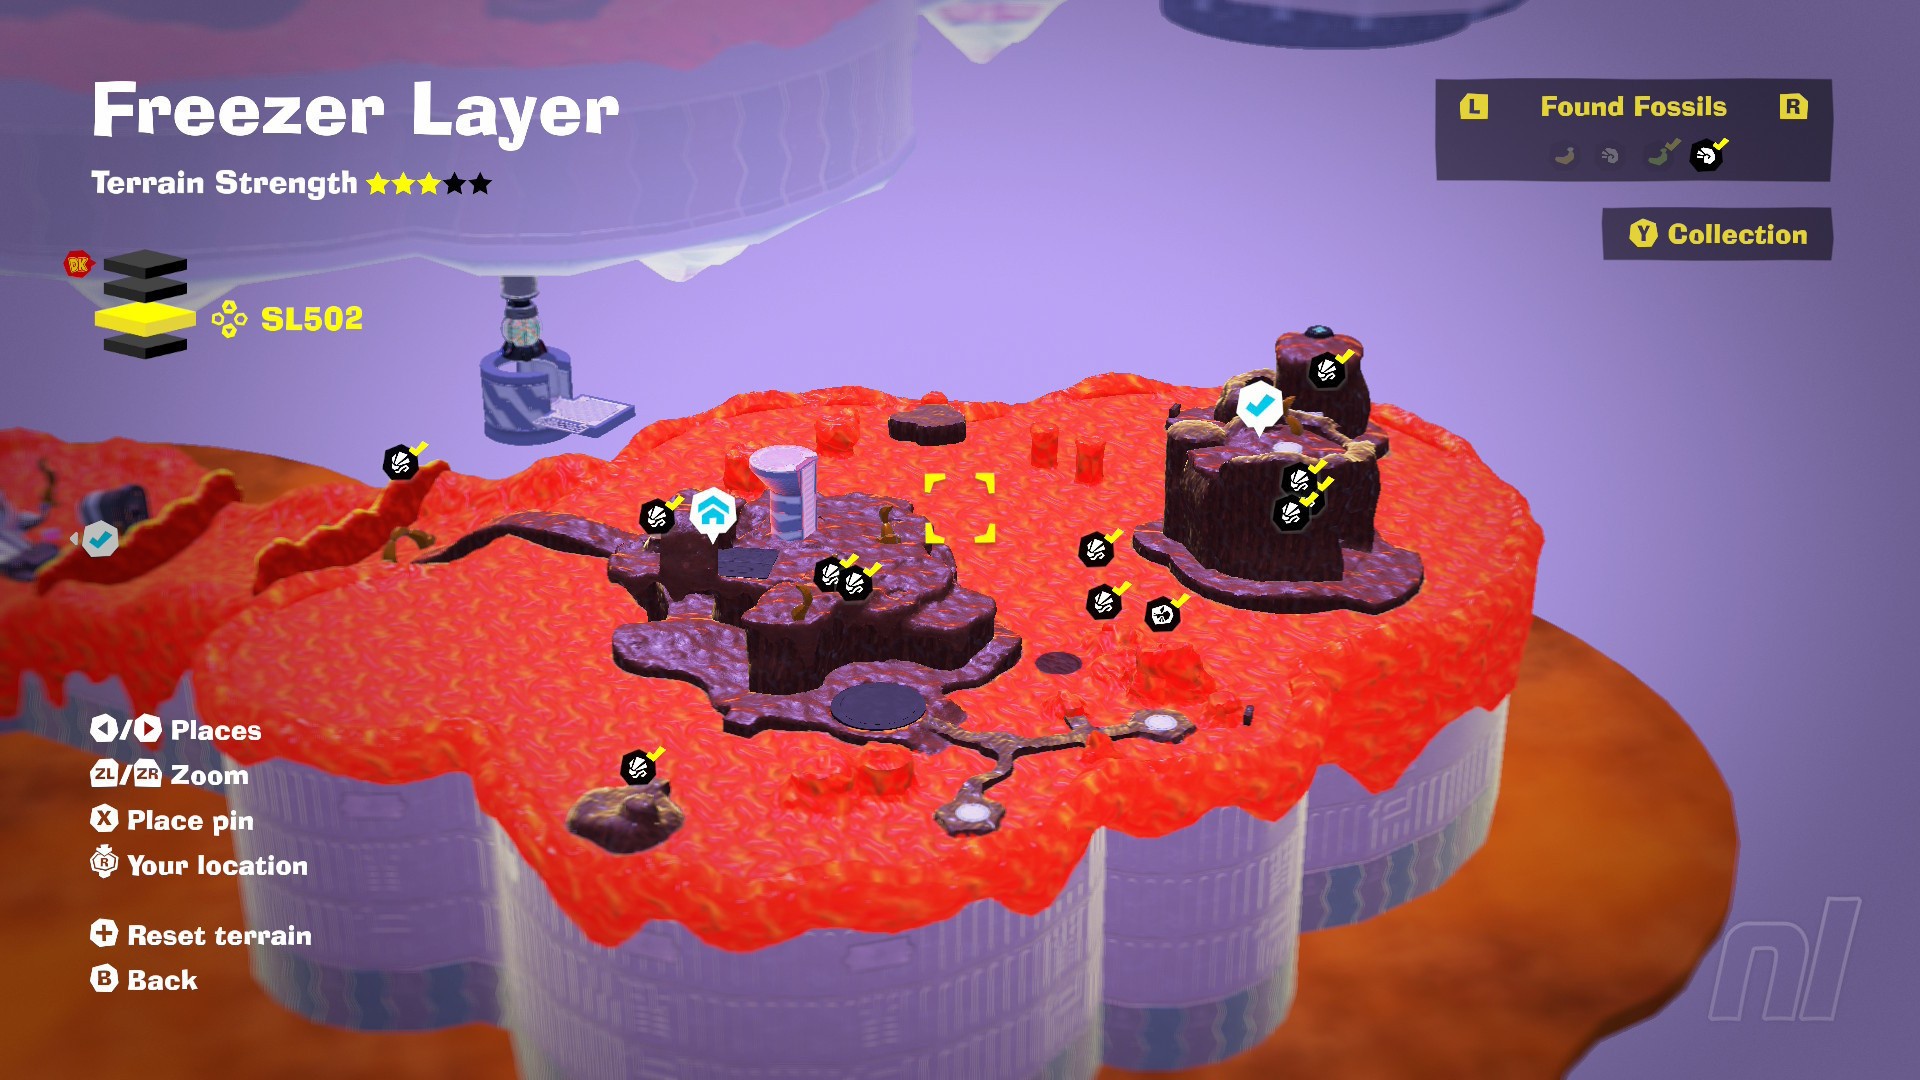
Freezer Layer Fossils
You'll find 72 Fossils in the snowy Freezer Layer, split across the three rarities below:
- Sea Lily (Normal) - 61
- Preserved Bug (Rare) - 10
- T. Rex (Extra-Rare) - 1
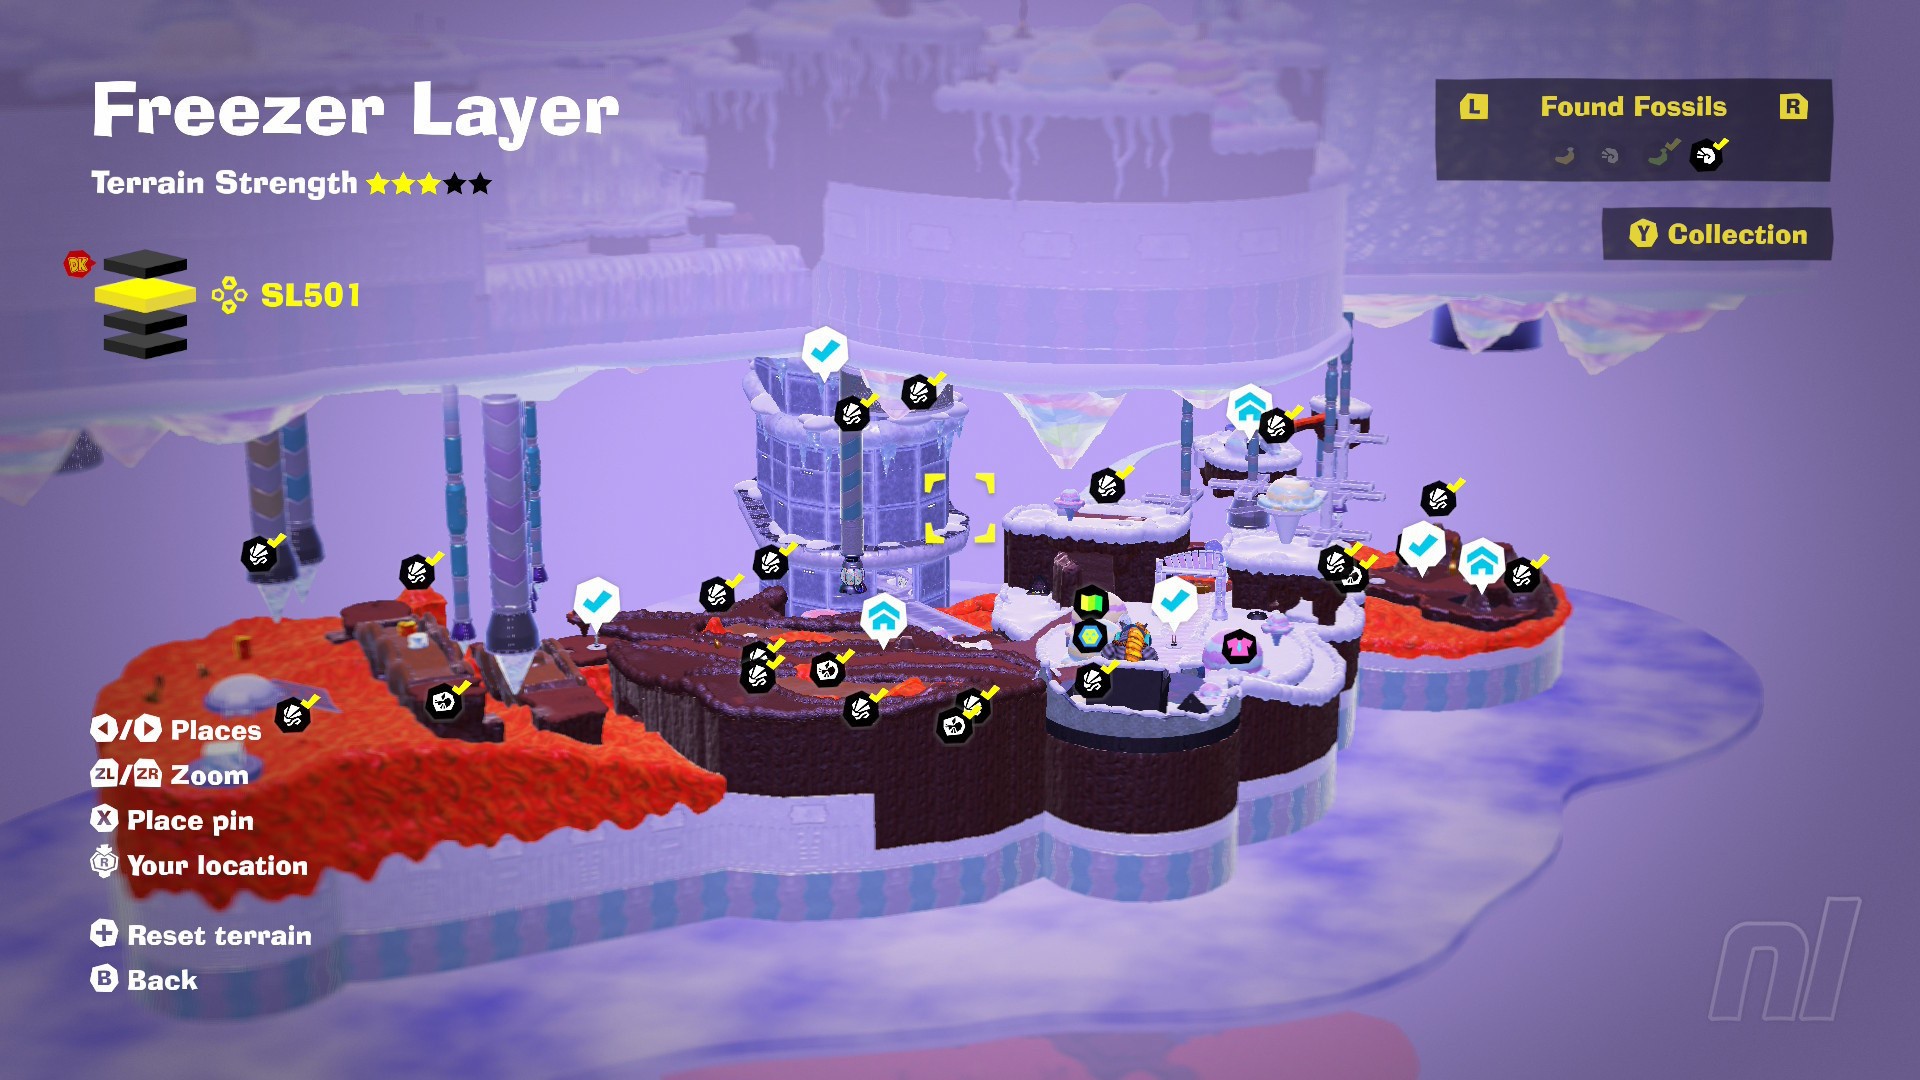
You'll find the Freezer Layer Extra-Rare Fossil on SL500. Use Zebra Bananza to climb the crumbling path up the cavern to access the roof. The T. Rex Fossil is hidden under a pile of petals in the biggest roof indent.
SL500 Fossil Map
SL501 Fossil Map
SL502 Fossil Map
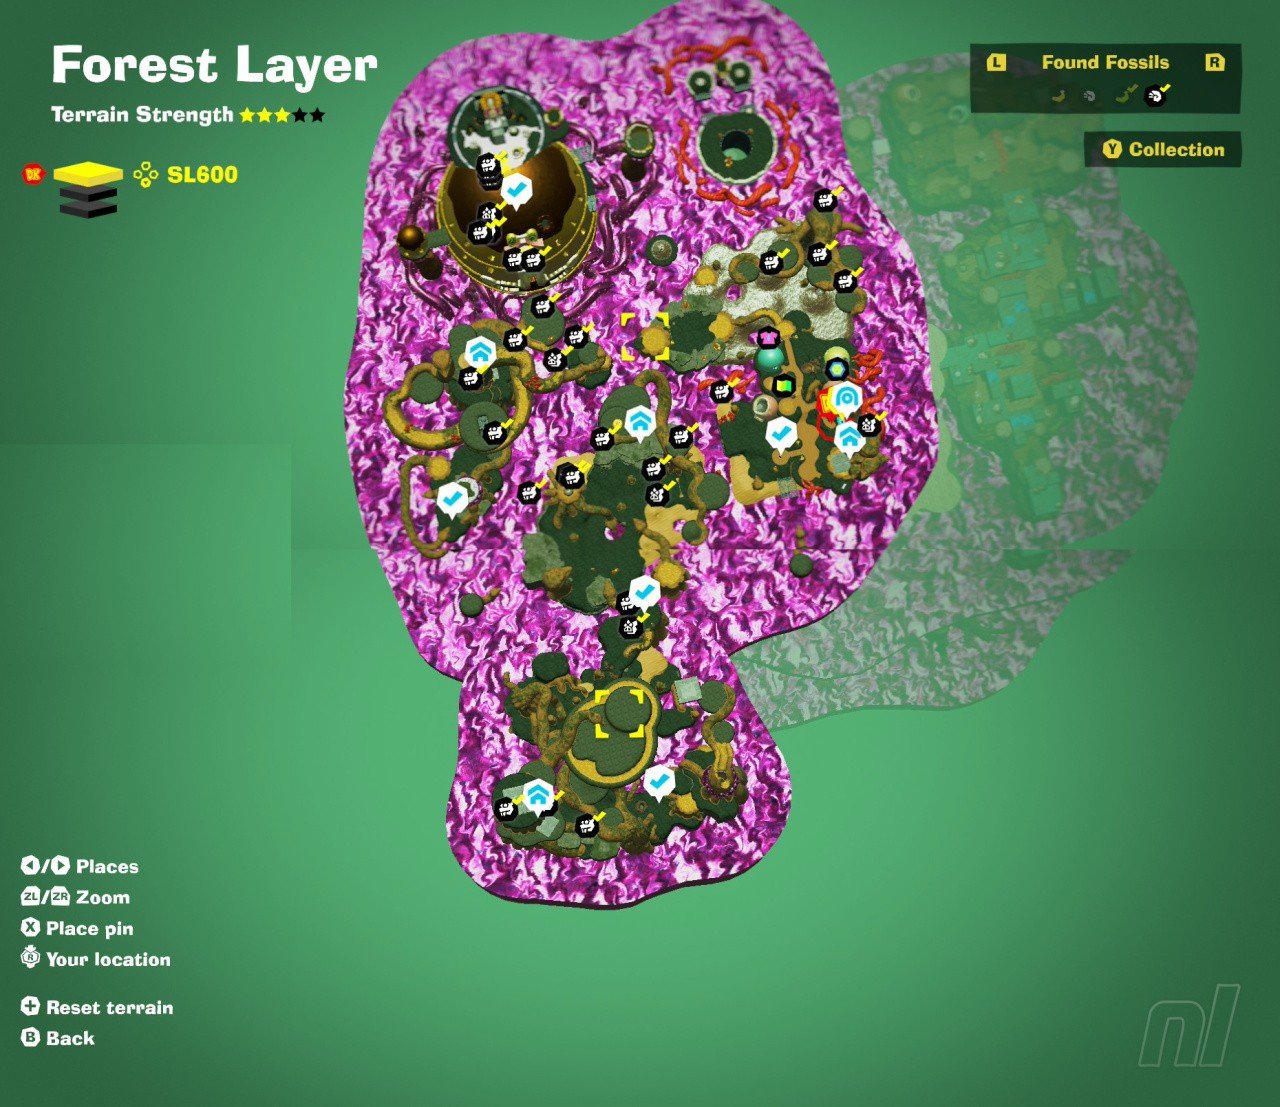
Forest Layer Fossils
Once again, there are 72 Fossils to track down in the Forest Layer, across three different rarities. Donkey Kong Country fans might want to look out for some familiar faces with these:
- Beaver (Normal) - 61
- Pig (Rare) - 10
- Spider (Extra-Rare) - 1
If you're looking to nab the Extra-Rare Spider Fossil in the Forest Layer, drain all the poison from Rubbery Roost on SL601, and you'll find it in the middle of a large sandy section, near the area's entrance.
SL600 Fossil Map
SL601 Fossil Map

SL602 Fossil Map

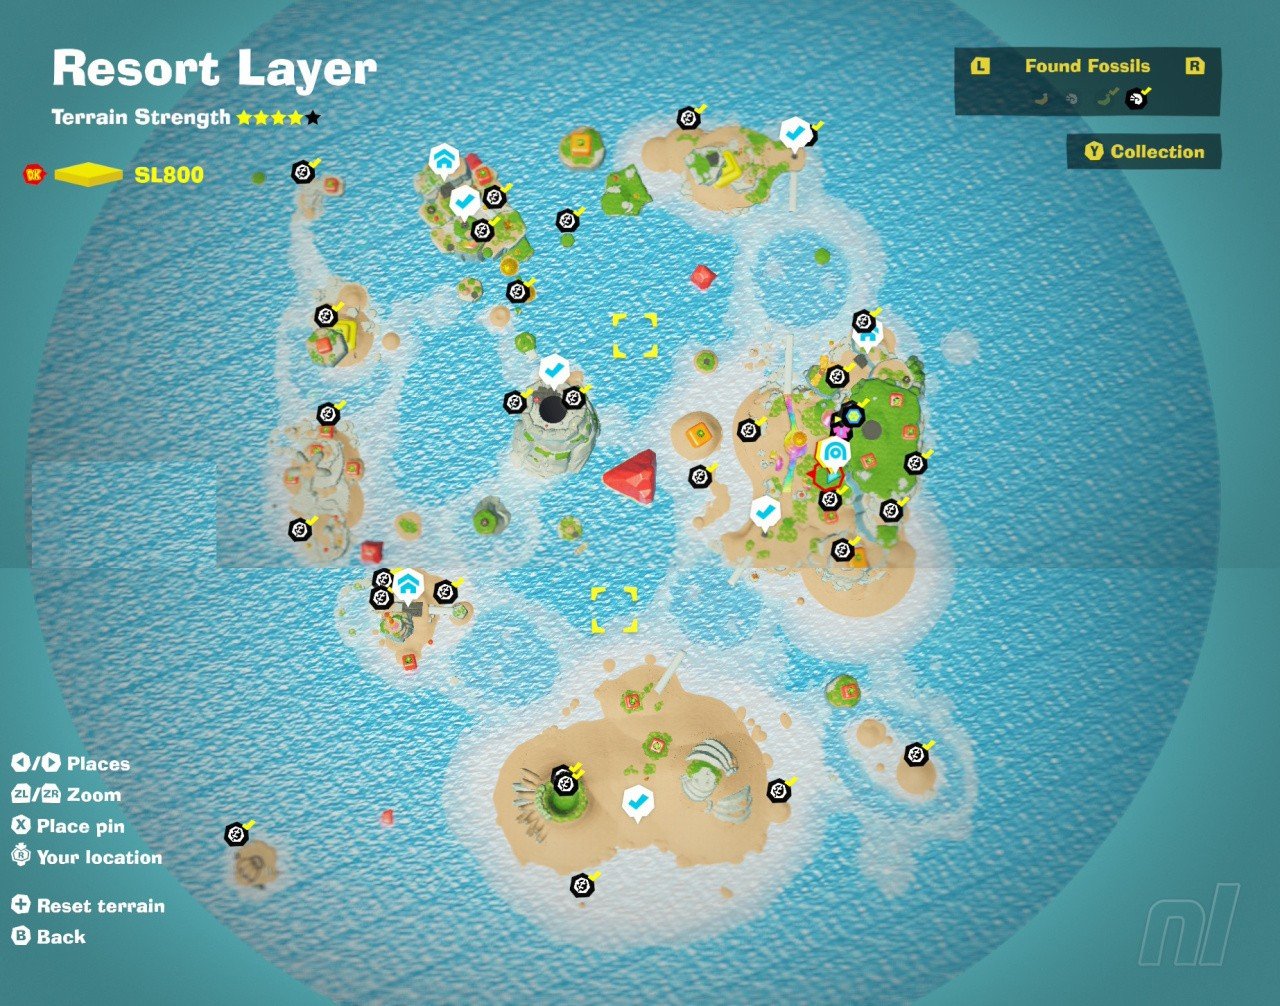
Resort Layer Fossils
There are only 30 Fossils to find on the Resort Layer, all of which are of the Normal Leaf (alt colour) variety.
SL800 Fossil Map
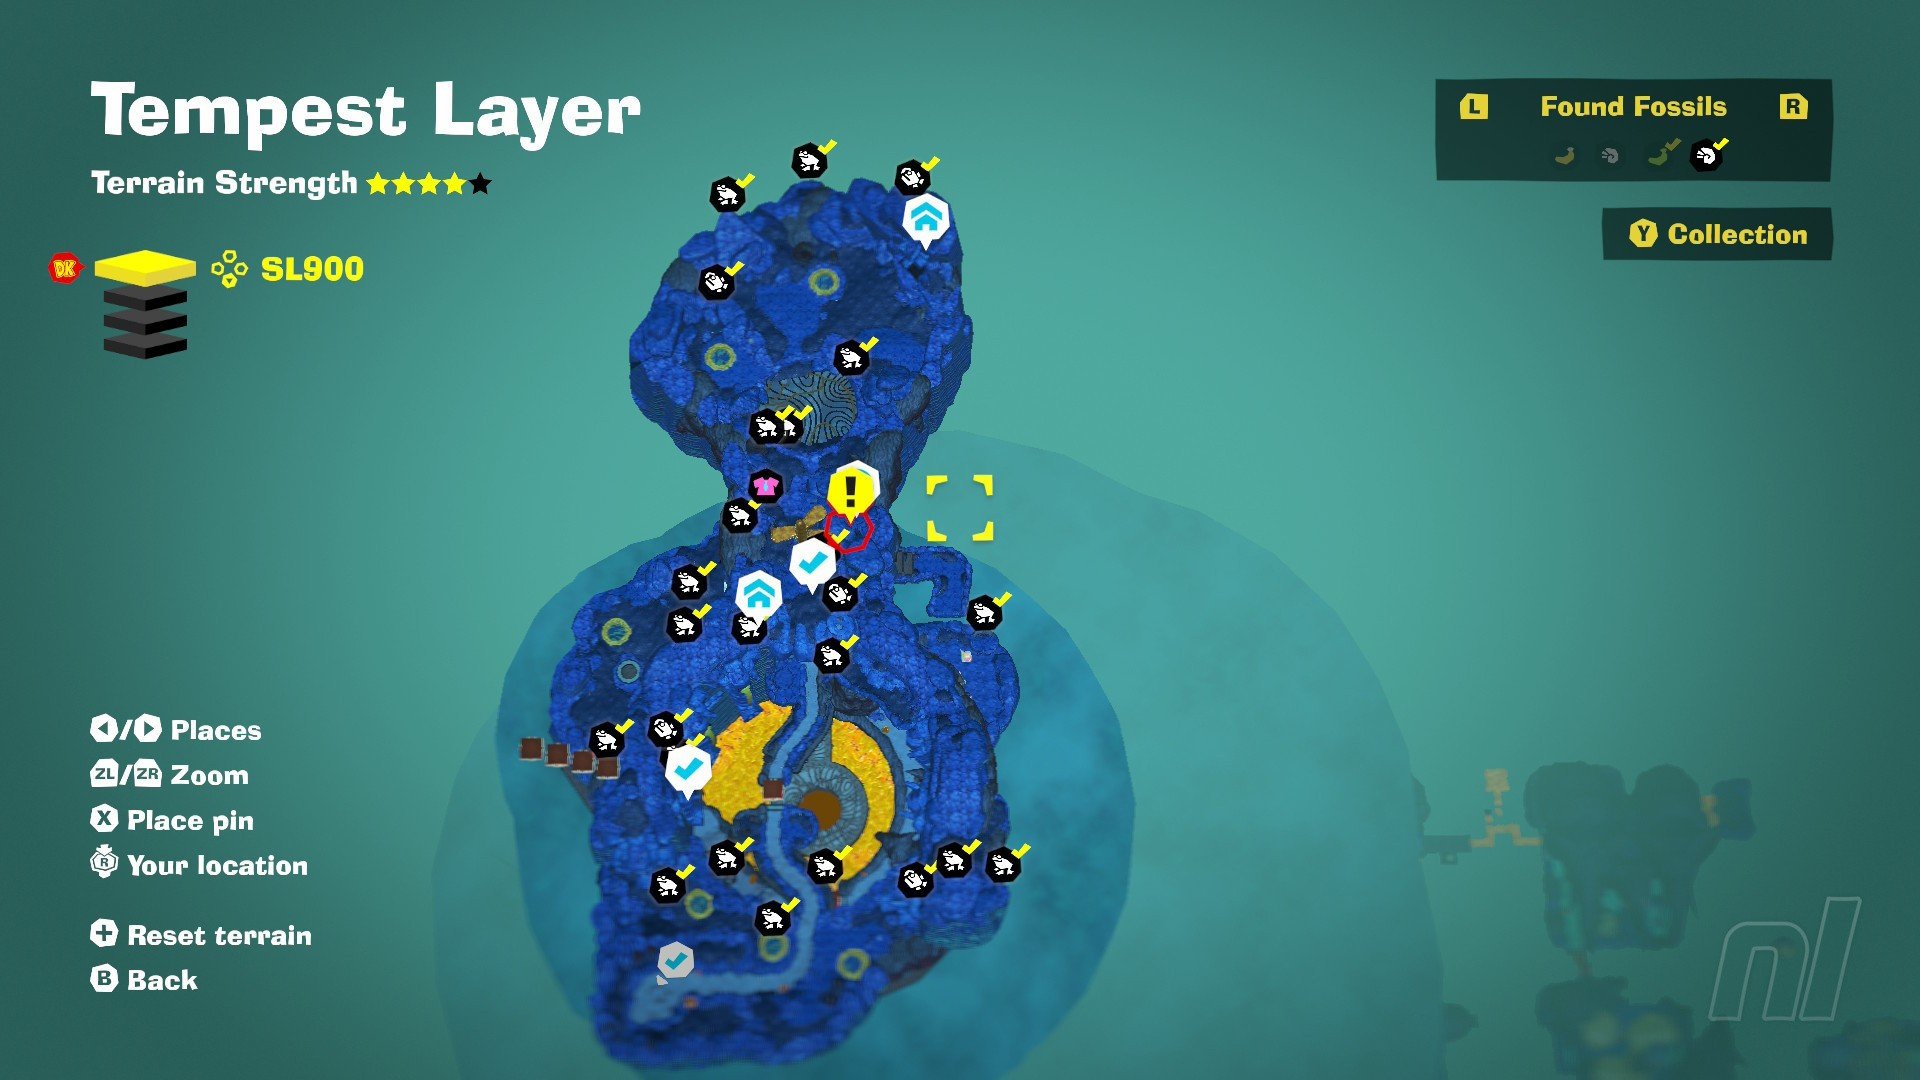
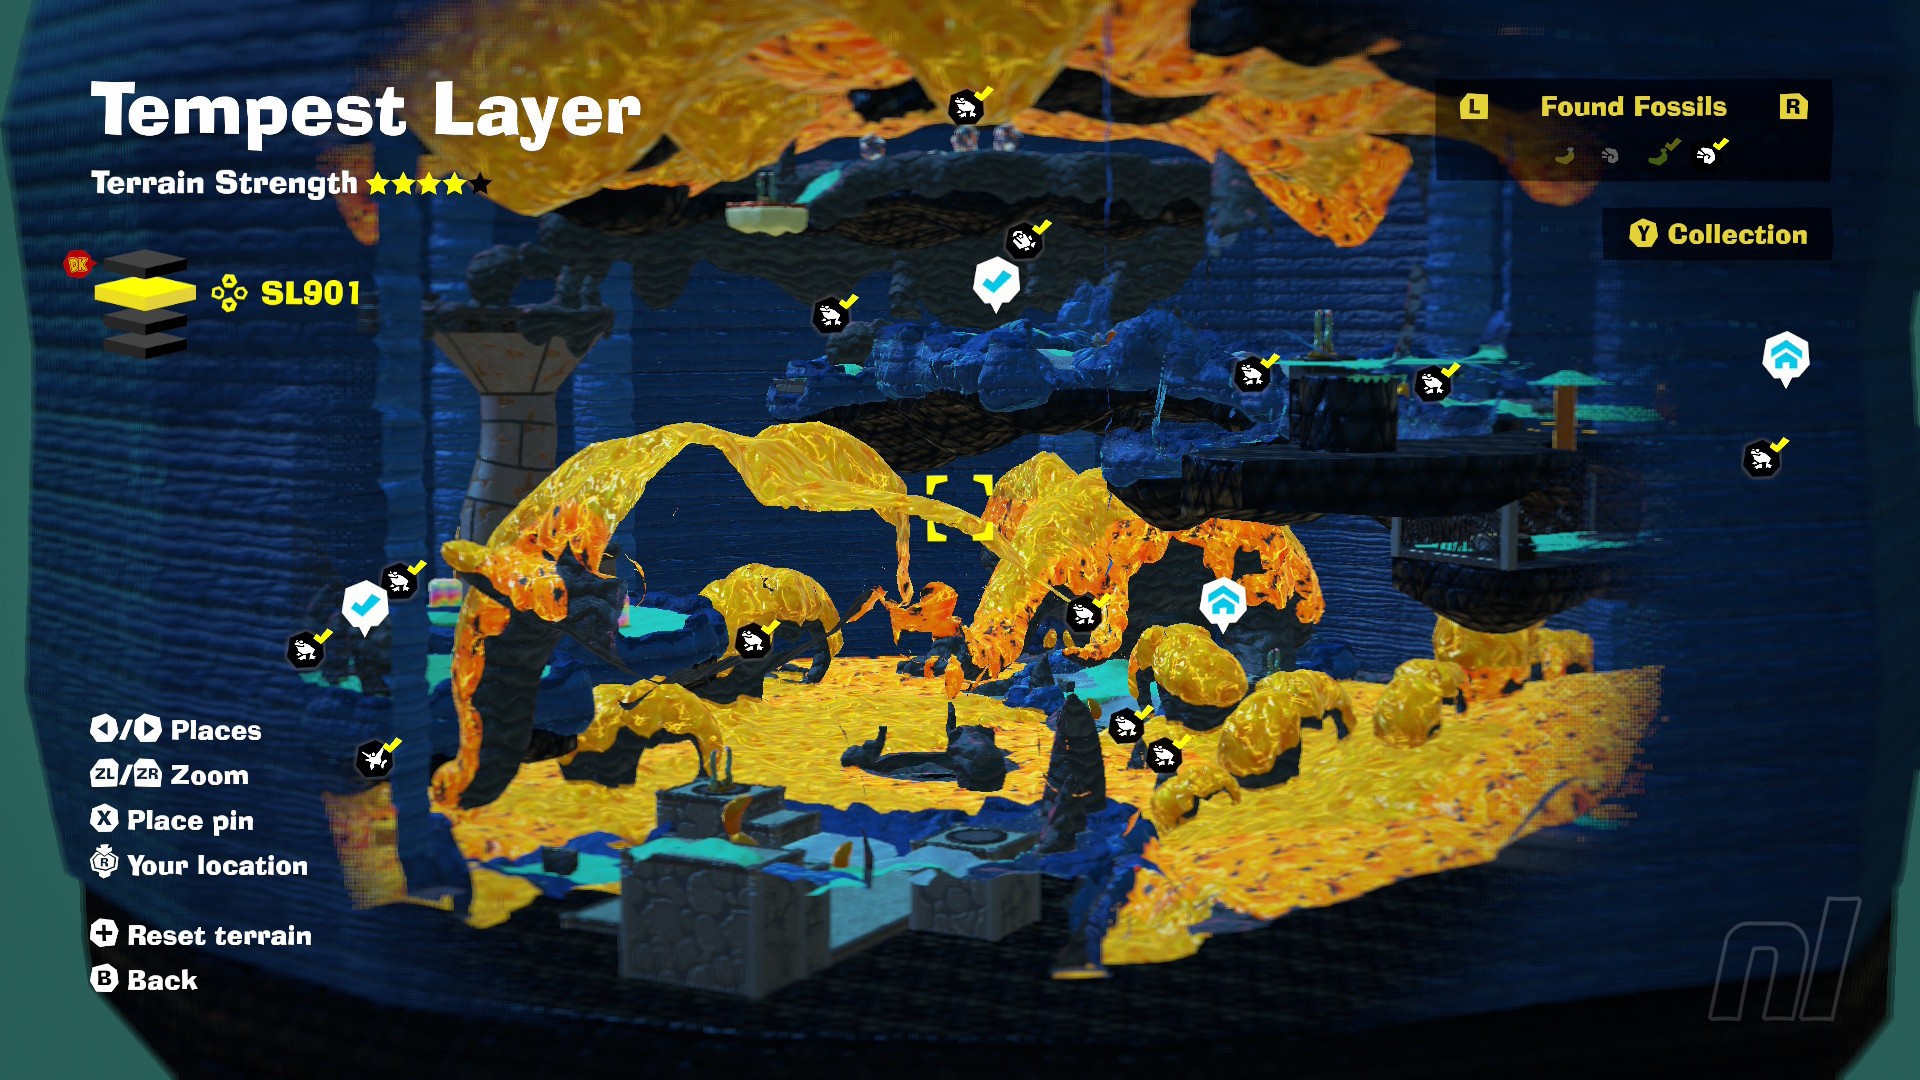
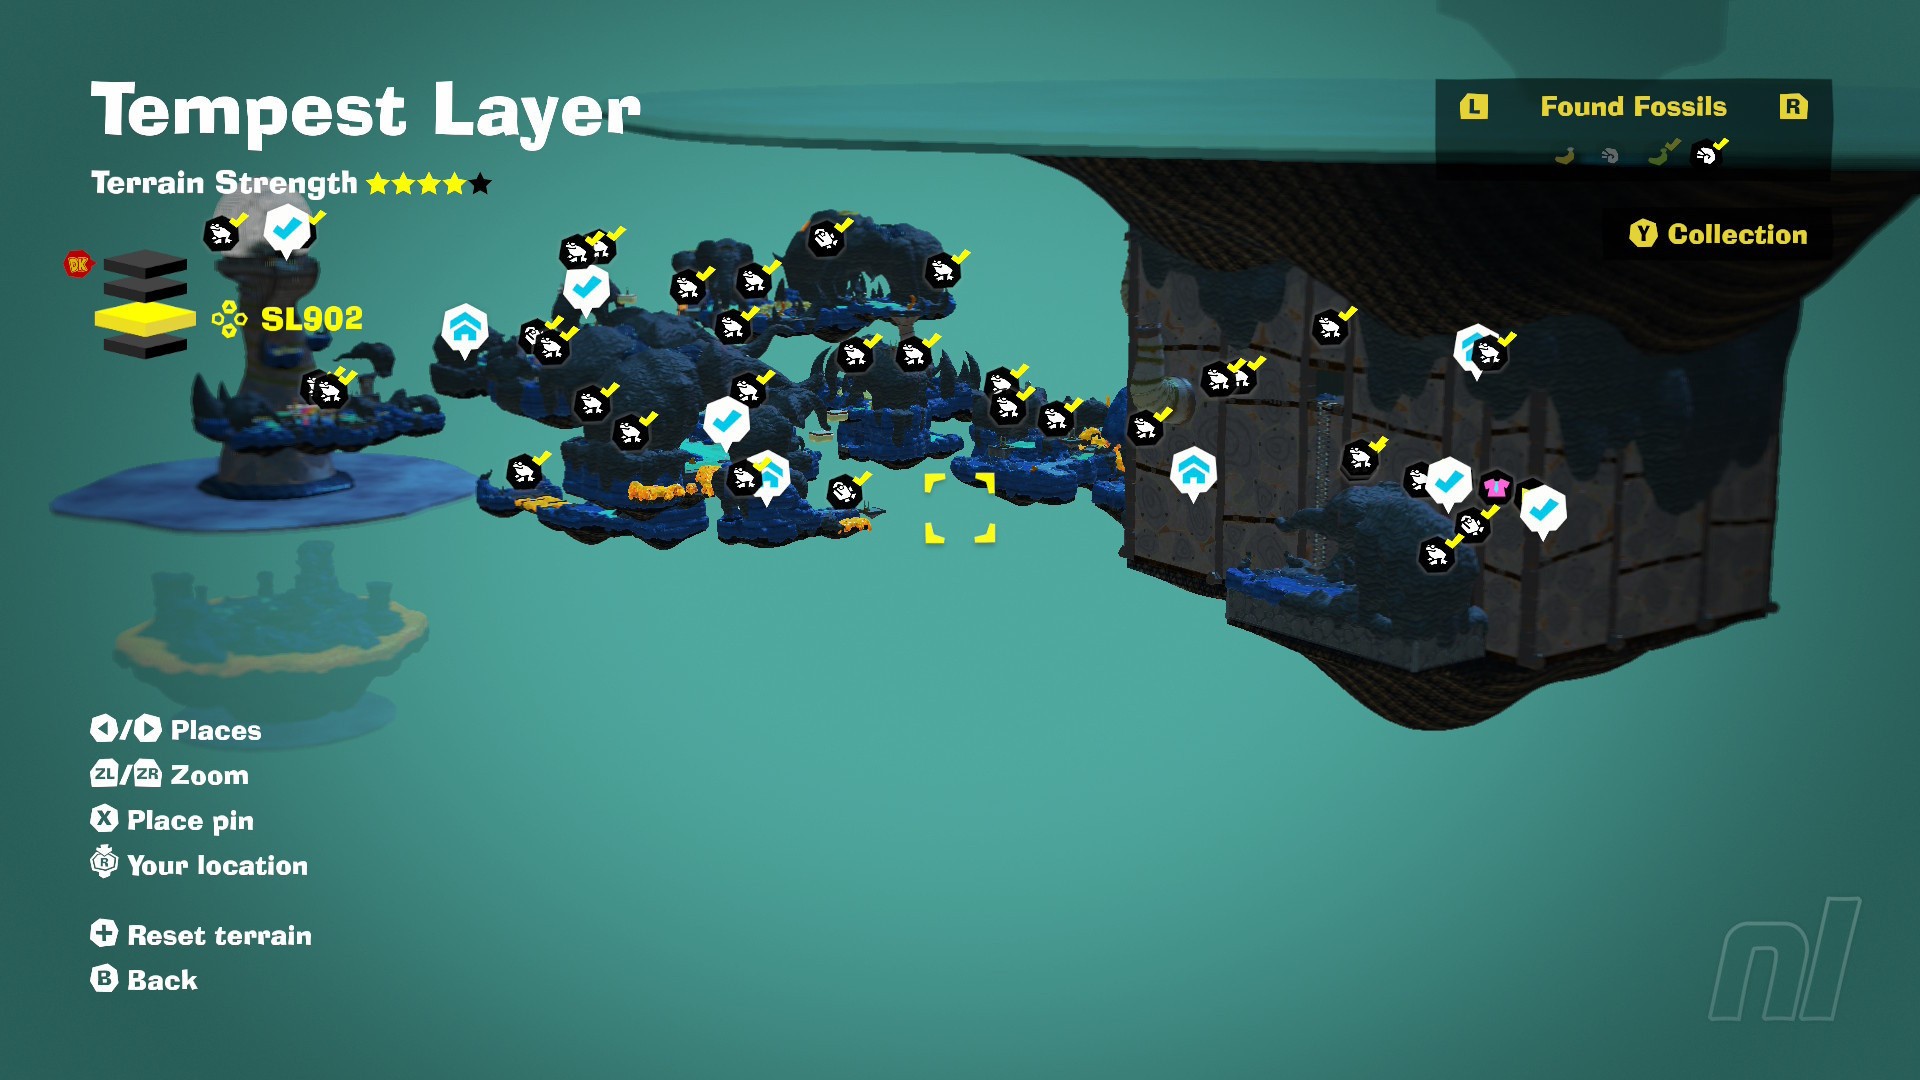
Tempest Layer Fossils
The Tempest Layer is another big one, with 71 Fossils to find across three of its four sublayers. These Fossils are split into the following groups:
- Frog (Normal) - 61
- Anglerfish (Rare) - 10
- Swordfish (Extra-Rare) - 1
To find the Extra-Rare Enguarde Swordfish Fossil in the Tempest Layer, head to the Ancient Record Crossroads checkpoint on SL901 and use Elephant Bananza to clear the lava wall below the rock platform.
SL900 Fossil Map
SL901 Fossil Map
SL902 Fossil Map
There's no map for the indoor Jumbo Spa on this sublayer, but a fully-upgraded Sonar means you should be able to use Hand Slap to clear up most of the covered Fossils.
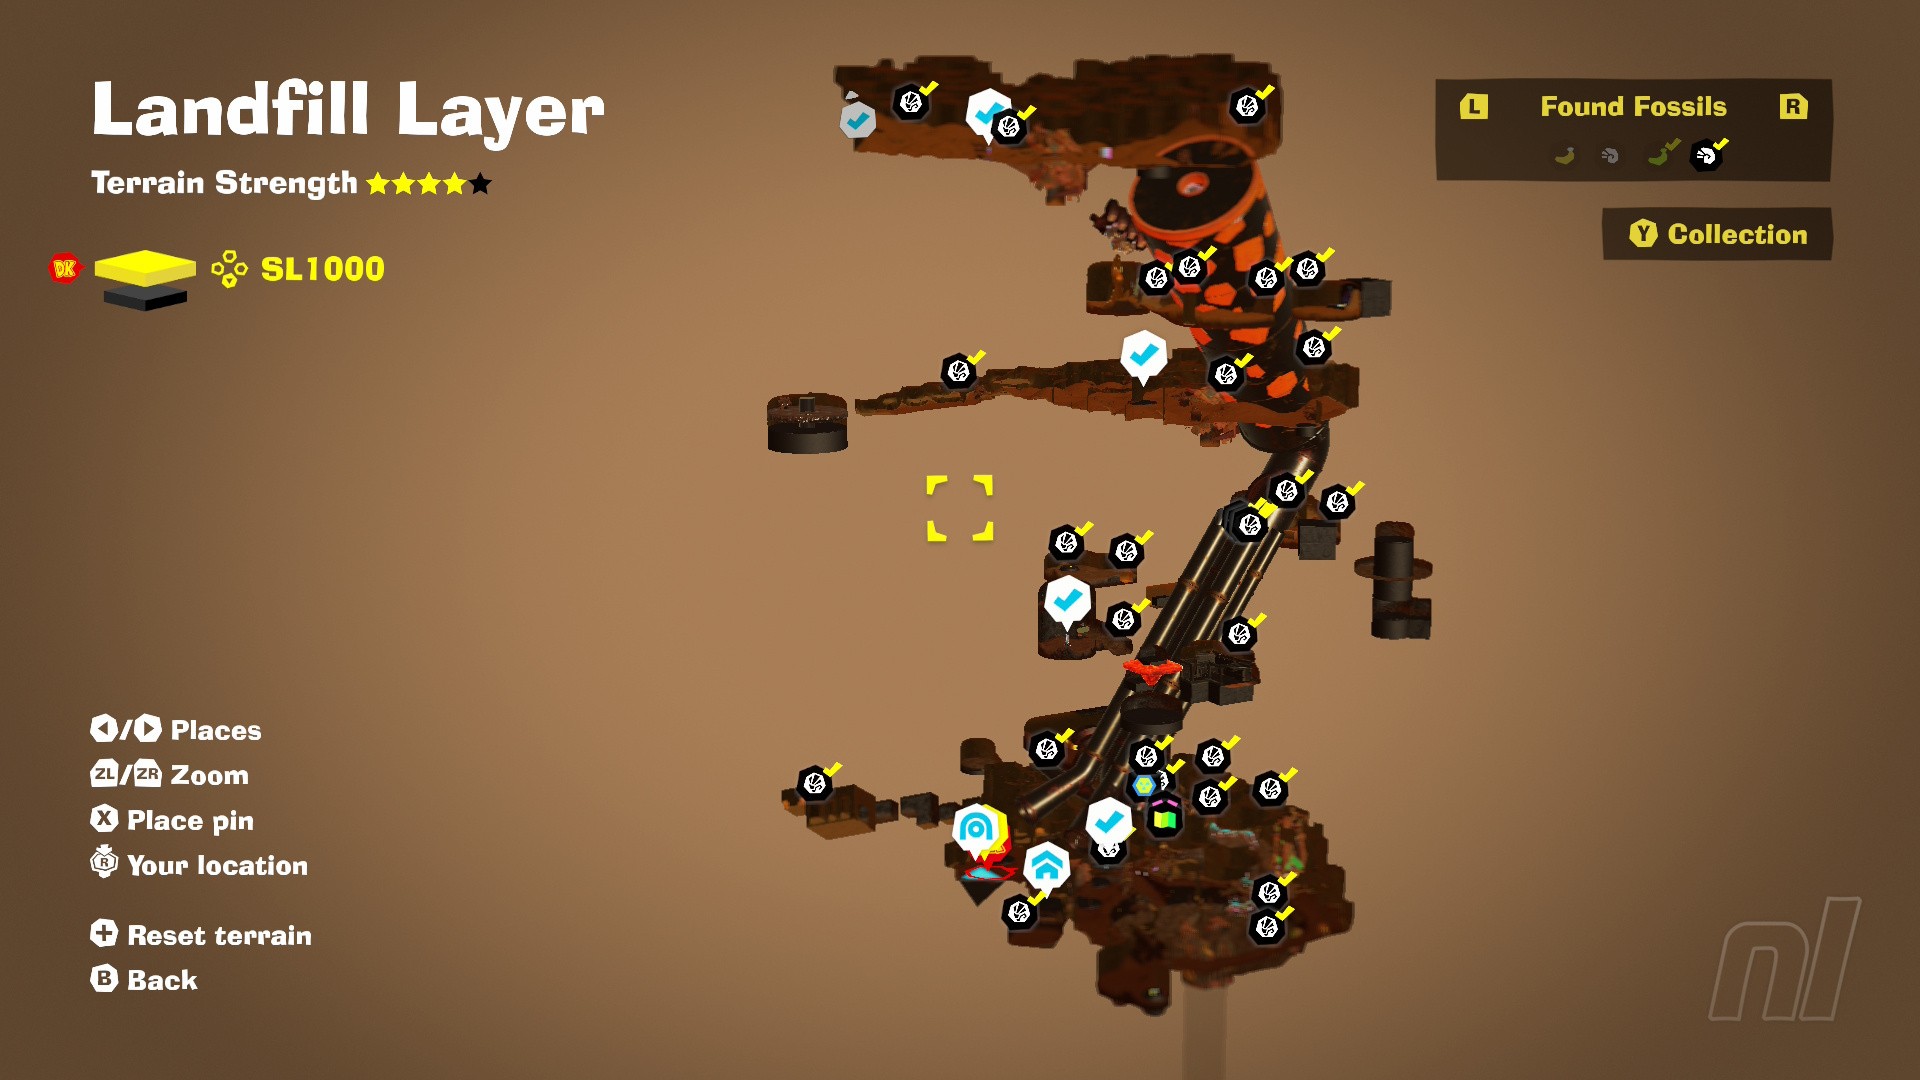
Landfill Layer Fossils
There are 30 Fossils in the Landfill Layer, with the rarity limited to one batch of Normals: Sea Lily (alt colour). The vertical structure of this layer makes the map a little hard to read, but if you visit every visible room on your downward dig and use Hand Slap, you'll pick up most of them in no time.
SL1000 Fossil Map
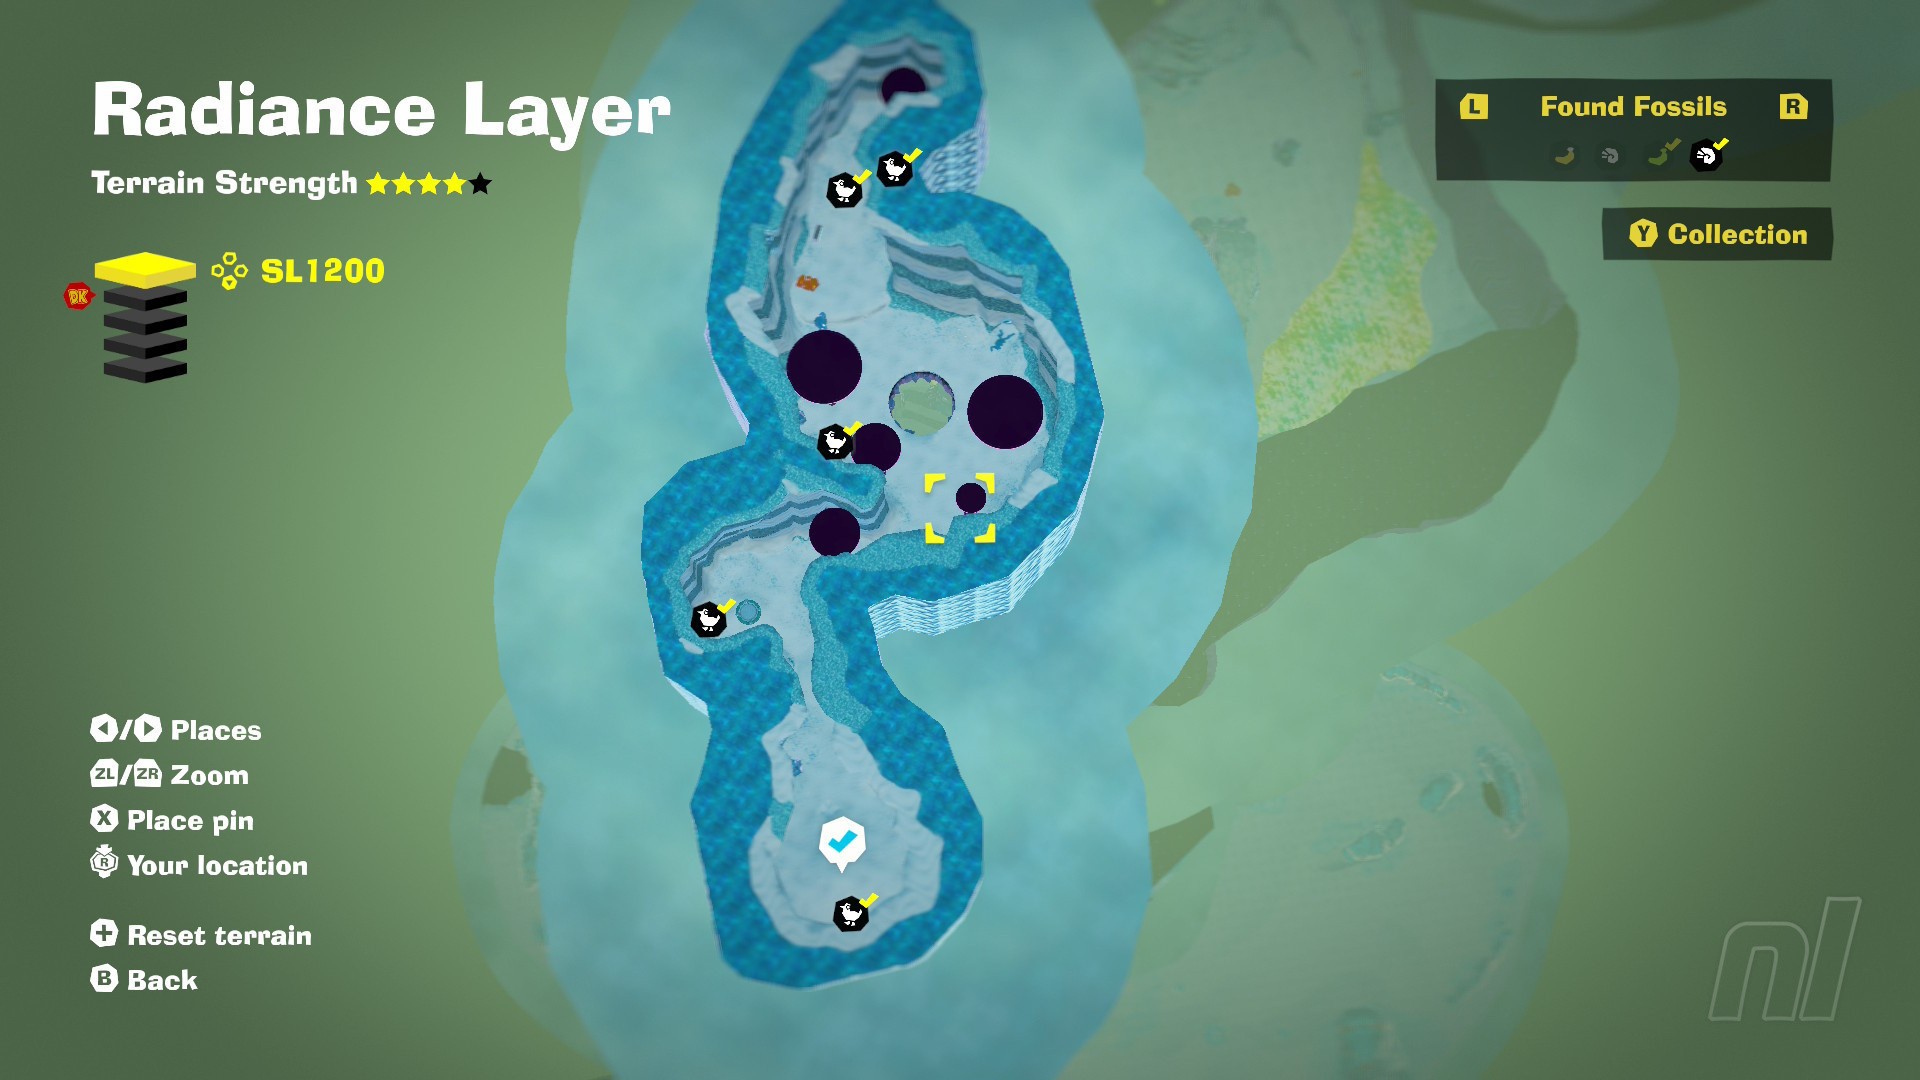
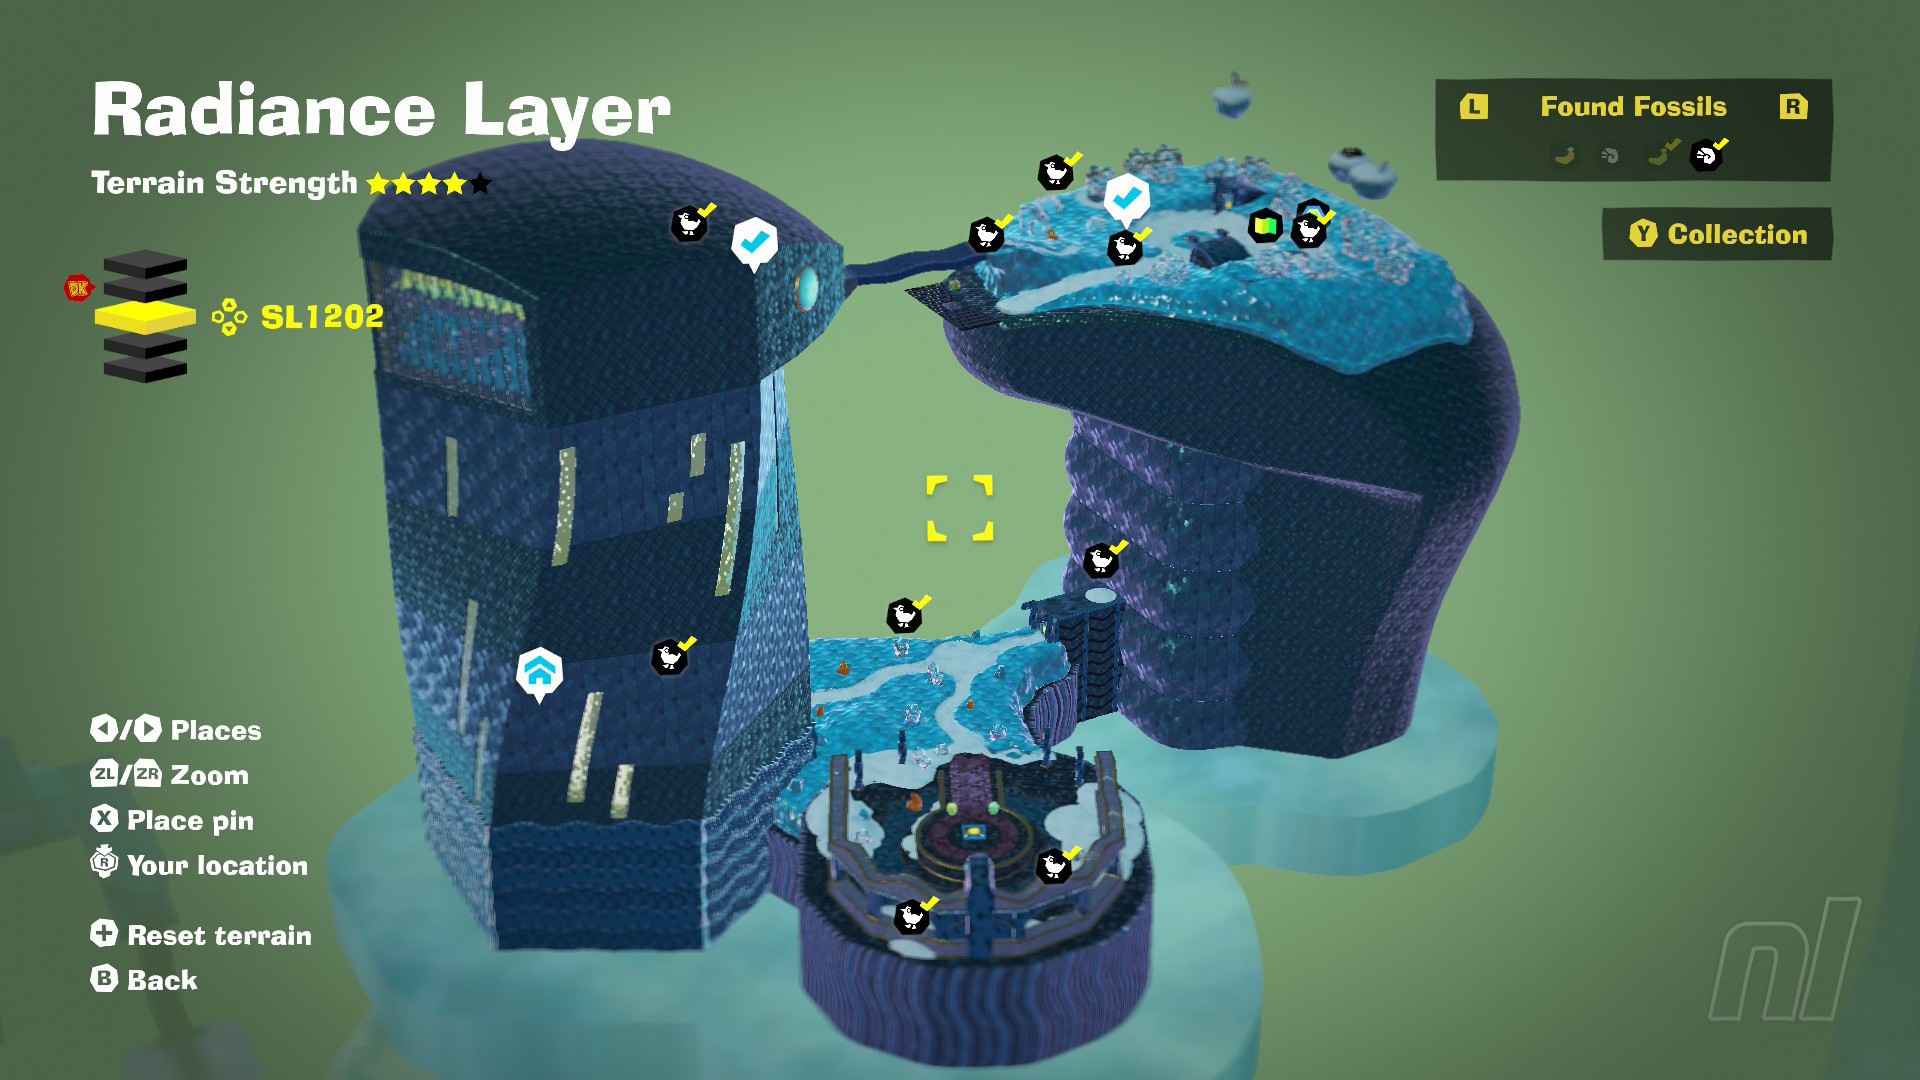
Radiance Layer Fossils
The Radiance Layer is home to 72 Fossils across its five sublayers. These collectibles fall into three different rarities:
- Banana Bird (Normal) - 61
- Armadillo (Rare) - 10
- Sea Urchin (Extra-Rare) - 1
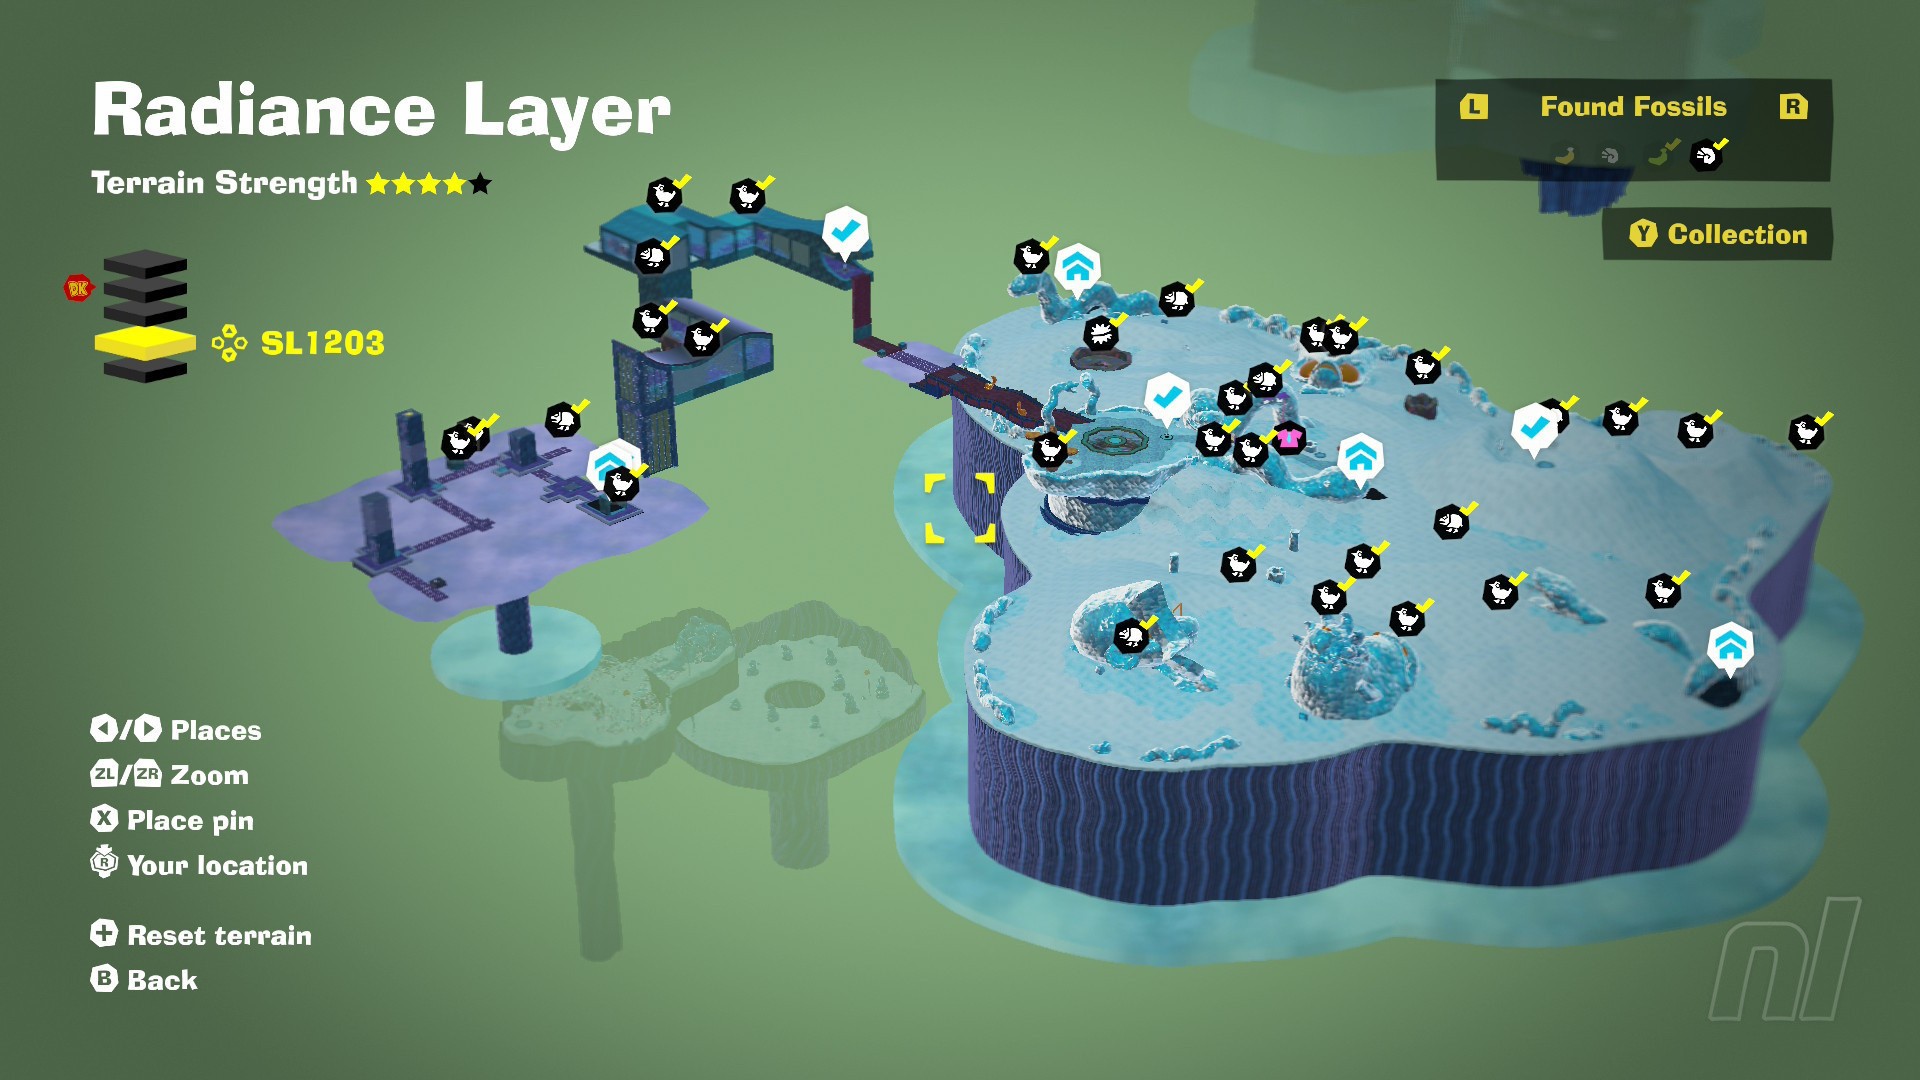
You'll find the Extra-Rare Fossil for this layer in a circular slab of concrete near the Oasis Observation Deck checkpoint on SL1203. Use Kong Bananza to smash through the concrete and take out any surrounding enemies to nab this one.
SL1200 Fossil Map
SL1201 Fossil Map

SL1202 Fossil Map
SL1203 Fossil Map
SL1204 Fossil Map

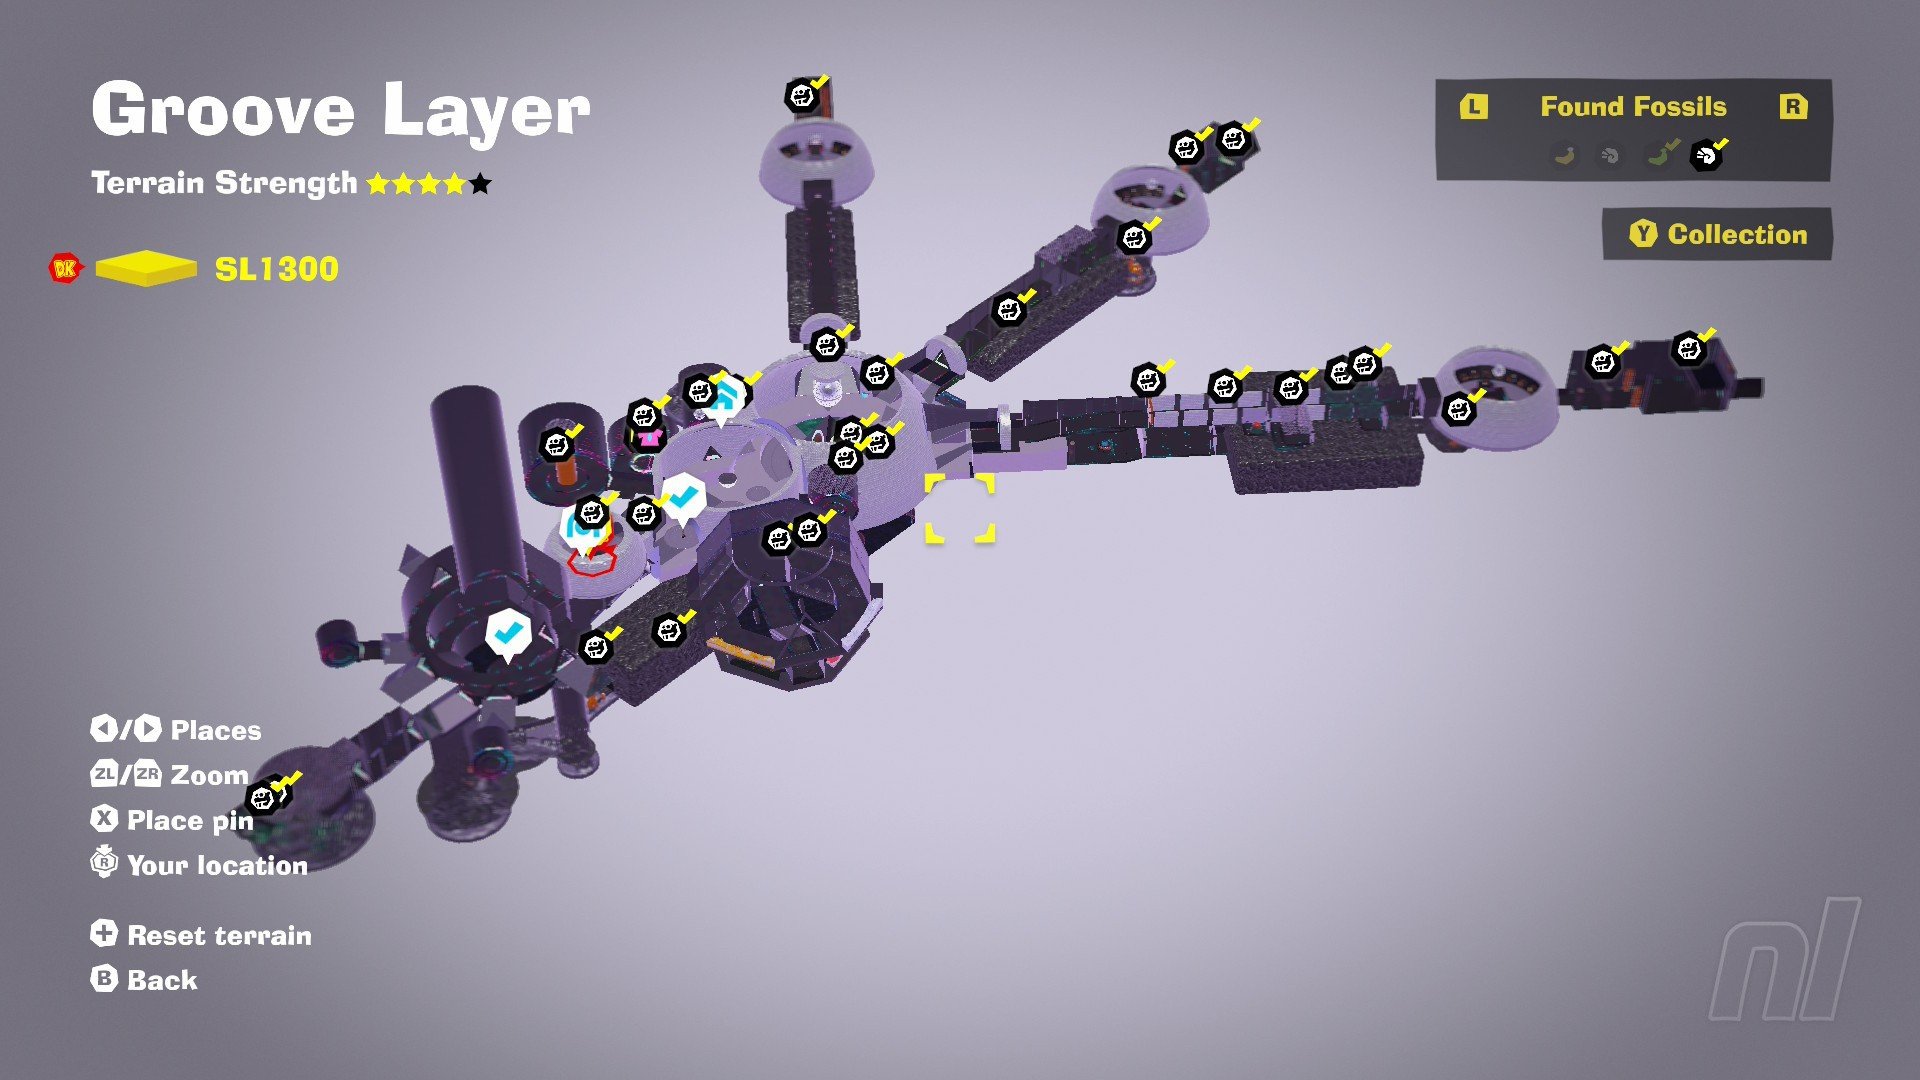
Groove Layer Fossils
The Groove Layer is pretty straightforward, with only 30 Fossils to be found in its one sublayer. All of these are an alternate colour variant of the Normal Beaver Fossil you'll remember from the Forest Layer.
SL1300 Fossil Map
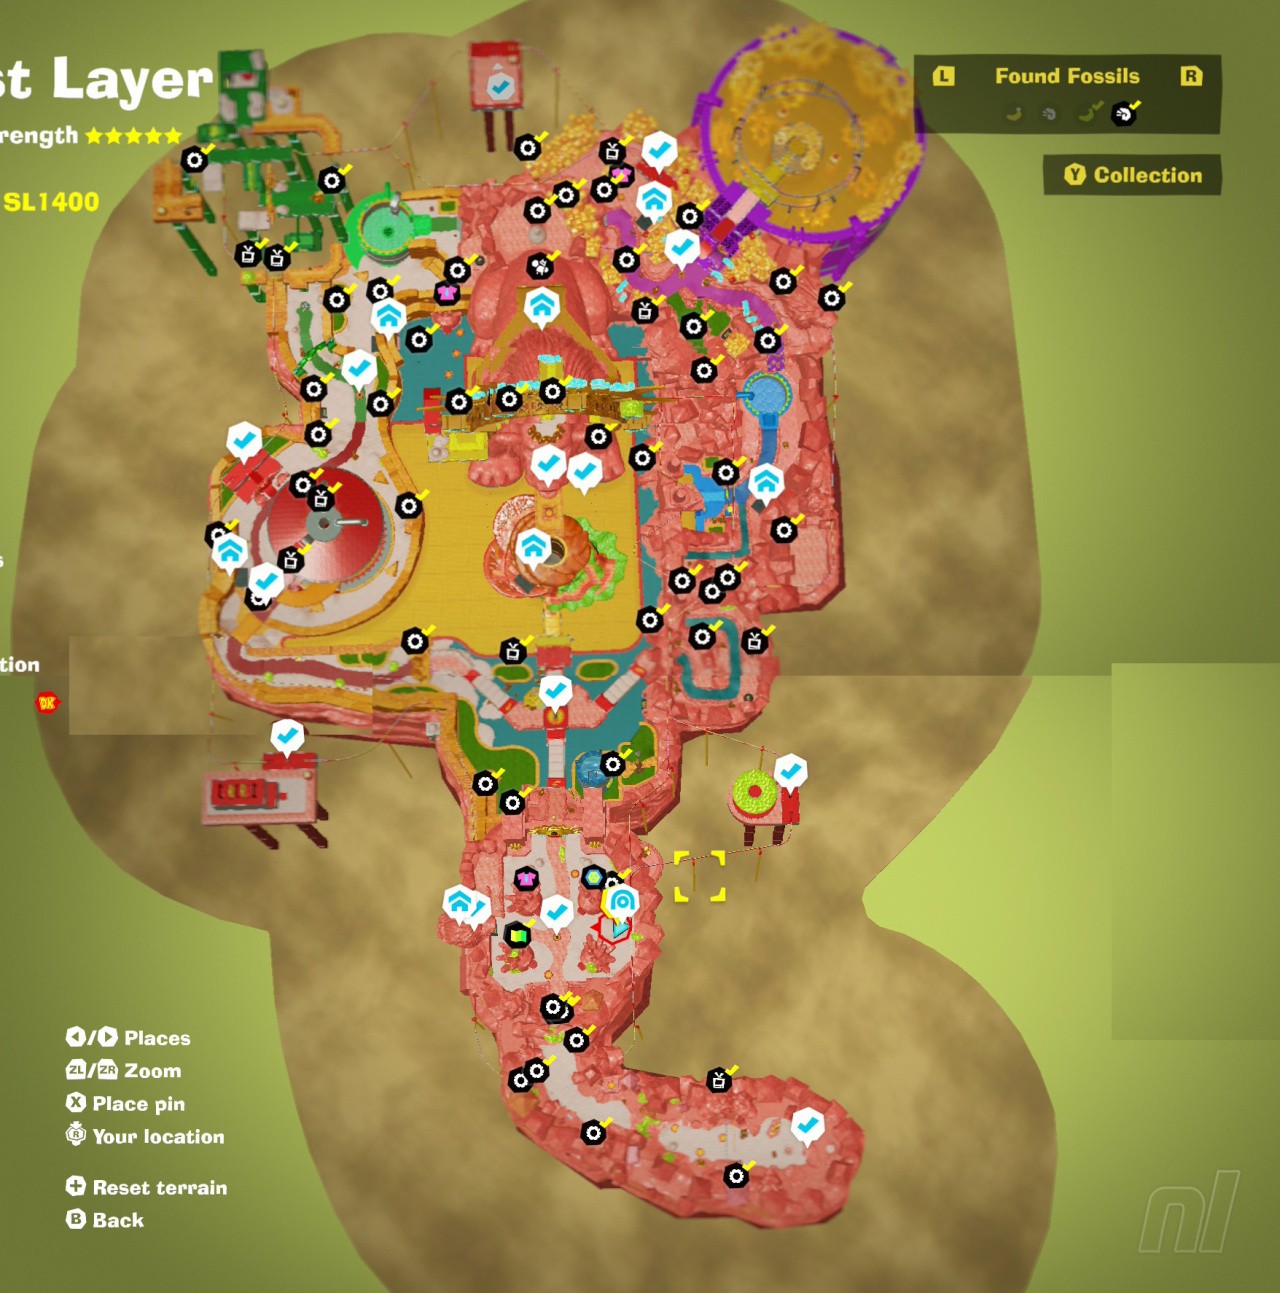
Feast Layer Fossils
The Feast Layer is home to 71 Fossils across all three rarity types:
- Old Tire (Normal) - 61
- Cathode-Ray Tube (Rare) - 10
- Robot (Extra-Rare) - 1
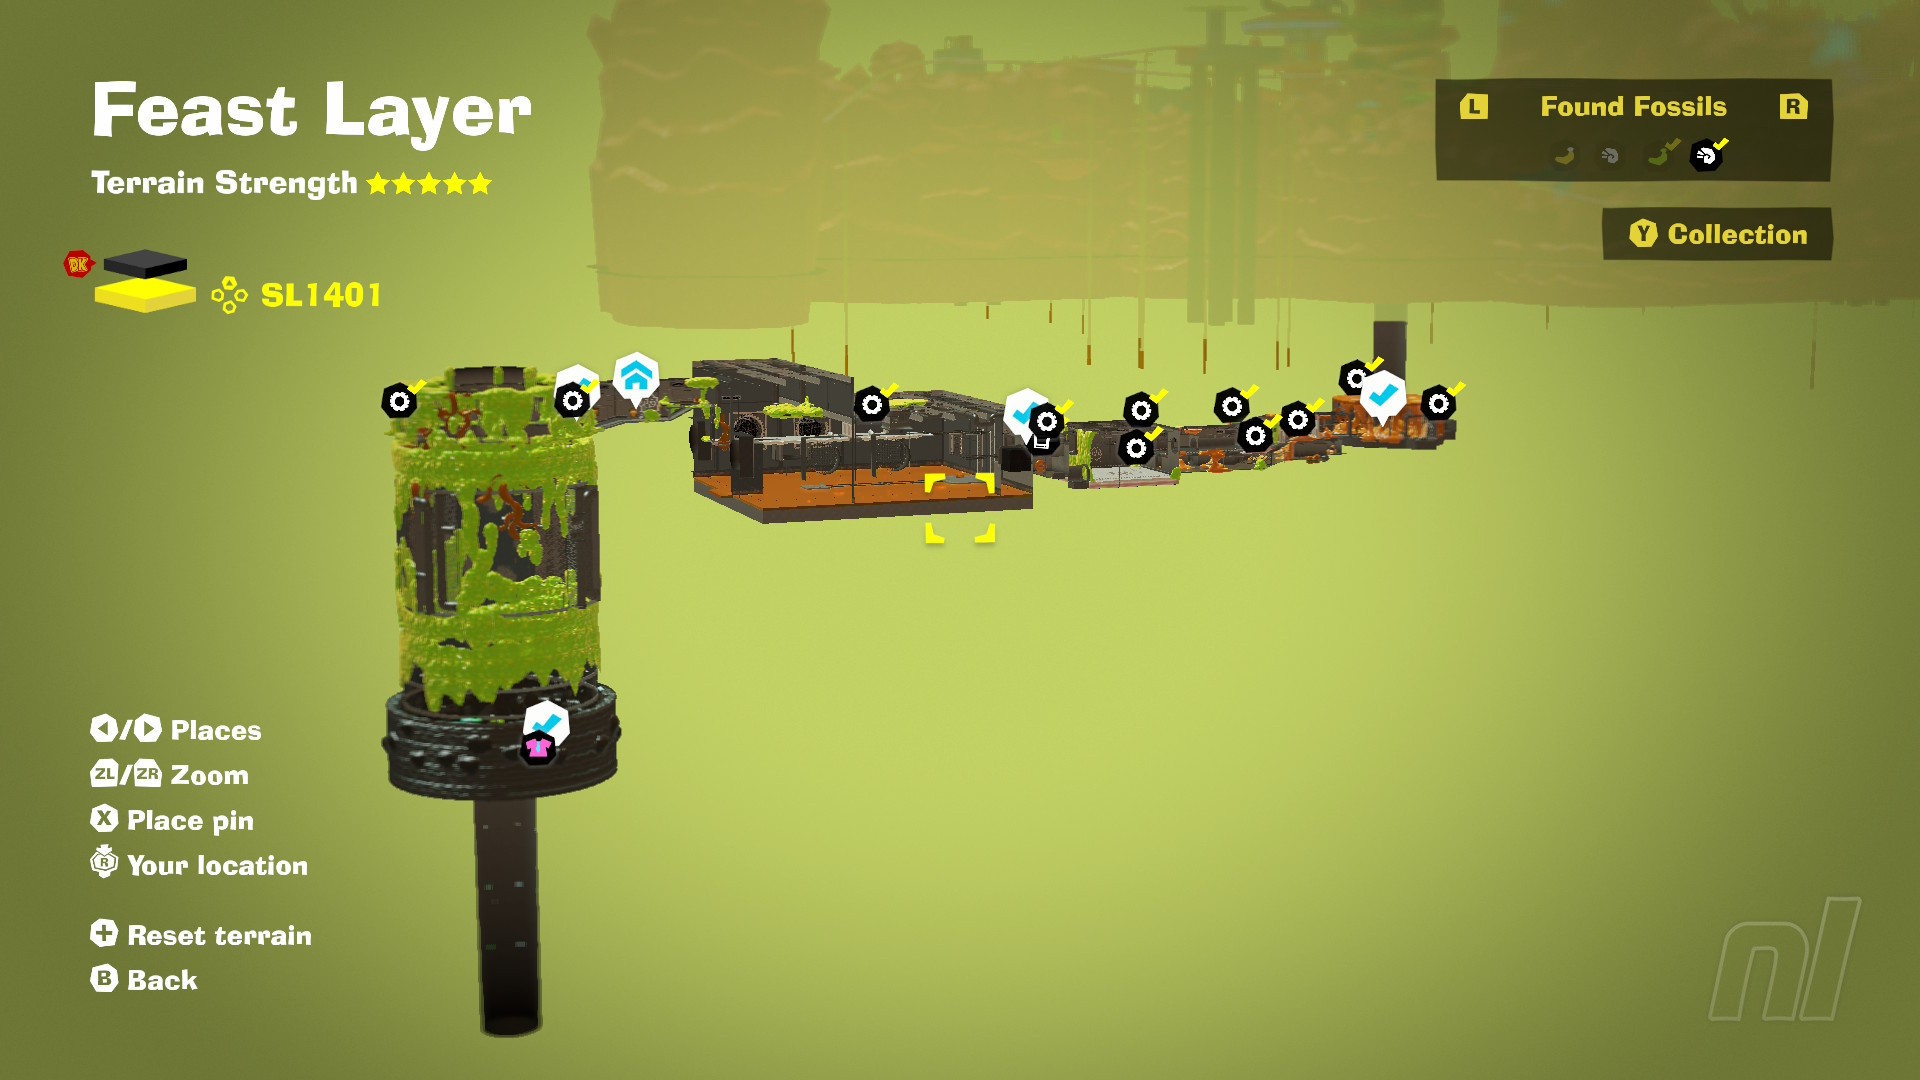
You'll find this layer's Extra-Rare Robot Fossil in a wall of muck on the back of the giant lion statue on SL1400. Grab chunks of Salt from the statue's tail, and throw them at the wall until the Fossil is free.
SL1400 Fossil Map
SL1401 Fossil Map
Forbidden Layer Fossils
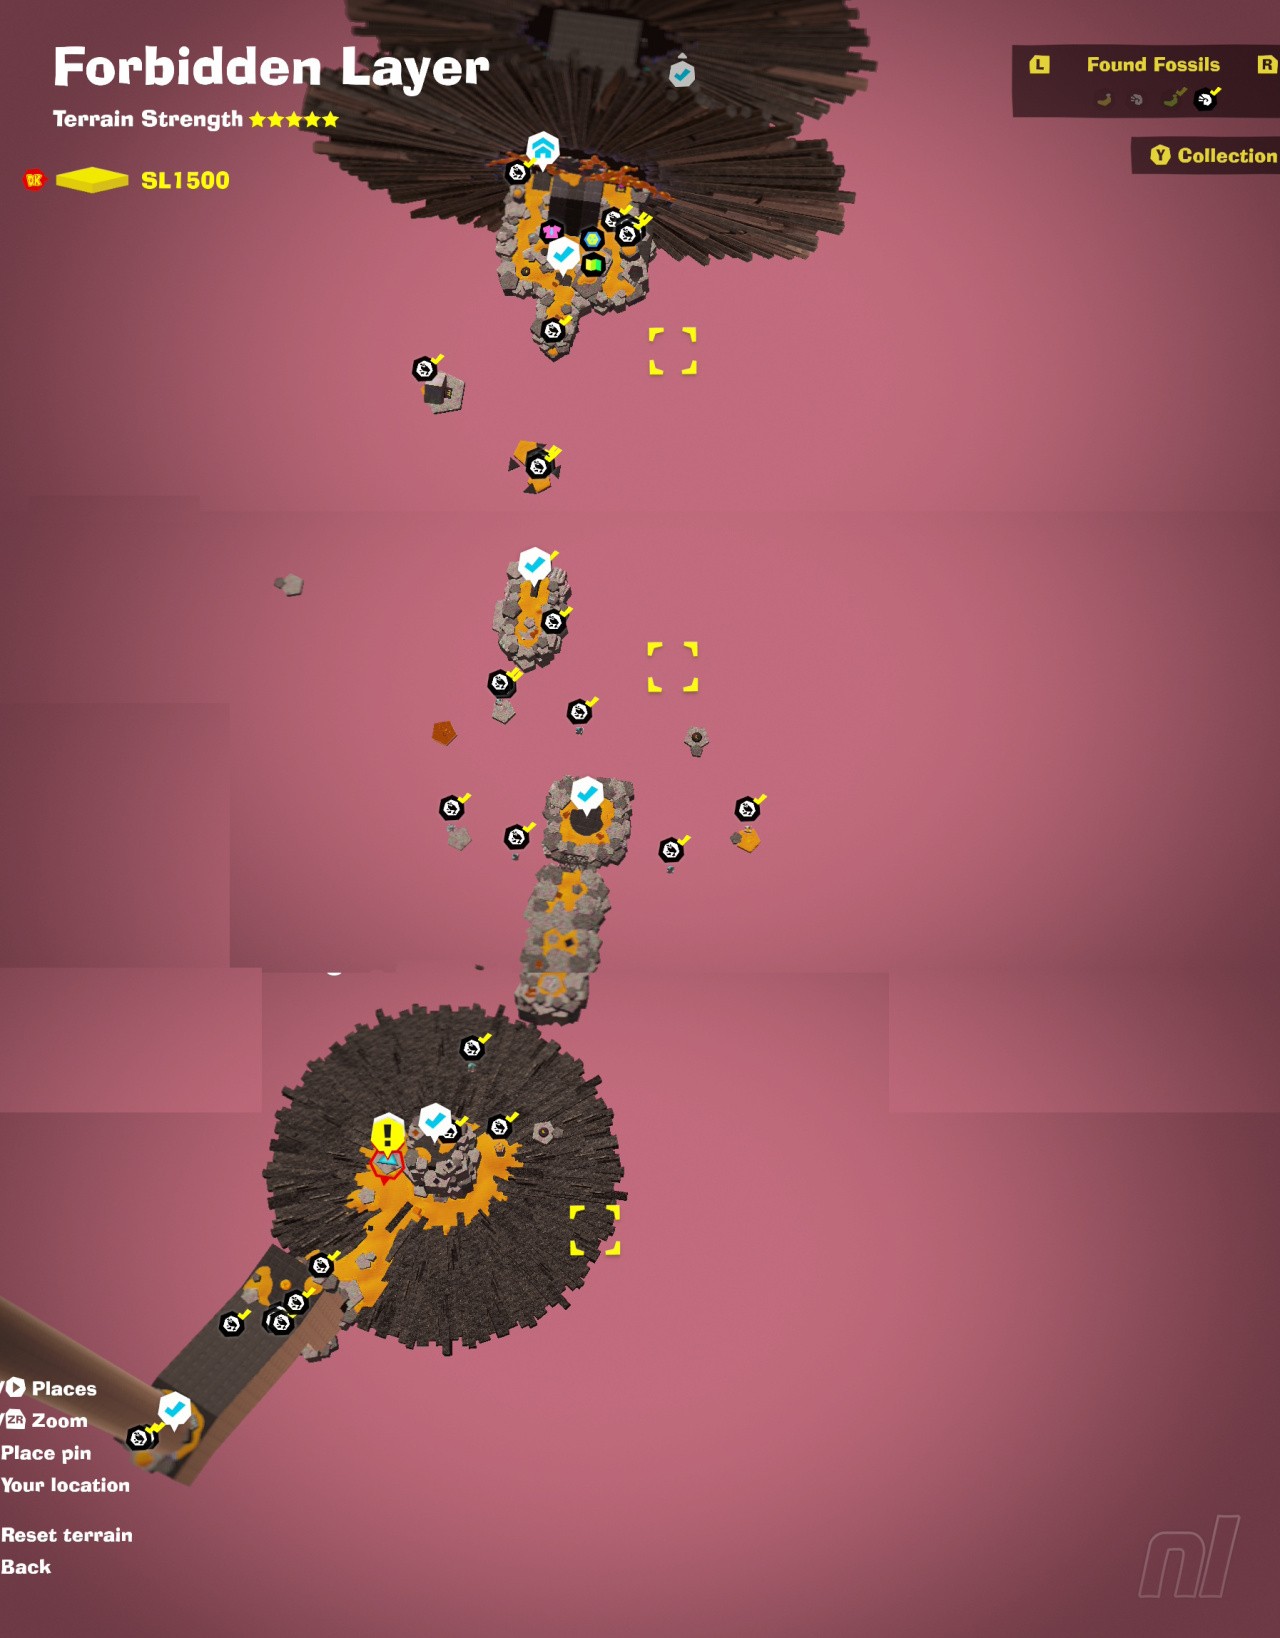
Time for another smaller one. The Forbidden Layer stretches 30 Fossils across its singular sublayer, all of which are a colour variant on the Normal Frog design we saw back on the Tempest Layer.
SL1500 Fossil Map
Planet Core Fossils
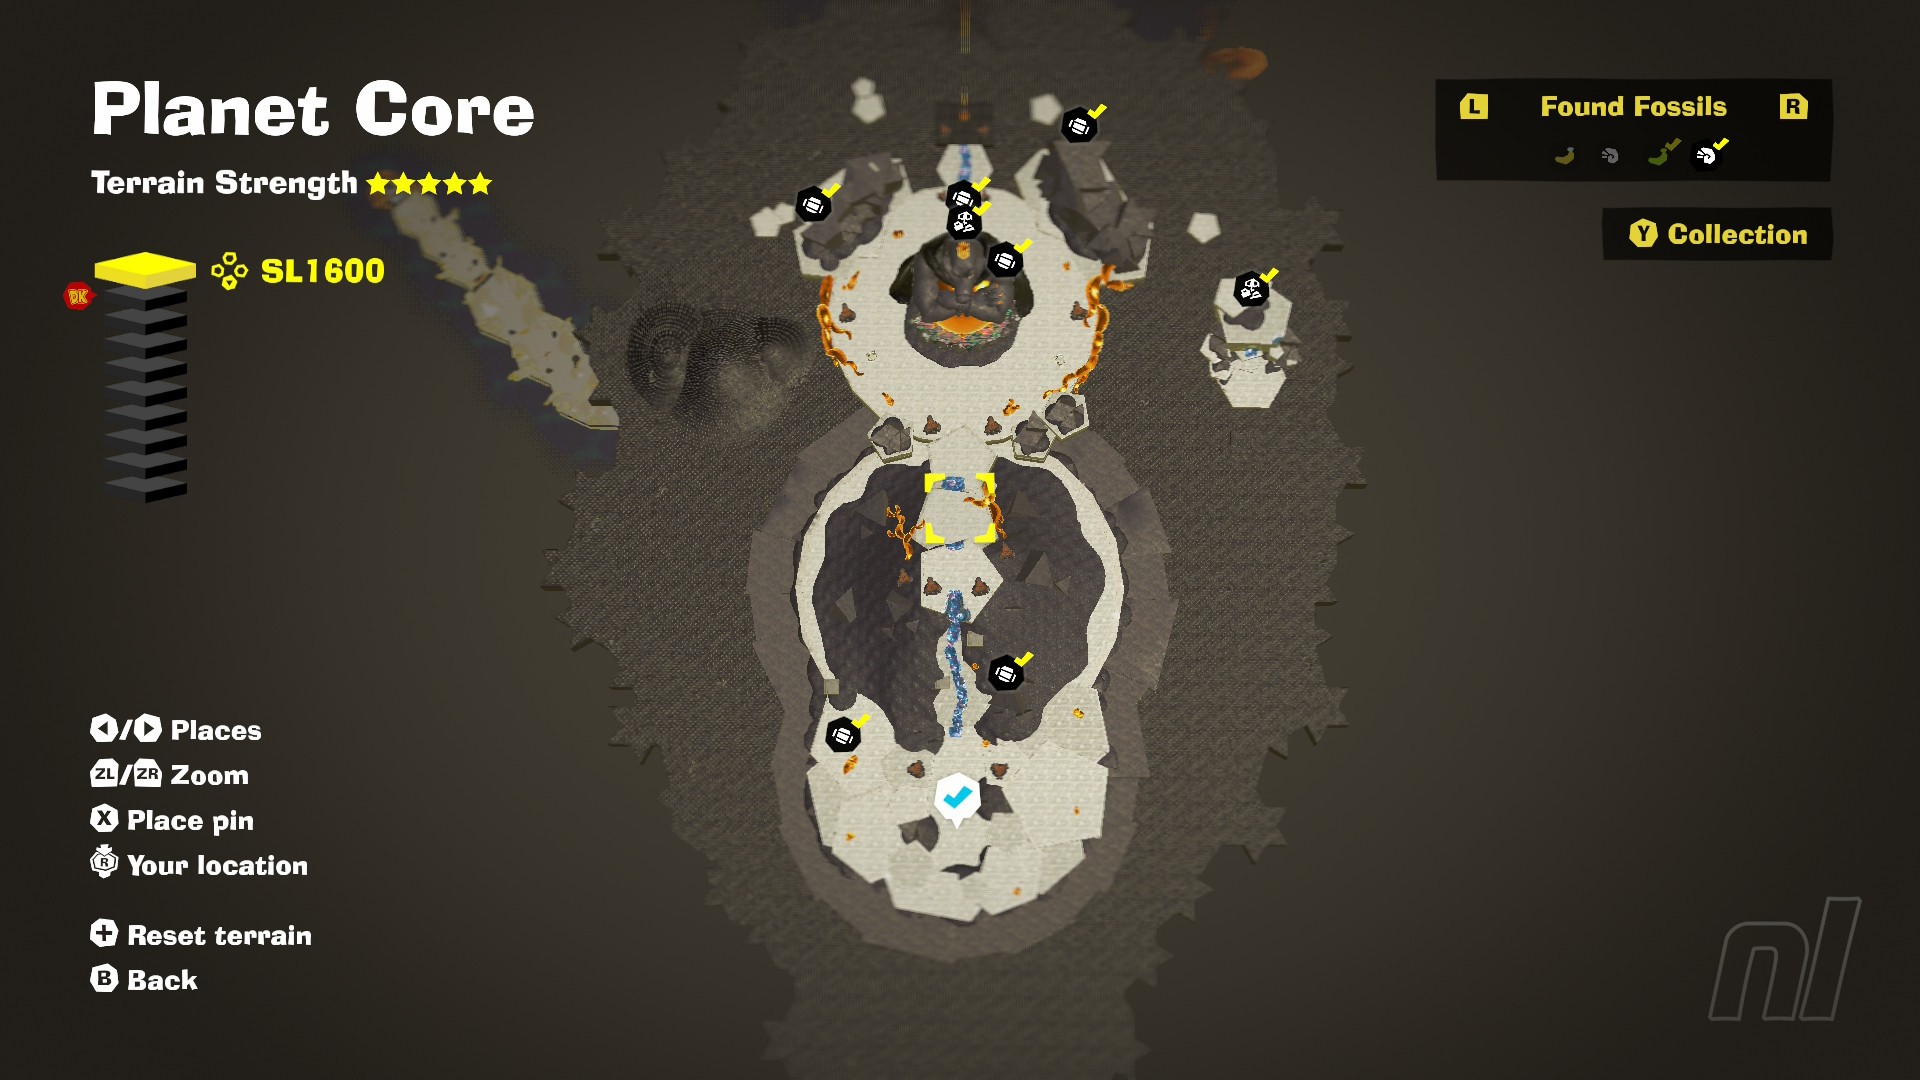
And so we arrive at the deepest layer. The Planet Core is a whopper, with another 72 Fossils scattered between most of its nine sublayers. You'll find the following Fossils in this region:
- 8-Bit Barrel (Normal) - 31
- 8-Bit Items (Rare) - 10
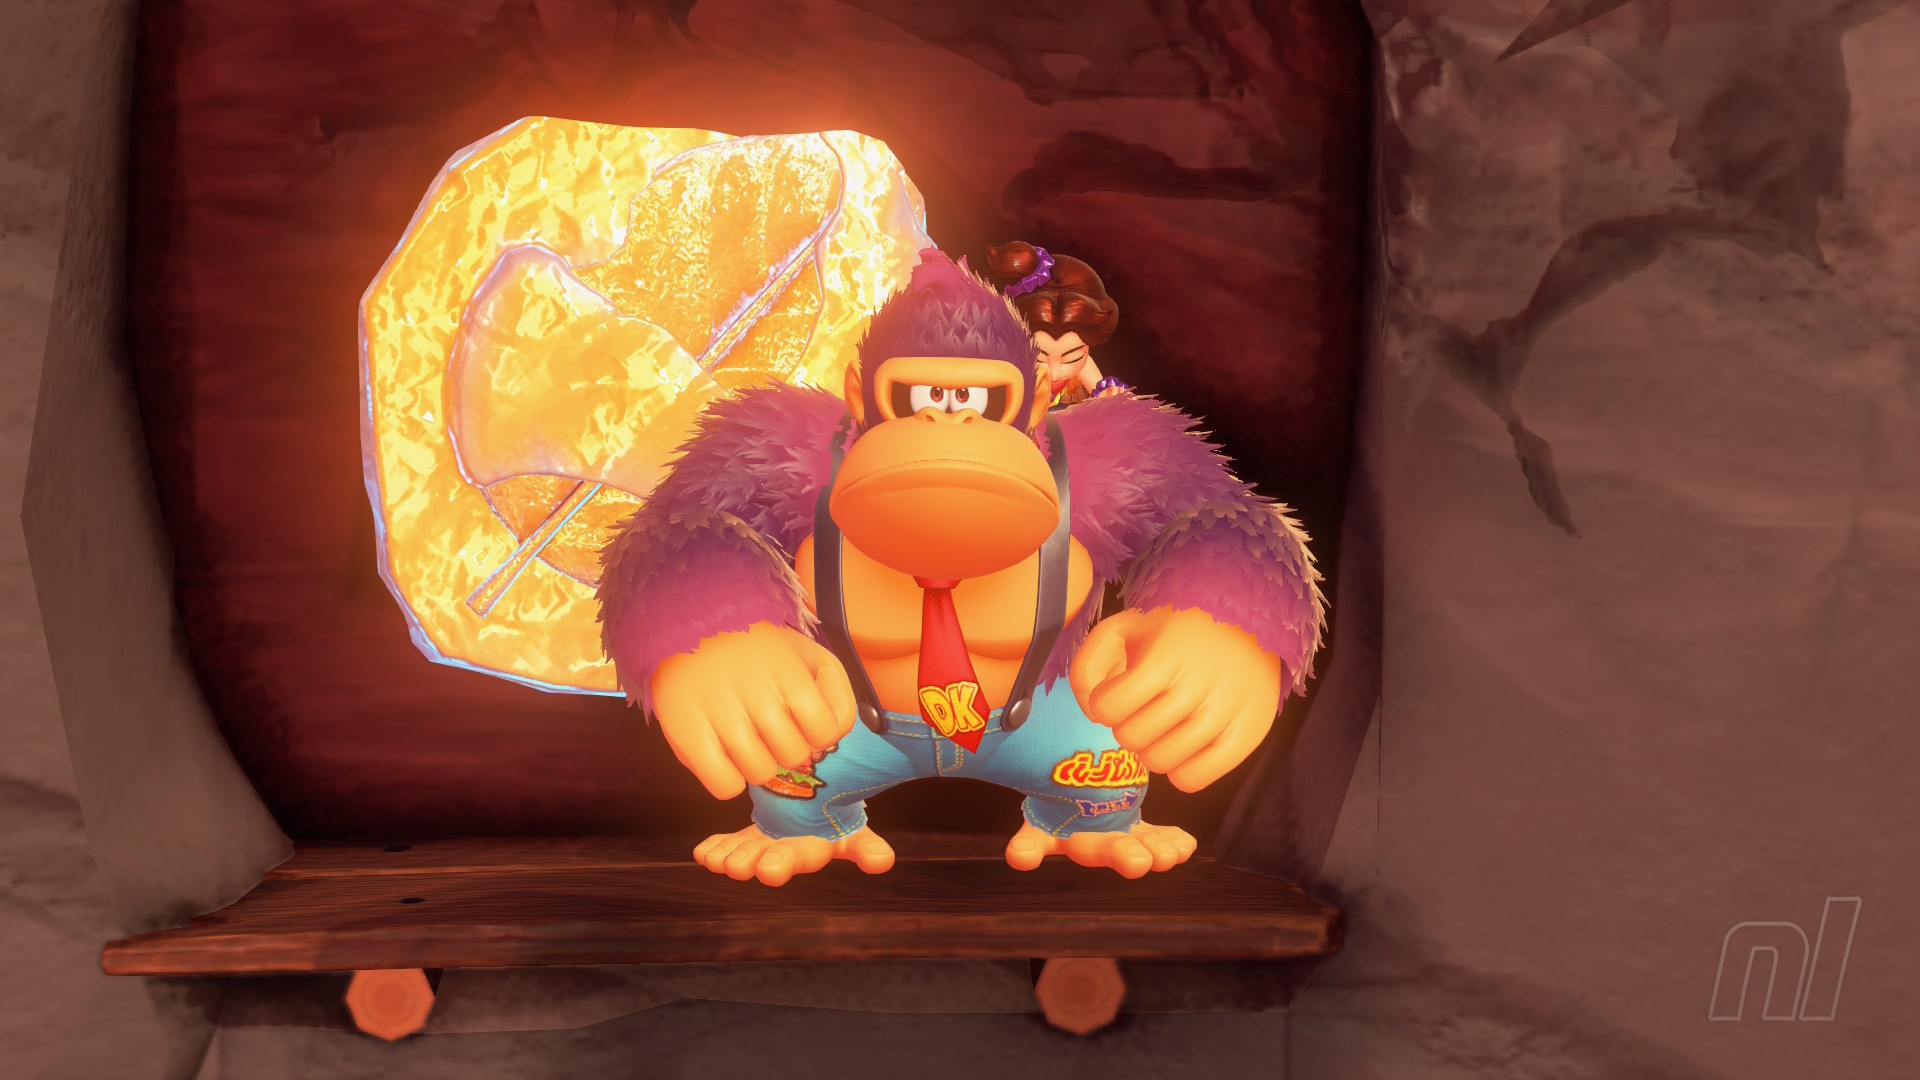
- 8-Bit DK (Extra-Rare) - 1
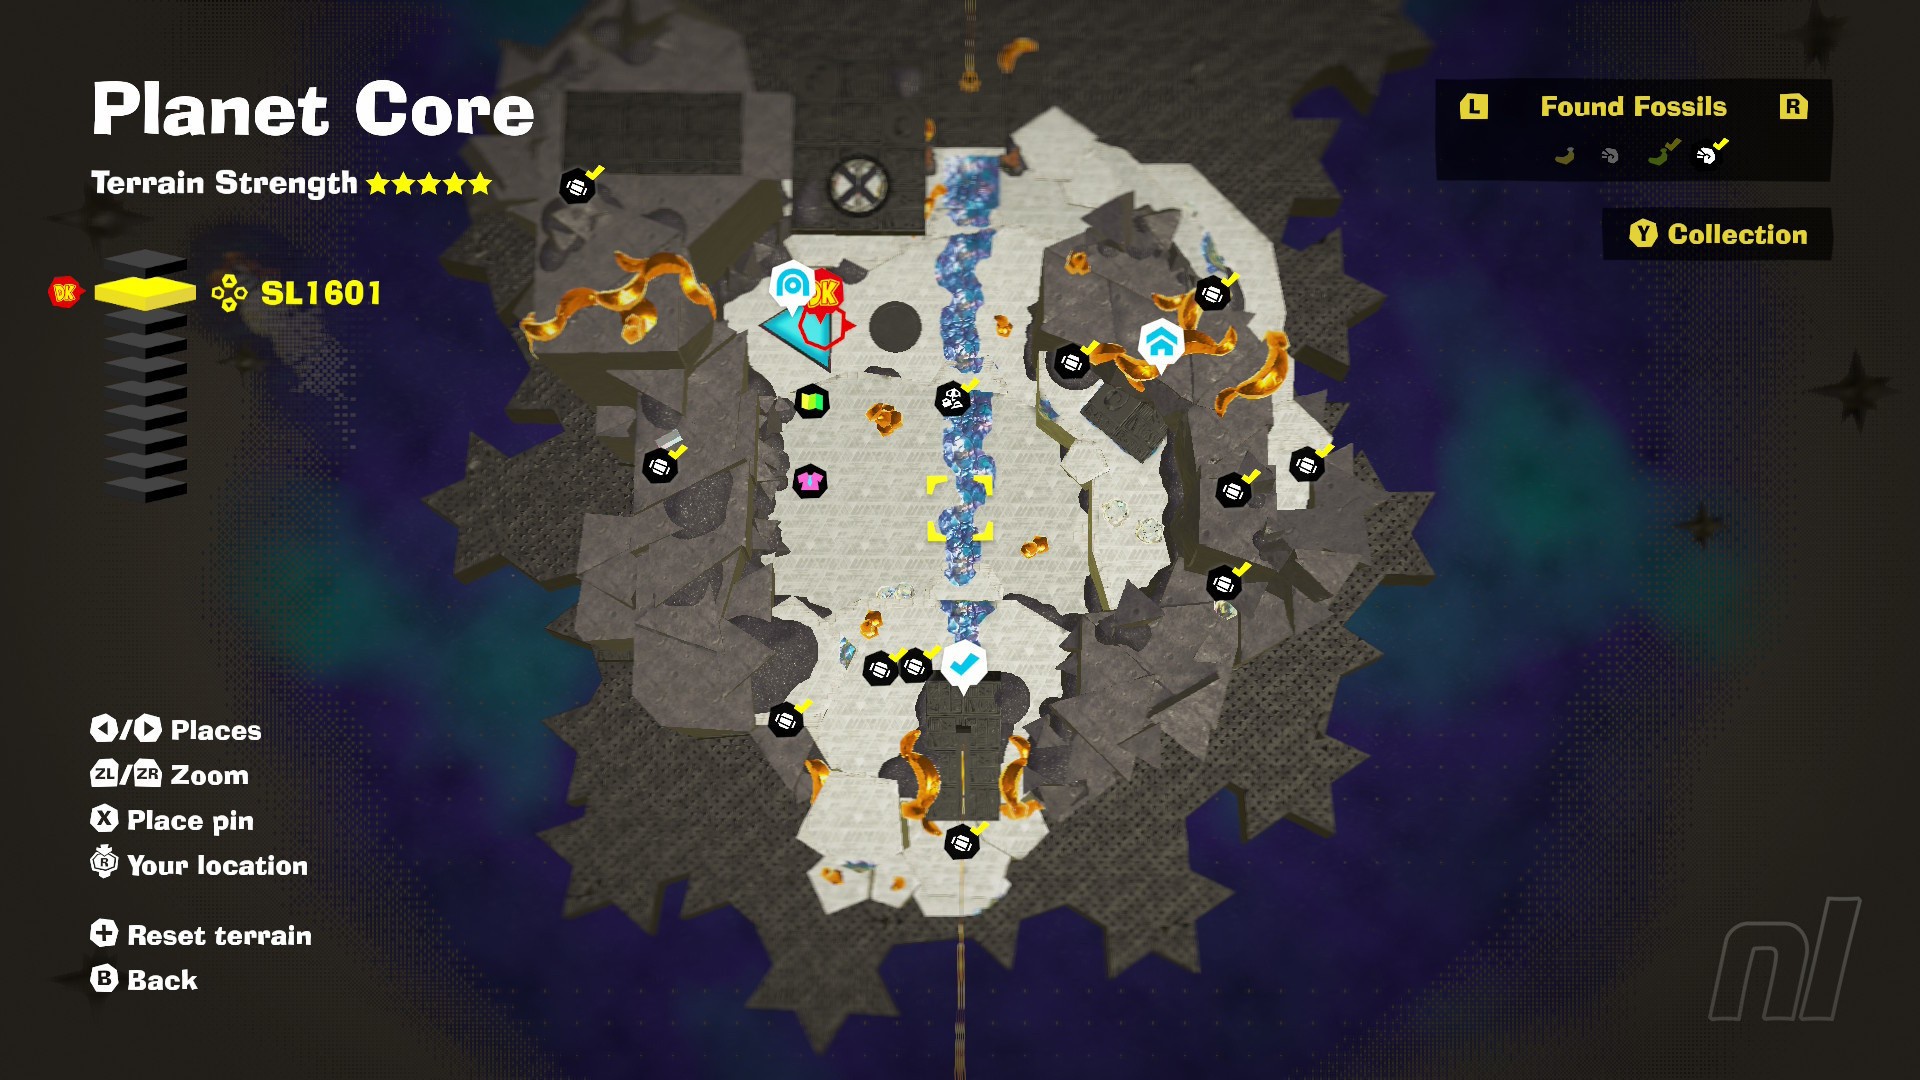
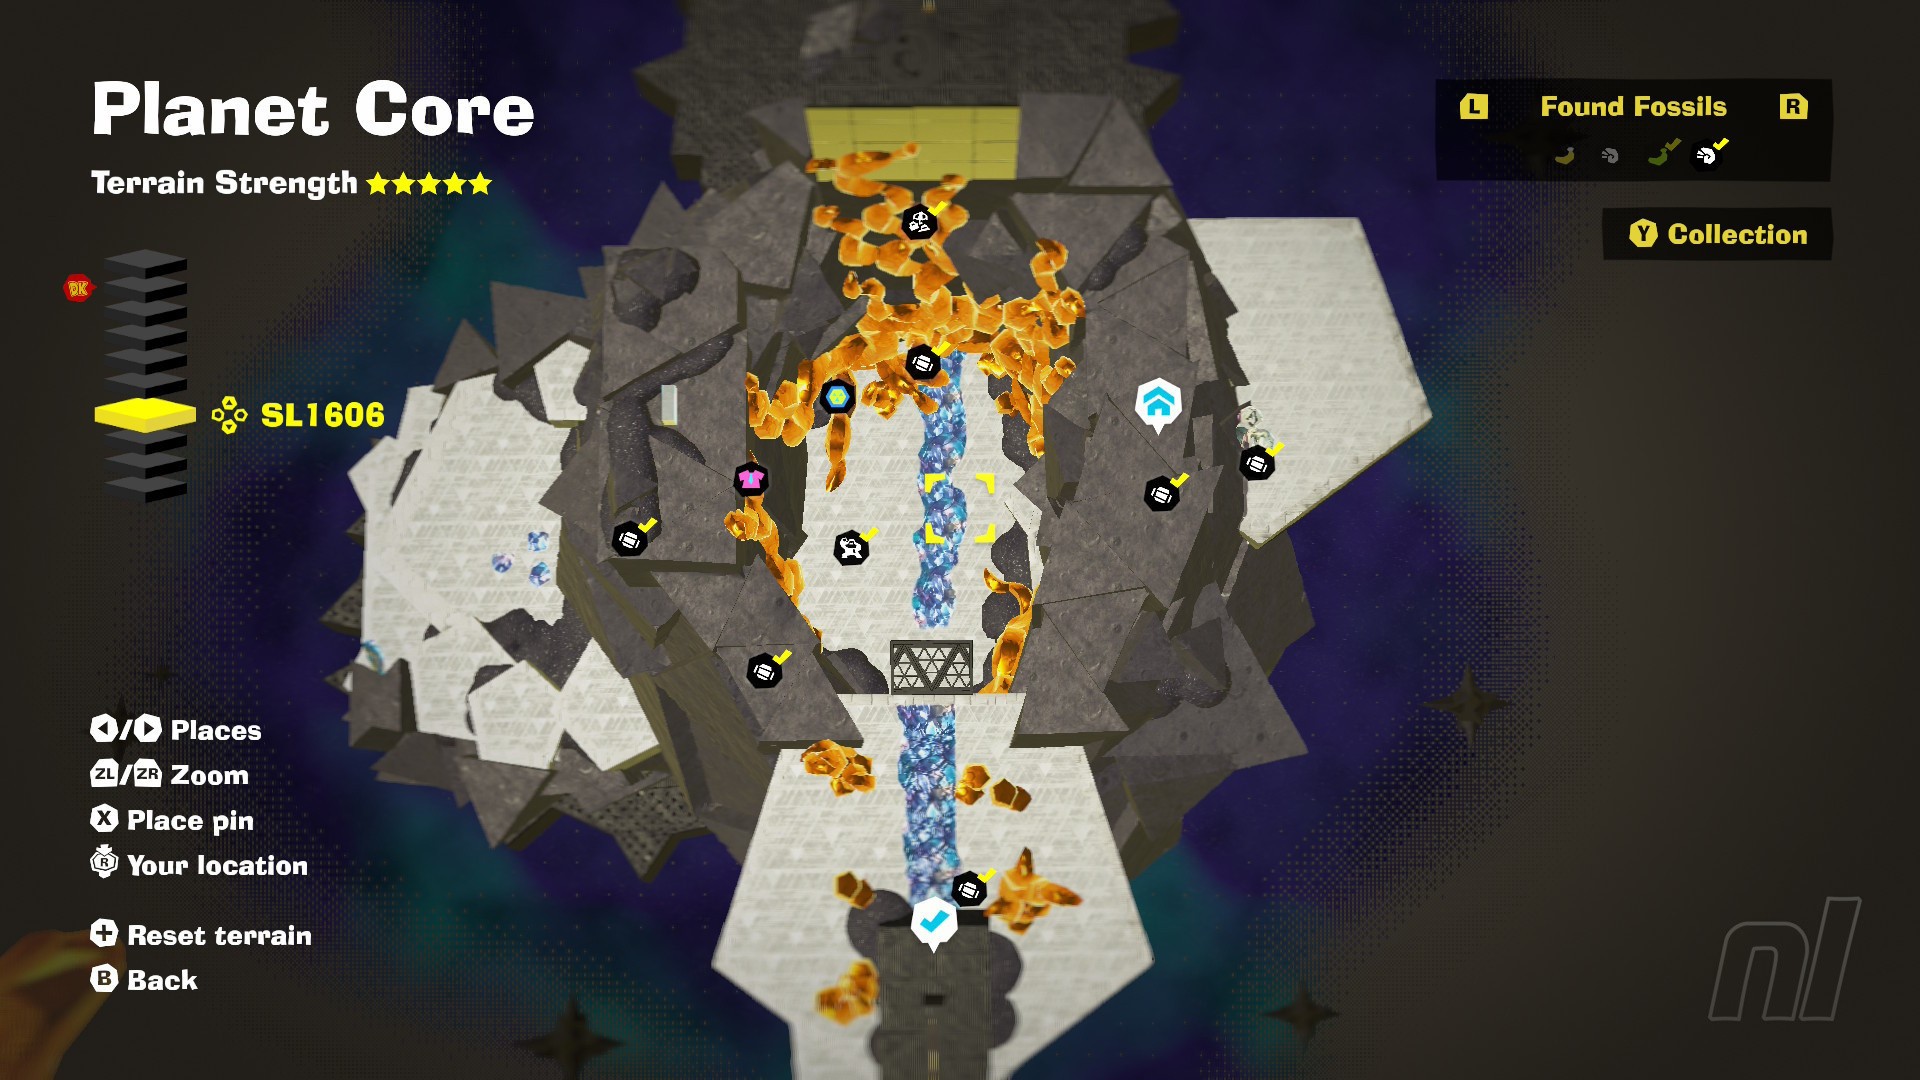
To find the Extra-Rare 8-Bit DK Fossil on this layer, head to SL1606 and trigger the bombs in the cave at the bottom of the main structure. Destroying the concrete wall will reveal the Fossil behind. Simply detonate the next wave of bombs around the Fossil to add it to your collection.
SL1600 Fossil Map
SL1601 Fossil Map
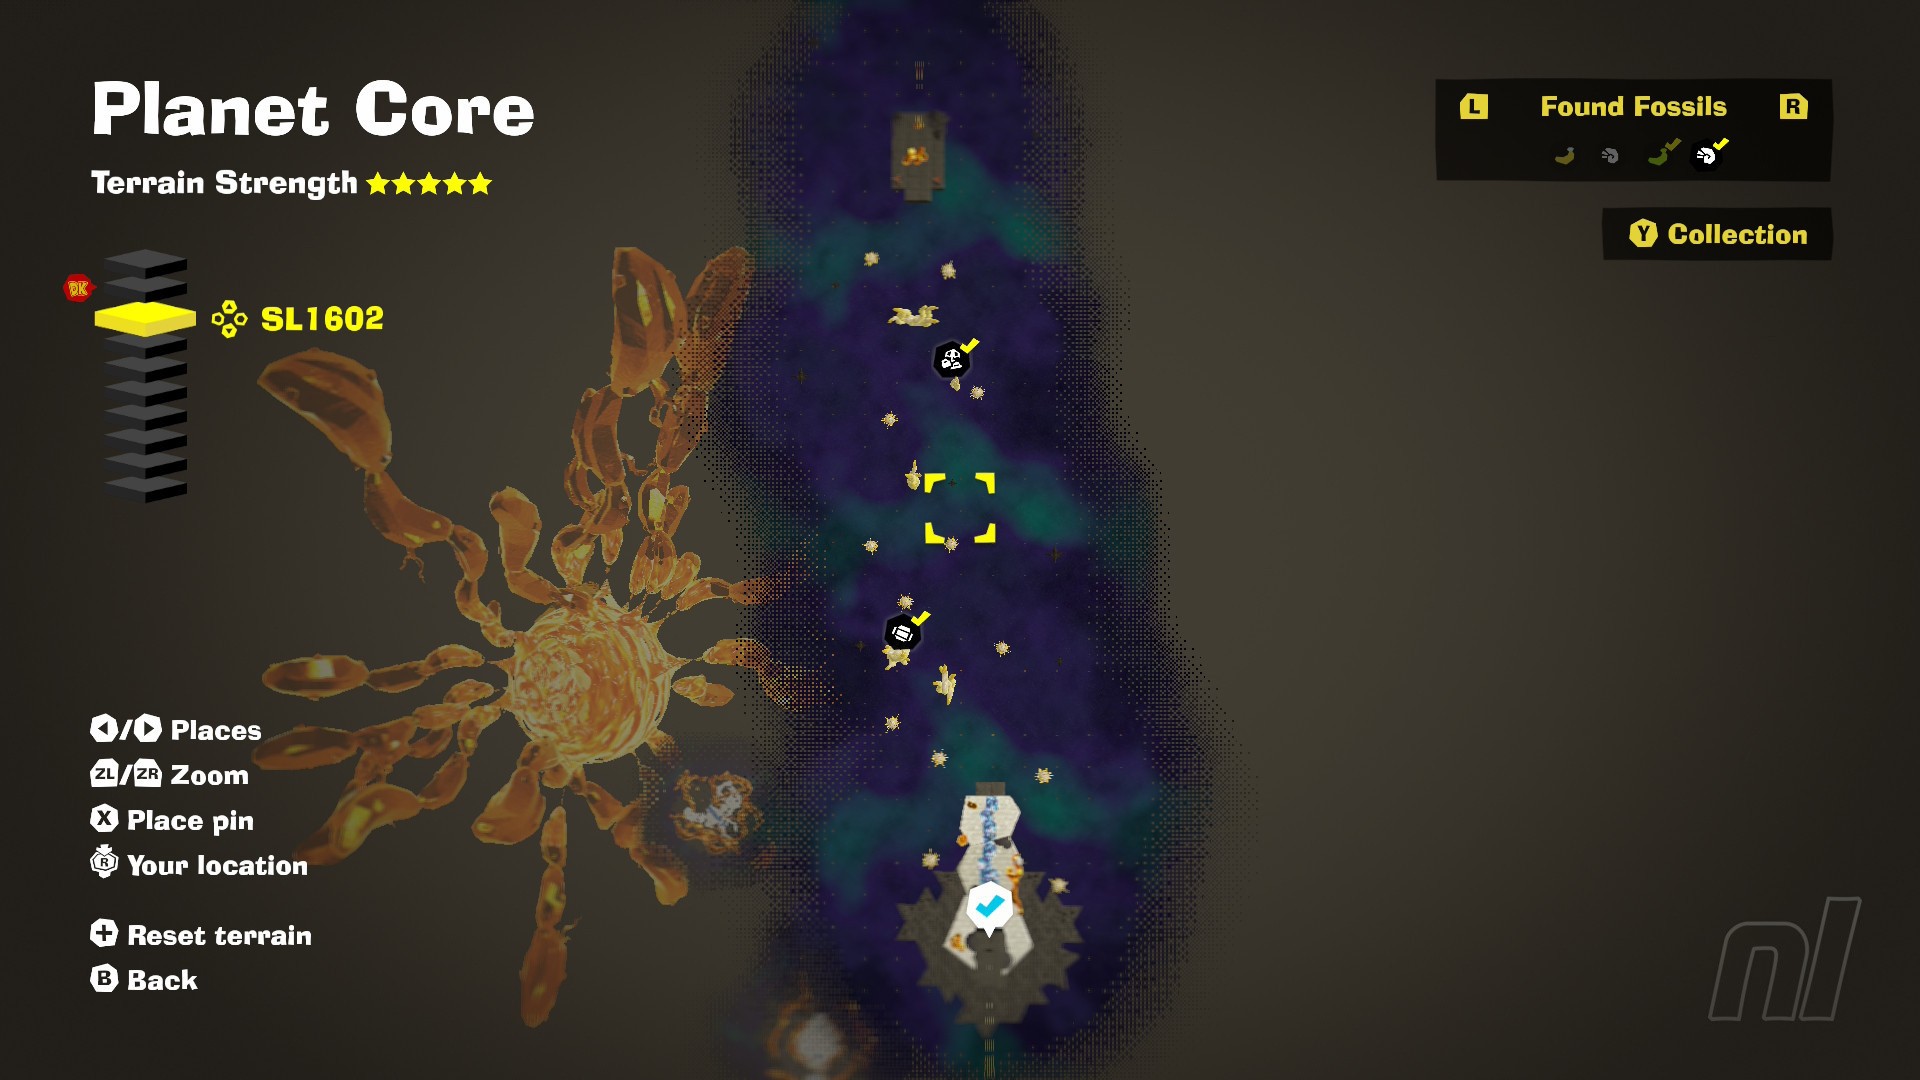
SL1602 Fossil Map
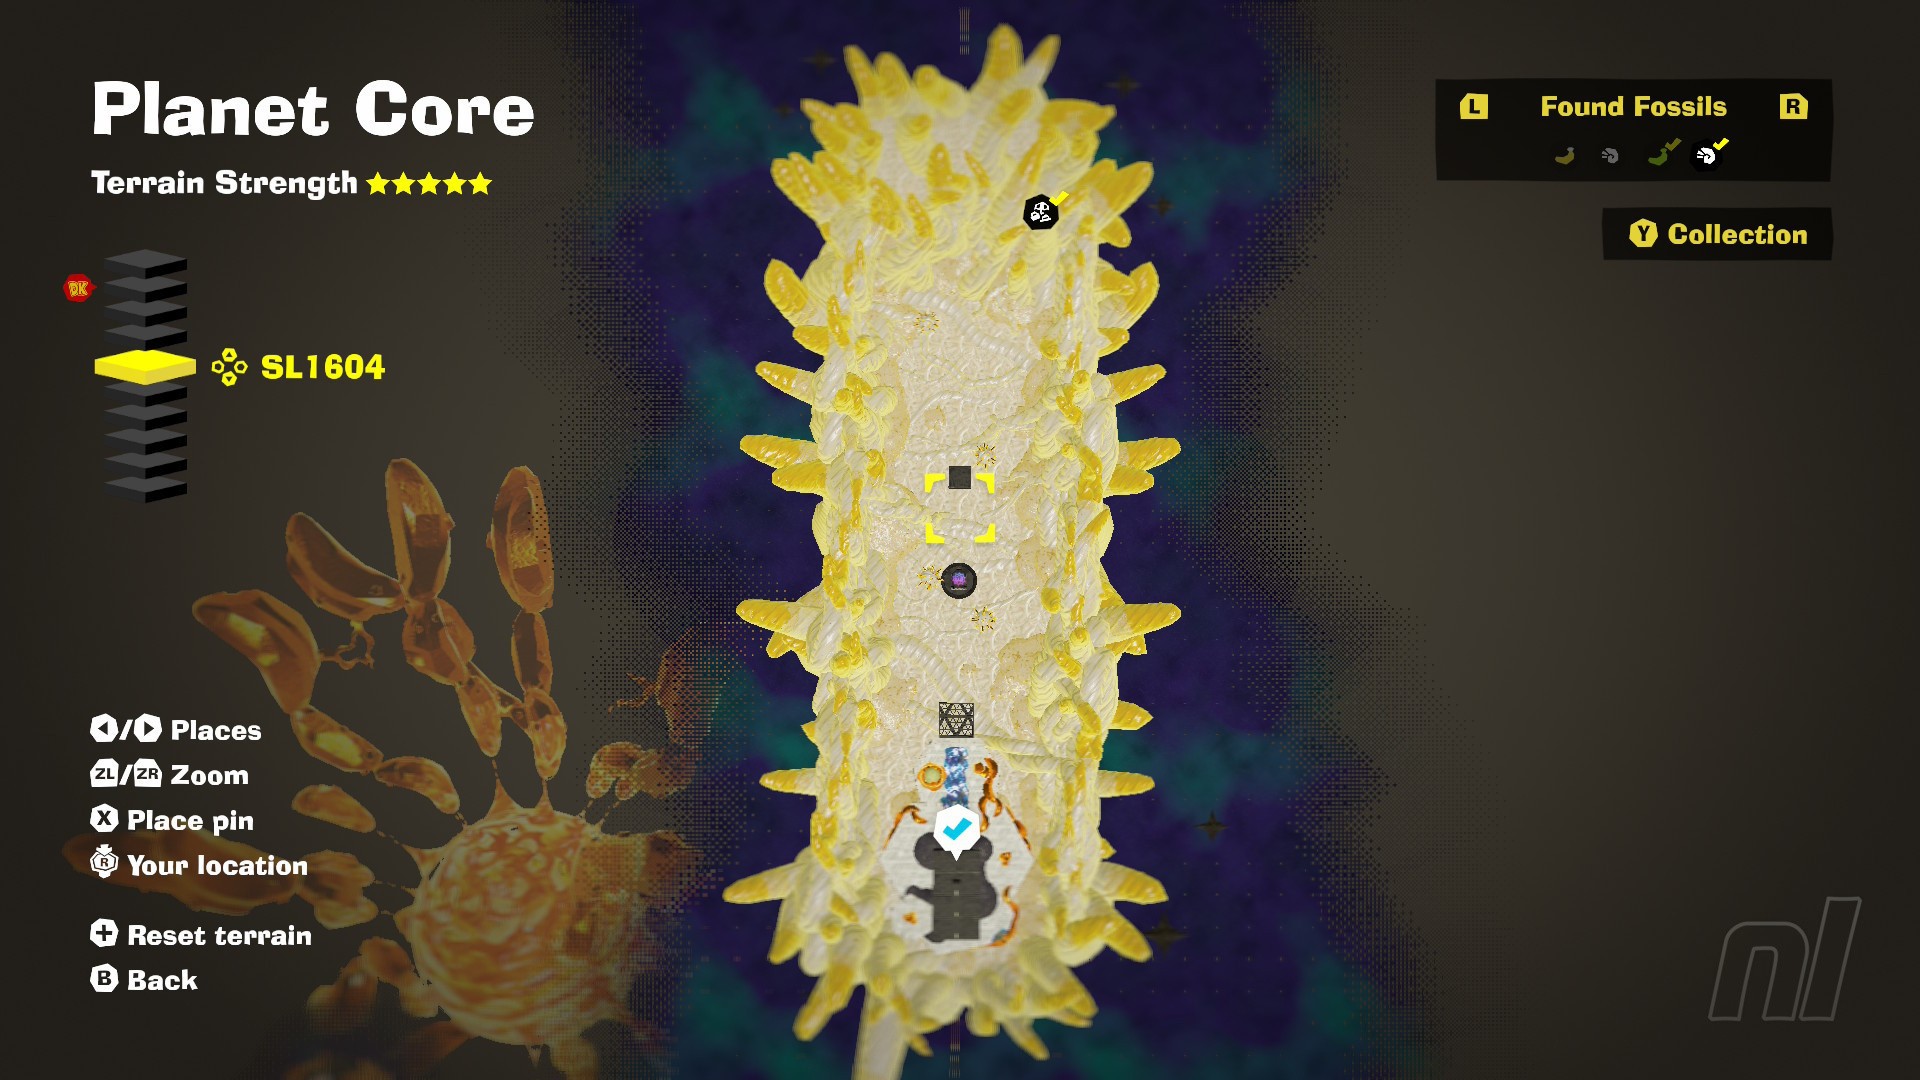
SL1604 Fossil Map
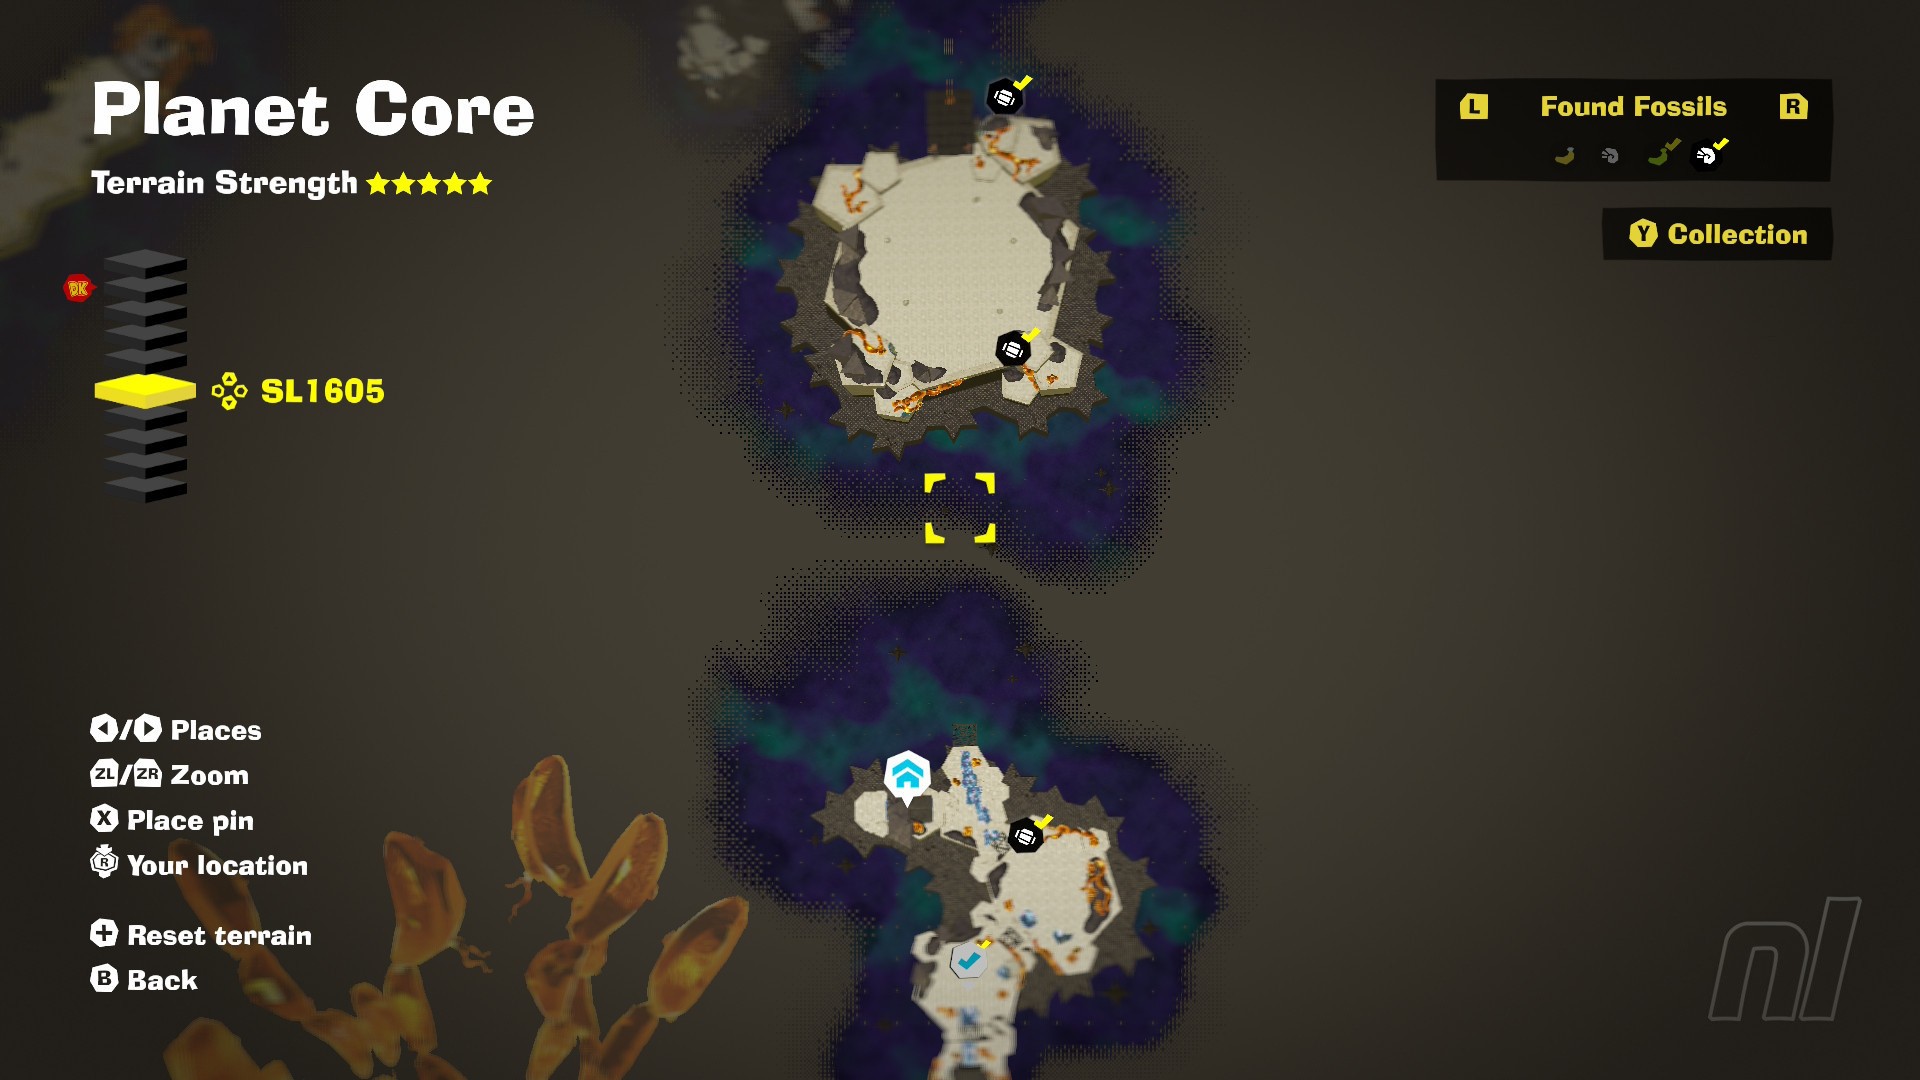
SL1605 Fossil Map
SL1606 Fossil Map
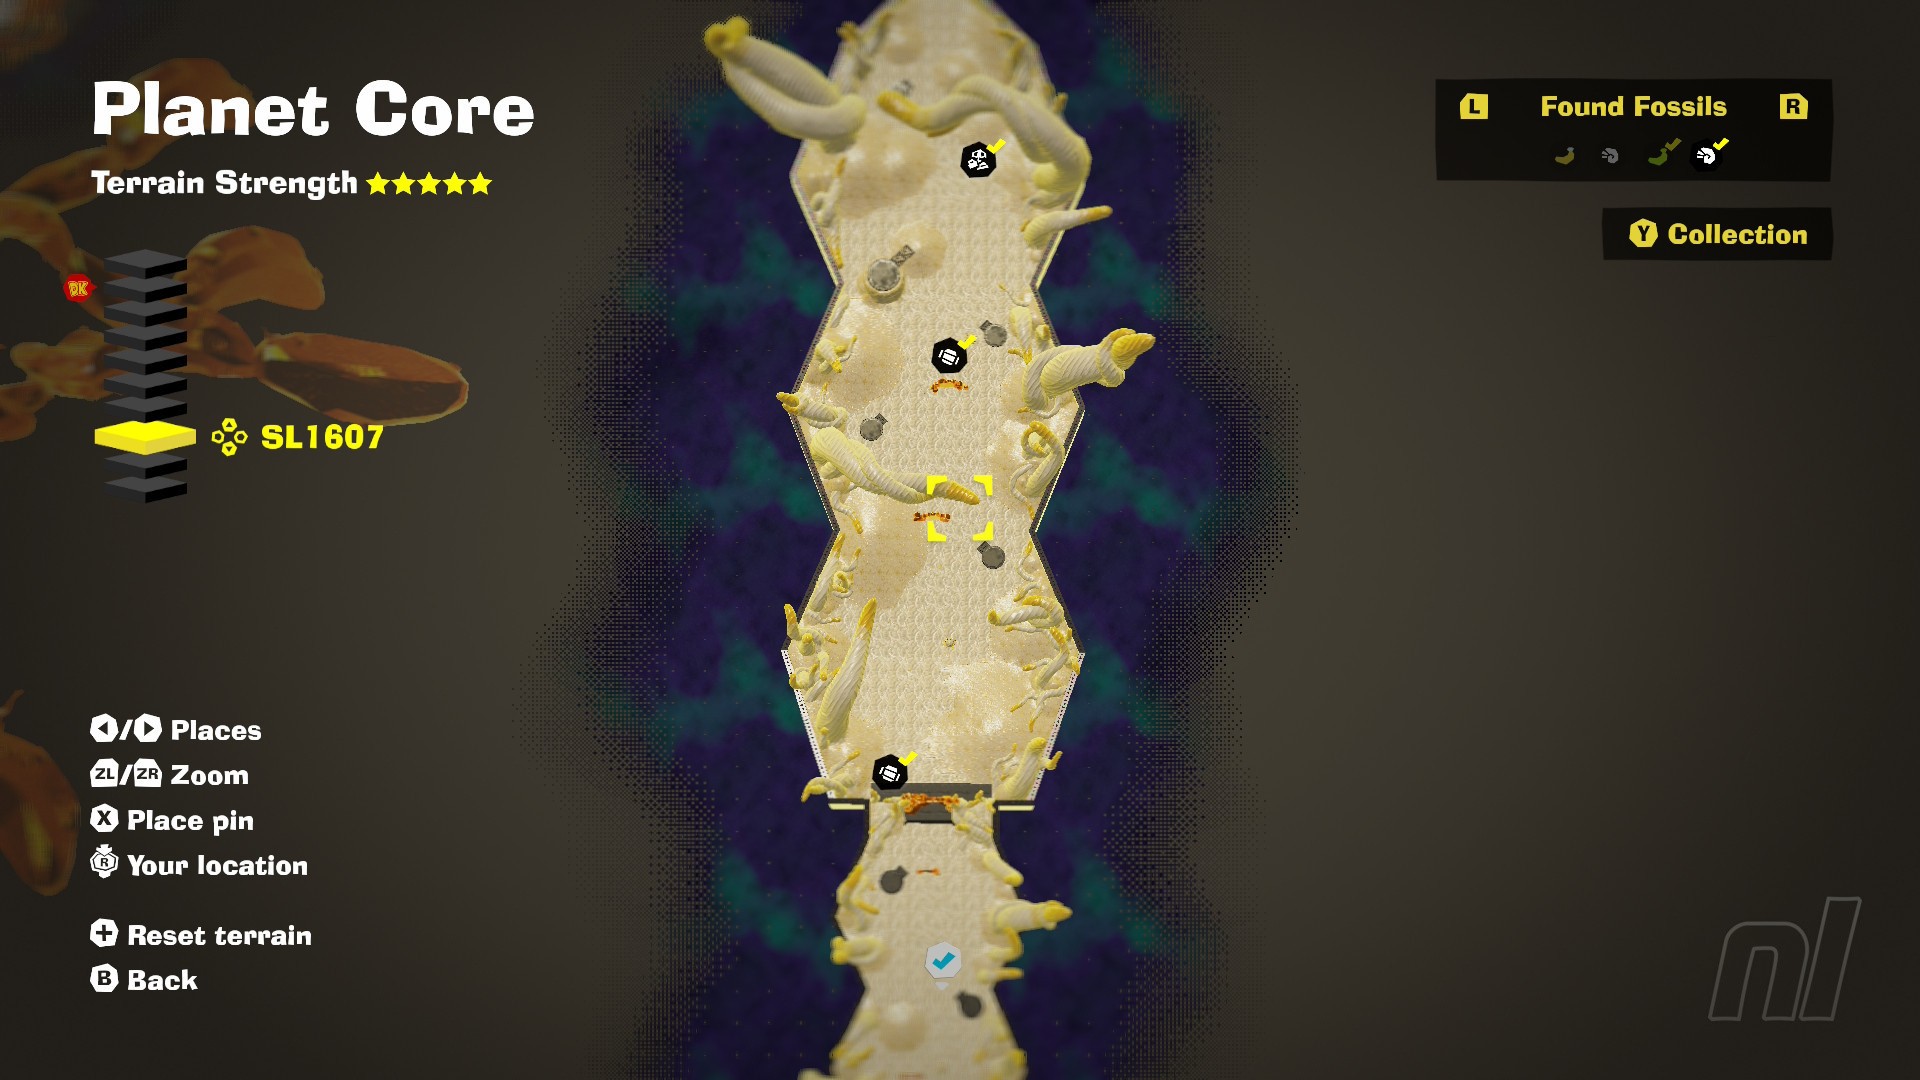
SL1607 Fossil Map
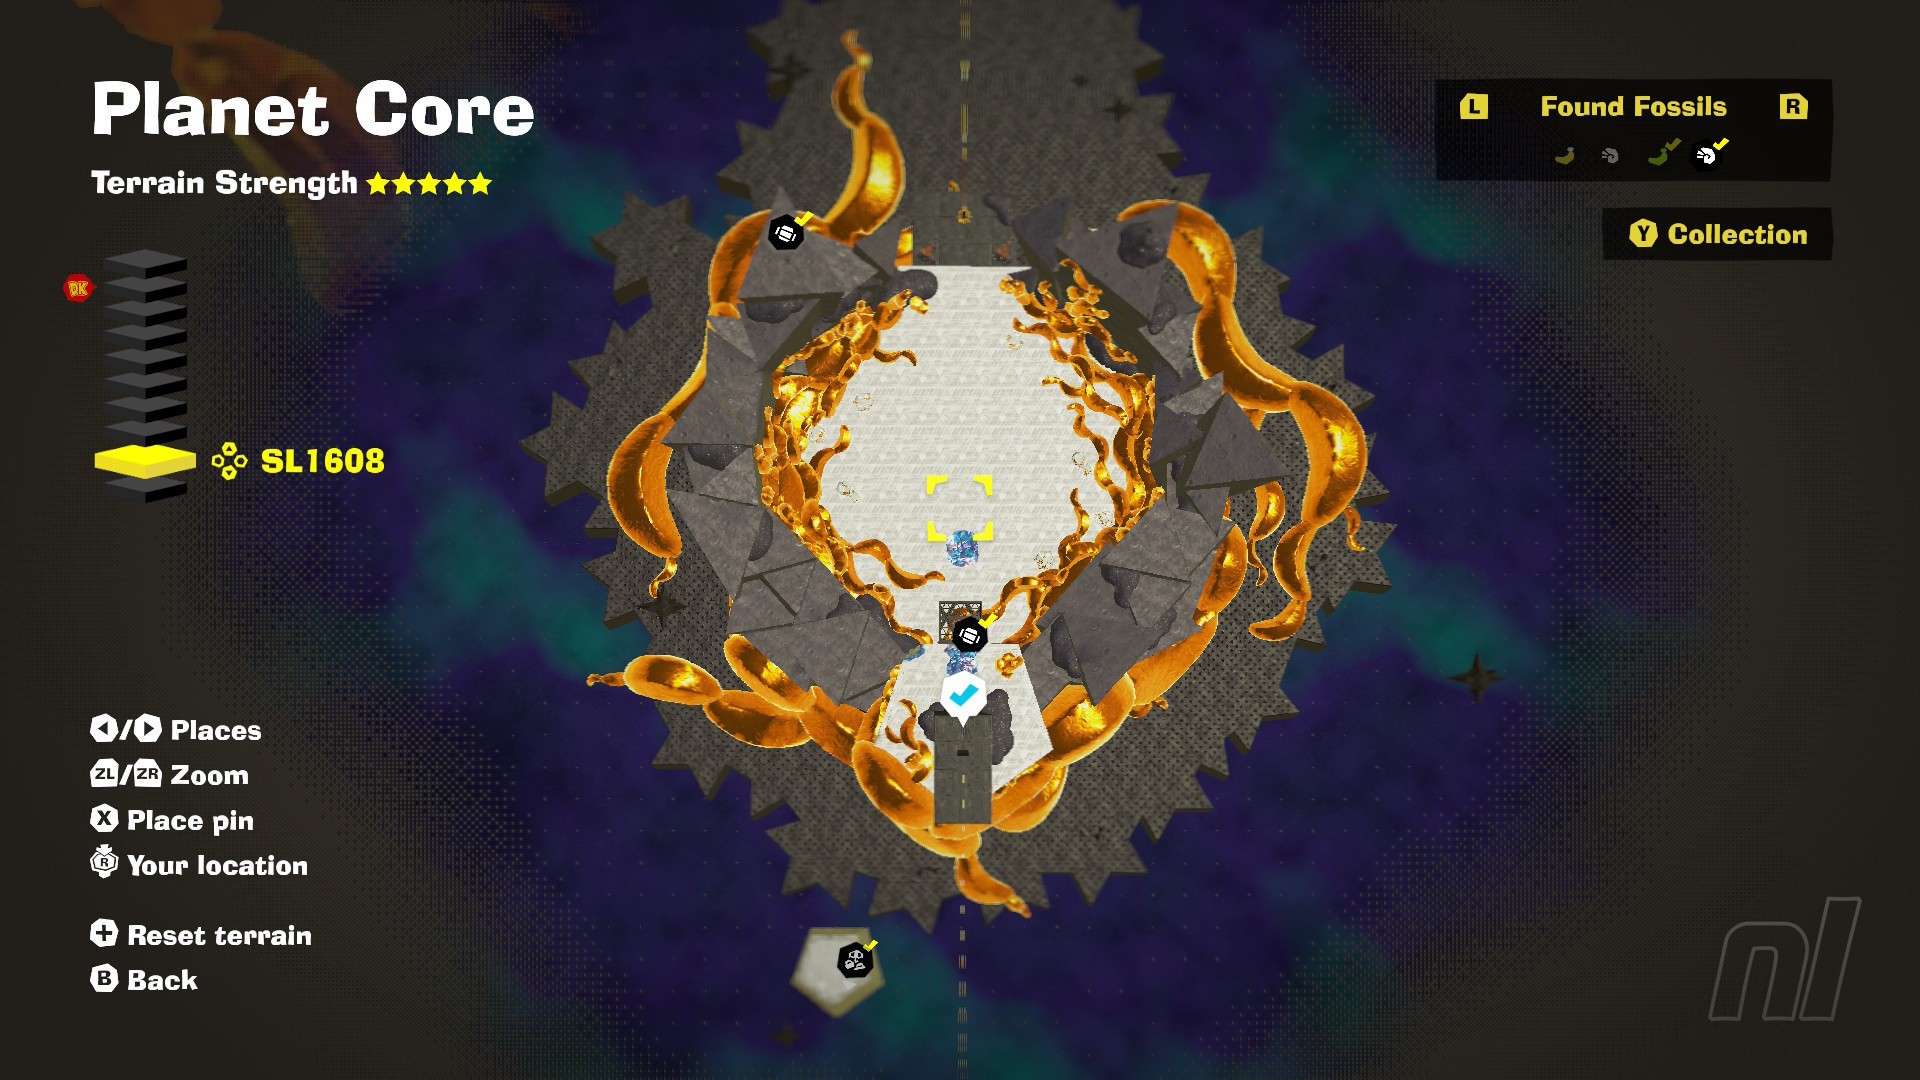
SL1608 Fossil Map
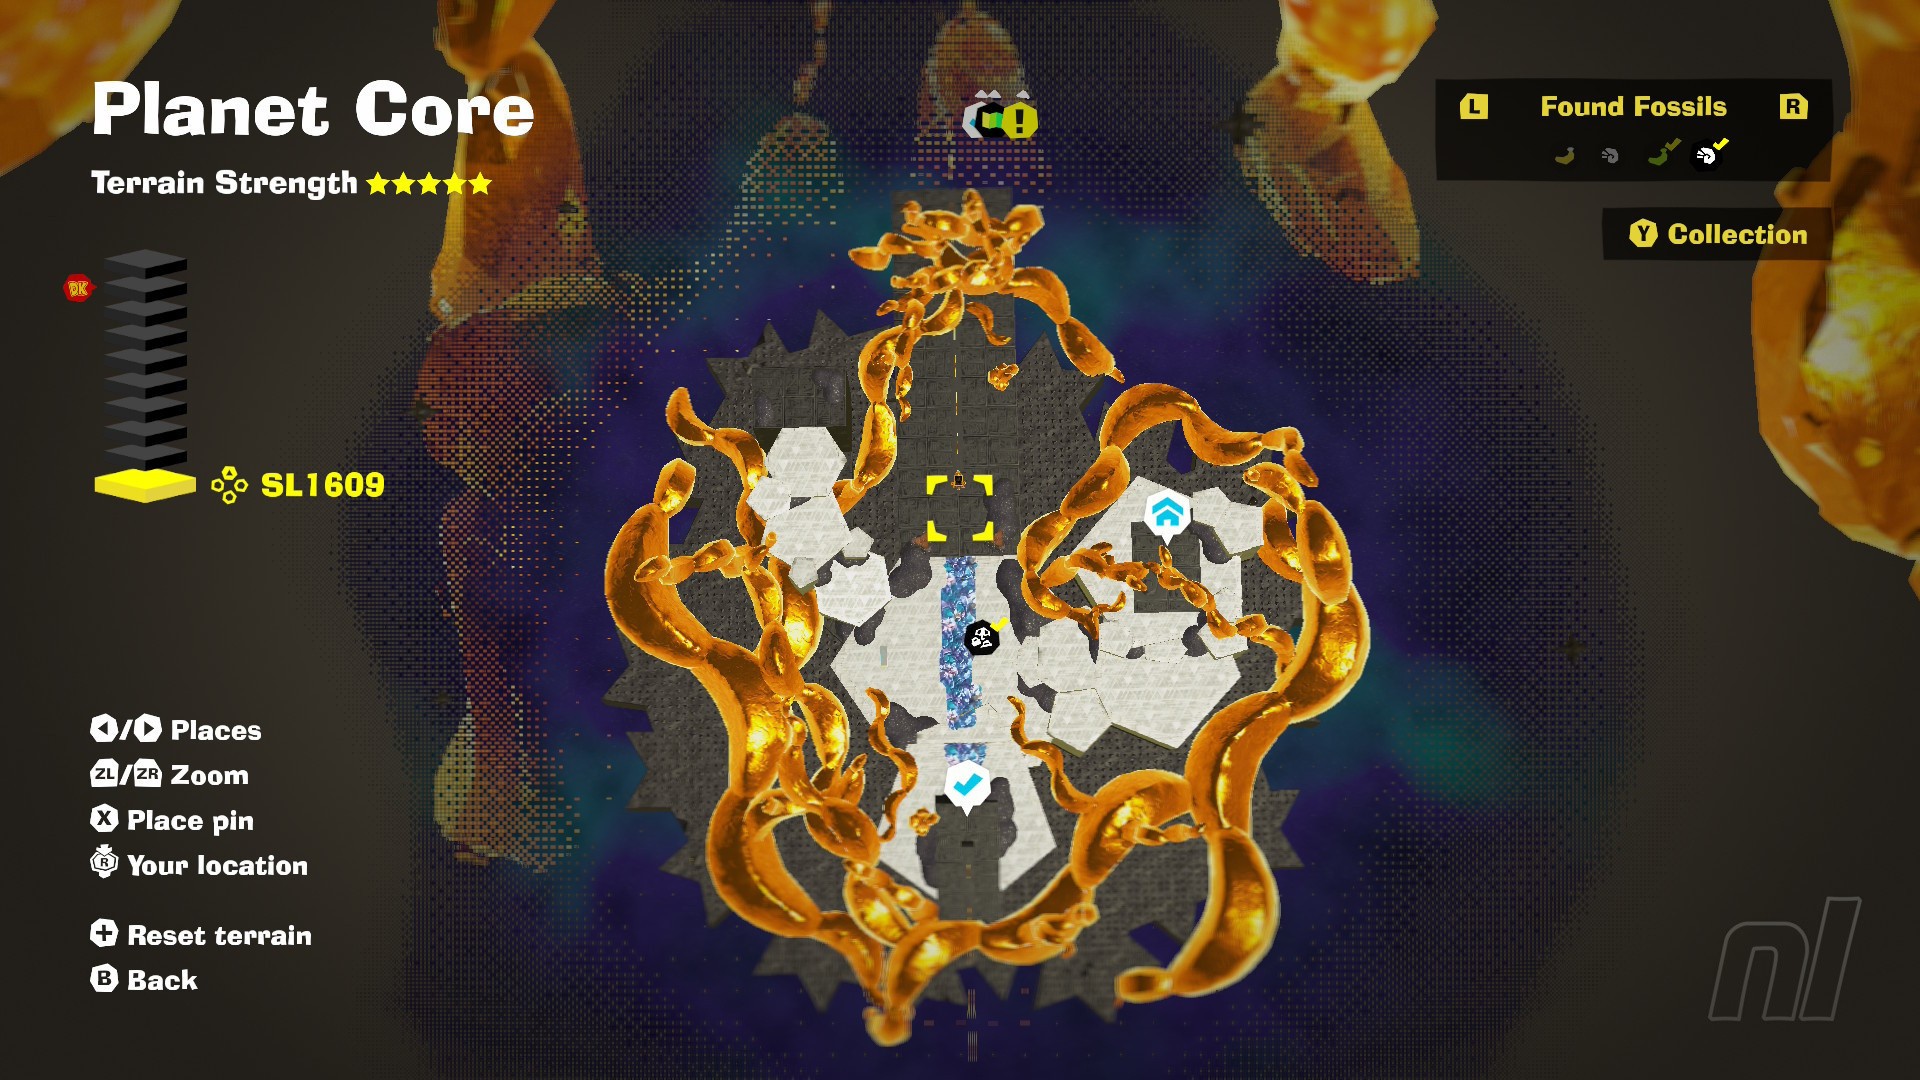
SL1609 Fossil Map
Fossil FAQs
Here are a few frequently asked questions you may have about Donkey Kong Bananza's Fossils.
What are Fossils for?
Fossils are the currency used to buy new Outfits throughout the underground world. You can cash in your Fossils at any layer's Style Shop (marked by a pink shirt icon on the map), and upgrade items by spending rarer finds.
Style Shops will only accept Fossils from their respective layer, so you'll need to keep an eye out for them in all regions if you want to make the most of the level's outfit options.
How many Fossils are there altogether in Donkey Kong Bananza?
In total, there are 696 Fossils in Donkey Kong Bananza. And yes, you need all of them to collect every item of clothing, so you best get collecting if you want to fill that closet to the max.
Where can I buy Fossil Maps?
You can pick up Fossil Maps at the Stuff Shop (pinpointed on maps by a yellow/green icon) on every layer where Fossils can be found. These maps will set you back 300 Gold for the location of a Normal Fossil, 1,000 Gold for a Rare one, and 3,000 Gold for an Extra-Rare, with the price incrementally going up for the first two with each one you buy.
These maps will show you the location of a Fossil on the layer they were purchased, and you can pick up as many of them as you'd like — if you have the funds to spare.
Is there a reward for collecting every Fossil?
While there's no huge prize for those who collect every Fossil in the game (aside from the chance to buy every outfit), you are rewarded with the 'A Complete Fossil Collection' Banandium Gem on the Groove Layer. Hey, those Skill Points don't come easy...
Why are some Fossils clear?
A clear Fossil is simply one that you have already collected. You can punch it again and pick up some Gold in the process, but it won't count towards your overall collection.
And just like that, you know the whereabouts of every Fossil in the game! For help with other collectibles, we have guides on All Banandium Gem Locations, All Outfits and All Discs, and there's even more in our full Donkey Kong Bananza Walkthrough guide hub.


Comments 0
Wow, no comments yet... why not be the first?
Leave A Comment
Hold on there, you need to login to post a comment...